Many of the standard widgets, such as the selection panel and the legend, are separate dialogs. Depending on the template, they can behave somewhat differently. For example, in the Aqua template the dialogs are floating, and in the Slate template many of them are docked at the side of the map display.
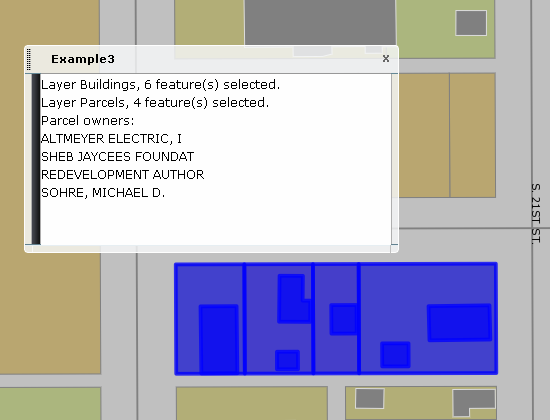
Example 3 creates a dialog that displays some details about the current selection. It updates automatically when the selection changes. It uses the following files in the folder C:\Program Files\Autodesk\Autodesk Infrastructure Web Server Extension 2016\www\fusion:
- widgets\Example3.js
- widgets\widgetinfo\example3.xml
- templates\mapguide\examples.xml
- templates\mapguide\examples\index.html
There are a few different concepts shown in this example:
- dialogs
- opening dialogs programatically
- responding to events
Dialogs
The Jx library includes full support for many different types of dialog. The style used is defined by the template, in the window.onload() function of index.html. For a floating dialog, create a Jx.Dialog object, as in the following:
dExample3 = new Jx.Dialog({
  id: 'dialogExample3',
  label: OpenLayers.i18n('Example 3'),
  modal: false,
  resize: true,
  horizontal: '50 left',
  vertical: '85 top',
  width: 400,
  height: 400,
  contentId: 'Example3'
  });
For examples of other types of dialog, see index.html for the other standard templates.
The properties passed to the Jx.Dialog constructor define the initial state of the dialog, such as size and location. The value of the ContentID property must correspond to a <div> element in the HTML. For example, the dialog defined above must have the following in index.html:
<div id="Example3"></div>
This ContentID must also correspond to the class name of the widget as defined in the JavaScript file. Example3.js contains the following class definition:
Fusion.Widget.Example3 = OpenLayers.Class(Fusion.Widget,
  {
  // ...
  }
);
The id property of the Jx.Dialog constructor (dialogExample3 in the example above) refers to a <div> element that contains the entire dialog, including outside borders, the title bar, and other parts. The Jx library creates this outer element when it initializes the dialog. In most cases, the widget code should only work with the content area of the dialog, identified with the ContentID property.
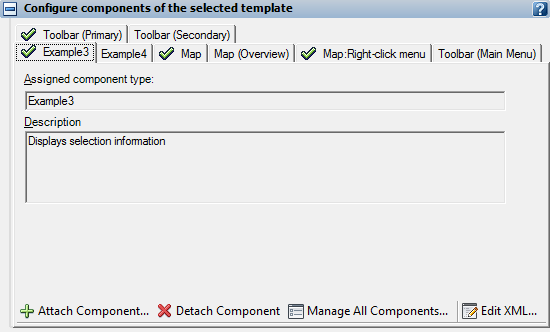
Within Infrastructure Studio, widgets that are dialogs are treated differently from widgets that are run from menus. The widget information file for Example 3, widgets\widgetinfo\example3.xml, contains the following:
<WidgetInfo>
  <Type>Example3</Type>
  <LocalizedType>Example3</LocalizedType>
  <Description>Displays selection information</Description>
  <Location></Location>
  <Label>Example3</Label>
  <Tooltip></Tooltip>
  <StatusText></StatusText>
  <ImageUrl></ImageUrl>
  <ImageClass></ImageClass>
  <StandardUi>false</StandardUi>
  <ContainableBy></ContainableBy>
</WidgetInfo>
The <ContainableBy> element is empty because this widget is a separate dialog and cannot be added to a menu. In Infrastructure Studio, this widget does not appear in the component list for toolbars and other containers.
The template definition file, templates\mapguide\examples.xml, contains a <Panel> element that can hold dialogs or containers:
<Panel>
<Name>Example3</Name>
<Label>Example3</Label>
<Description>The dialog displaying example 3</Description>
</Panel>
By default, Infrastructure Studio places widgets with matching names into the appropriate panel. The panel name matches the <div> ID in the index.html file. If a given template uses a dialog-style widget it must have a matching <div> element. The <Panel> elements create tabs in the Infrastructure Studio UI.
Events
Many dialogs and other widgets react to events in the map, such as a user selecting a feature.
There are two steps that must be done in a widget that handles events:
- Create a callback routine to handle the event.
- Register the callback routine for the event.
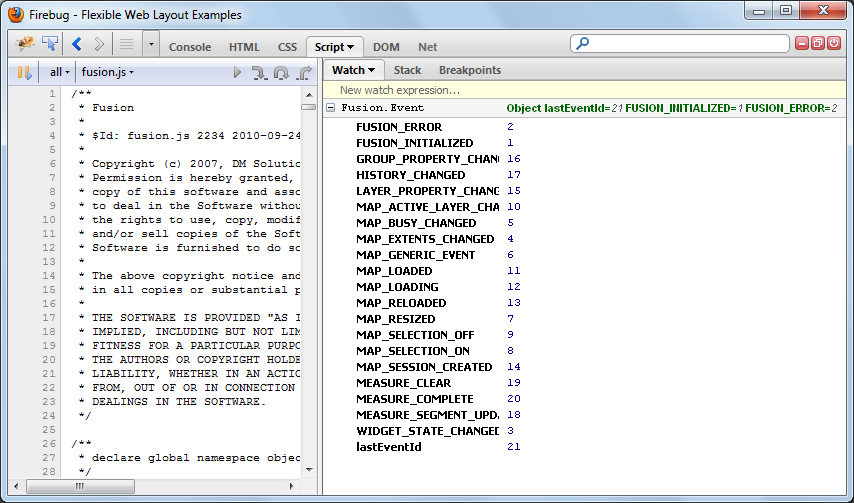
Example 3 uses the events Fusion.Event.MAP_SELECTION_ON and Fusion.Event.MAP_SELECTION_OFF, which trigger when the selection changes.
The initialization code for the Example3 widget, in Example3.js, registers event handlers for both these events, as follows:
this.getMap().registerForEvent(
  Fusion.Event.MAP_SELECTION_ON,
  OpenLayers.Function.bind(this.updateSelection, this));
this.getMap().registerForEvent(
  Fusion.Event.MAP_SELECTION_OFF,
  OpenLayers.Function.bind(this.clearSelection, this));
The event handler for Fusion.Event.MAP_SELECTION_OFF is simple:
clearSelection: function() {
  this.showInformation('No features are selected.');
},
The event handler for Fusion.Event.MAP_SELECTION_ON is a bit more complex because it needs to process the selection. It calls getSelection() with a callback routine to process the current selection. See Example 2: Selections for more details about processing selections.
updateSelection: function() {
  this.getMap().getSelection(this.listSelection.bind(this));
},
Running the Example
The initialization code for the Example3 widget, in index.html, hides the dialog. There is a menu option to display the dialog, Examples menu  Example3. This is defined in the Application Definition as an Invoke Script command that calls the following JavaScript routine:
var showExample3 = function() {
    dExample3.open();
}
The routine is defined in index.html where it is available to the Invoke Script command.
When the dialog is open it reacts to changes in the selection. Any time the selection changes, the dialog updates to show a list of the currently selected features.