When you create a flexible web layout in Infrastructure Studio, you can base it on one of a number of templates, such as the Aqua template. These templates work for many applications and can be customized when needed. However, if you need to create a new template, this section describes how to do so.
A template for a flexible web layout contains various interrelated pieces that contribute to how the template looks and what it does. All the files for a given template are stored in the folder web_server_extensions\www\fusion\templates\mapguide. Some important pieces are described in the following table.
| Name | Description |
|---|---|
| Template Info XML file | Contains information about the template and a list of the panels available for the template. These correspond to the tabs shown in Infrastructure Studio on the Configure Components of the Selected Template section of the Web Layout Editor. The template XML file has the same name as the template. For example, the Aqua template uses aqua.xml. Note:
The template XML file is used internally by Infrastructure Studio. It is not required for displaying a flexible web layout in a browser. Infrastructure Studio saves any necessary data from the template XML file into the application definition. |
| ApplicationDefinition | Generated by Infrastructure Studio and stored in the site repository. The application definition defines which components (menus and widgets) are available in a given template. The application definition uses the ApplicationDefinition.xsd schema. Note:
The default templates each contain a file named ApplicationDefinition.xml. This is an alternate location for the application definition. See Application Definitions for details. |
| index.html | Home page for displaying a flexible web layout in a browser. The index.html file defines the arrangement and operation of the components from the application definition. For example, the selection panel can be docked or floating, and can be initially hidden or visible, depending on how it is initialized in index.html. |
| CSS files | Style definitions for the template. |
| Image files | Buttons, icons, and related items. |
The simplest way to understand the files in a flexible web layout is to experiment with the existing templates. Follow the instructions below to create a new template or a copy of an existing template.
- Create a sub-folder below the web_server_extensions\www\fusion\templates\mapguide folder (where web_server_extensions is the directory where the Infrastructure Map Server web server extensions are installed, typically C:\Program Files\Autodesk\Autodesk Infrastructure Web Server Extension 2016). Give this new folder the name of your template, for example HelloMap.
- Copy the CSS files from an existing template to your template’s folder, or create new ones.
- Copy the images directory from an existing template to your template’s folder, or create your own icons.
- Create a preview graphic for your template and store in your template’s folder. This graphic will be shown in the list of templates when you create a flexible web layout in Infrastructure Studio. The name of the graphic is arbitrary. The dimensions should be 126 x 96 pixels. You will use this name later when you create a TemplateInfo file.
- In the template’s folder, create an HTML file called index.html. This file defines the layout of the template.
- Use a valid, strict doctype for your template pages. If you omit the doctype, use an invalid doctype, or use a transitional doctype, most browsers will revert to “Quirks Mode.” The layout will appear to function correctly, but you may notice some minor issues and your application may appear differently depending on the browser. By using a valid HTML or XHTML doctype, browsers will use “Standards Compliant Mode” and your application will work consistently between browsers.
- In the <Head> section, import the CSS file(s).
For example:
<style type="text/css">
  @import url(template.css);
</style>
This is important, as the default CSS styles set all components to be initially invisible.
- In the <Head> section, include the fusion.js library.
For example:
<script type="text/javascript"
  src="../../../lib/fusion.js">
</script>
Make sure that the src of the script tag that points to fusion.js is a valid path. It can be relative (as in the example above) or absolute (starting with http://). If it is absolute, then the URL must be pointing to the same server as the URL you use to load the application.
- In the <Head> section, define a window.onload function. In it, use JavaScript and the Jx library to position the elements of the layout including the components. Also, register for the FUSION_ERROR and FUSION_INITIALIZED events.
For example:
<script type="text/javascript">
  window.onload = function() {
    Fusion.initializeLocale();

    var main = new Jx.Layout('AppContainer',
      {left: 0, right: 0, top: null, bottom: null});
    new Jx.Layout('Help', {height: 25, left: 0,
      right: 0, top: 34, bottom: null});
    new Jx.Layout('Map', {width: null, height: null,
      left: 25, right: 0, top: 59, bottom: 21});
    main.resize();
    $('AppContainer').style.visibility = 'visible';

    Fusion.registerForEvent(
      Fusion.Event.FUSION_ERROR, fusionError);
    Fusion.registerForEvent(
      Fusion.Event.FUSION_INITIALIZED, fusionInitialized);
    Fusion.initialize();
  }
</script>
For more information on the Fusion object, see Fusion Object API.
For more information on events, see Events.
- In the <Head> section, define the fusionError and fusionInitialized functions. For example:
<script type="text/javascript">
  var fusionError = function(eventId, error) {
    console.log('Fusion Error: \n' + error.toString());
}

var fusionInitialized = function() {
}
</script>
For an example of a template where the fusionInitialized function is used, see web_server_extensions\www\fusion\templates\mapguide\aqua\index.html.
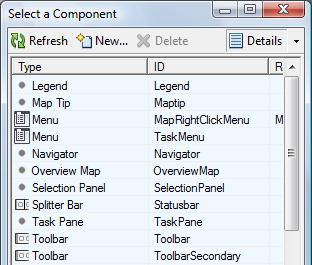
- In the <Body> section, insert <div> elements to determine which components will appear on the template. Any HTML element with an ID that matches a component ID will be replaced with that component. For example, <DIV id=”Help”> will be replaced with the Help component. And <DIV id=”Toolbar”> will be replaced with a toolbar; the components that appear on this toolbar will be configured through Infrastructure Studio. To see the available IDs, click Attach Component while editing a flexible web layout in Infrastructure Studio.
Components will be inserted in any DOM container object with a matching ID, not just in <DIV>s. So you can also use Jx methods, such as Jx.Panel and Jx.Layout to structure your page. For example, this will create an object that will have a legend inserted:
var p1 = new Jx.Panel({label: 'Legend'});If there is no matching component for the ID, then when the user configures the flexible web layout, Infrastructure Studio will display an empty tab for it (one with no components added). The user can then add components to it through Infrastructure Studio. The ID will be used for the tab’s title, so use IDs that will help the user understand what he or she is configuring.
- So in this example, the complete index.html file would look like this:
<!DOCTYPE HTML PUBLIC "-//W3C//DTD HTML 4.01//EN"
 "http://www.w3.org/TR/html4/strict.dtd">
<html>
<head>
  <title>Hello Map</title>

  <meta http-equiv="Content-type"
    content="text/html; charset=UTF-8">

  <style type="text/css">
    @import url(template.css);
  </style>

  <script type="text/javascript"
    src="../../../lib/fusion.js"></script>

  <script type="text/javascript">
    window.onload = function() {
      Fusion.initializeLocale();

      var main = new Jx.Layout('AppContainer',
        {left: 0, right: 0, top: null, bottom: null});
      new Jx.Layout('Help', {height: 25, left: 0,
        right: 0, top: 34, bottom: null});
      new Jx.Layout('Map', {width: null, height: null,
        left: 25, right: 0, top: 59, bottom: 21});
      main.resize();
      $('AppContainer').style.visibility = 'visible';

      Fusion.registerForEvent(
        Fusion.Event.FUSION_ERROR, fusionError);
      Fusion.registerForEvent(
       Fusion.Event.FUSION_INITIALIZED, fusionInitialized);
      Fusion.initialize();
    }

    var fusionError = function(eventId, error) {
      console.log('Fusion Error: \n' + error.toString());
    }

    var fusionInitialized = function() {
    }

  </script>
</head>

<body>
  <div id="AppContainer" style="visibility: hidden;">
    <div id="Help"></div>
    <div id="Map"></div>
  </div>
</body>
</html>
- Create a <TemplateInfo> XML file based on the ApplicationDefinitionInfo XML schema. (The XML schemas are installed in
Autodesk Infrastructure Map Server 2016
\Schema (where
Autodesk Infrastructure Map Server 2016
is the installation directory of the Infrastructure Map server, typically C:\Program Files\Autodesk\Autodesk Infrastructure Map Server 2016).
- Name the file with the name of your template plus .xml, for example, HelloMap.xml.
- Store it in the parent folder of the template. In other words, store it in web_server_extensions\www\fusion\templates\mapguide.
- In the LocationUrl element, point to the location of your template’s index.html file.
- In the PreviewImageUrl element, use the name of the preview graphic you created earlier.
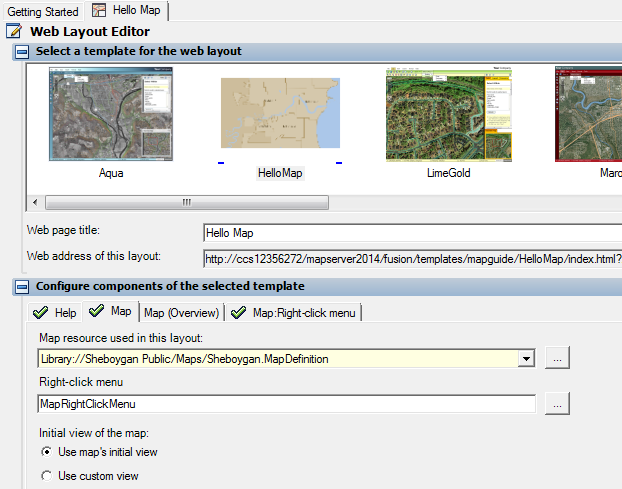
- Create a <Panel> element for each component (such as a toolbar) in the template. Each panel here will be shown as a tab when the template is configured in Infrastructure Studio.
The order of the <Panel>s does not matter; the layout is controlled through the index.htmlfile.
For the HelloMap example, the TemplateInfo file is:
<TemplateInfo>
  <Name>HelloMap</Name>
  <LocationUrl>
    fusion/templates/mapguide/HelloMap/index.html
  </LocationUrl>
  <Description>HelloMap template</Description>
  <PreviewImageUrl>
    fusion/templates/mapguide/HelloMap/preview.png
  </PreviewImageUrl>
  <Panel>
    <Name>Help</Name>
    <Label>Help</Label>
    <Description>The help button</Description>
  </Panel>
  <Panel>
    <Name>Map</Name>
    <Label>Map</Label>
    <Description>The main map display</Description>
  </Panel>
</TemplateInfo>
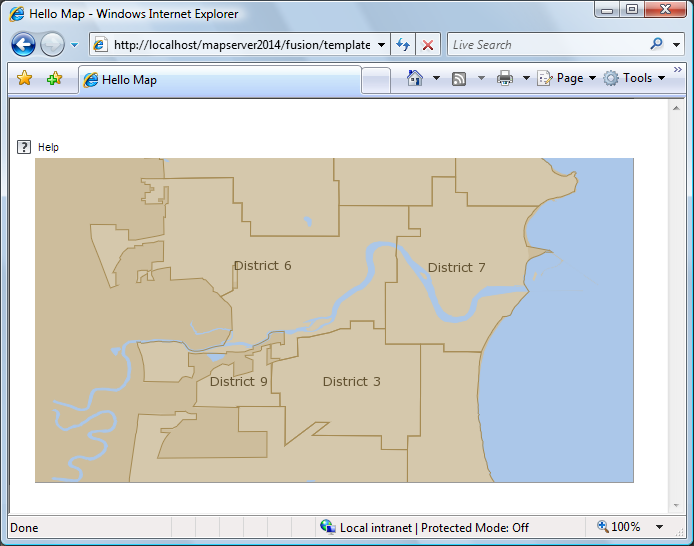
The template can now be used in Infrastructure Studio just like any of the default templates.
If you create a flexible web layout based on this template, it will look like this:
If you edit a template’s index.html file, right-click the preview image in Infrastructure Studio and choose Refresh to see the changes. If you change any of the other template files, such as modifying or adding a <Panel> element, also right-click on one of the panel tabs and choose Refresh Panels to update the panel definitions.