Maya で PySide を使用する
PyQt と PySide は非常に似ており、2 つはほぼ同じ API を使用します。
また、PySide は Qt ディストリビューションに含まれているので、各 Maya バージョンのソースから手動でビルドする必要はありません。
PyQt と PySide の違い
読み込みの方法、クラス名、ツール名にいくつかの違いがあります。次に例を示します。
- (PyQt) from PyQt4.QtCore import *
- (PySide) from PySide.QtCore import *
- (PyQt) QtCore.pyqtSignal v (PySide) QtCore.Signal
- (PyQt) QtCore.pyqtSlot v (PySide) QtCore.Slot
- (PyQt) QtCore.pyqtProperty v (PySide) QtCore.Property
- (PyQt) pyuic4 v (PySide) pyside-uic
- (PyQt) pyrcc4 v (PySide) pyside-rcc
- (PyQt) pylupdate4 v (PySide) pyside-lupdate
- (PyQt) sip v (PySide) shiboken
- 旧形式の信号には括弧が必要です。
- 引数を指定しない信号のみが QAction などのコンストラクタに自動接続されます。
Maya の PySide について
次に Maya 固有の PySide についていくつかの事実を示します。
- 「ウィジェットへのリファレンスの維持」で説明されているように、Python インタプリタのガベージ コレクターによってウィジェットが破棄されないように、既存の Maya ウィンドウに対して Qt ウィジェットをペアレント化する必要があります。Maya のメイン ウィンドウまたはドッキング コントロールに対して PySide ウィジェットをペアレント化することができます。これは、「maya.app.general.mayaMixin クラスの使用」の説明に従って、ミックスイン クラスを使用しても、簡単に行うことができます。
- ウィジェットを使用できるようにし、maya.OpenMayaUI.MQtUtil.findControl()からルックアップできるように、ウィジェットには一意の objectName()が必要です。
- PySide ウィジェットにネイティブのサイズ変更プリファレンスはありません。サイズ変更プリファレンスは、windowPref コマンドを直接使用して設定することができます。
- ウィンドウをドッキングしたときにウィジェットのサイズが保持され、同じ領域に複数のウィンドウをドッキングすることができるため、Maya と同様にタブを使用してウィンドウを切り替えることができます。
PySide サンプル スクリプト
Developer Kit インストール フォルダ devkit/pythonScripts に基本的な PySide スクリプトの基本概念を例示するいくつかのサンプル スクリプトがあります。「ビルド環境を設定する: Windows 環境(64 ビット)」を参照してください。
サンプル スクリプトを実行する
サンプル スクリプトは、スクリプト エディタ(Script Editor)の Python タブで次のように execfile コマンドを使用して実行することができます。
execfile('C:/Program Files/Autodesk/Maya2016/devkit/pythonScripts/widgetHierarchy.py')
または、スクリプトを読み込むことで、サンプル スクリプトを実行することもできます。次は、createNodeUI.py サンプルを実行するための推奨方法です。
import sys
import os.path
sys.path.insert(0,  os.path.join(os.environ['MAYA_LOCATION'], 'devkit', 'pythonScripts' ) )

import createNodeUI
w = createNodeUI.main()
w.close()
Maya ウィジェットのカラーをカスタマイズする
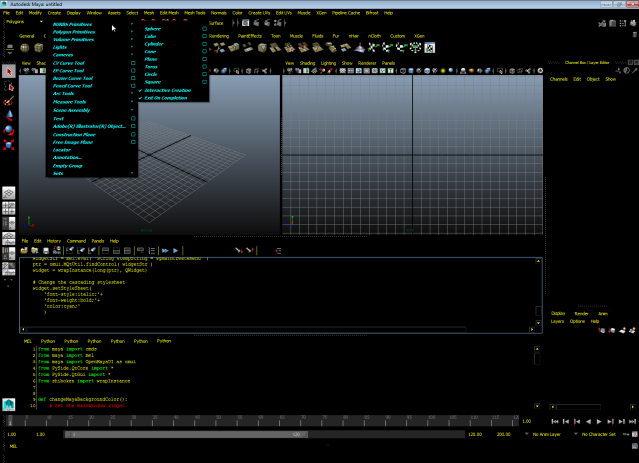
以下の editMayaWidgets.py スクリプトで、Maya のメイン ウィンドウのカラーとメニューをカスタマイズする方法を例示します。
from maya import cmds
from maya import mel
from maya import OpenMayaUI as omui
from PySide.QtCore import *
from PySide.QtGui import *
from shiboken import wrapInstance
Maya のメイン ウィンドウ ウィジェットを PySide ウィジェットとして取得するには、次のようにします。
omui.MQtUtil.mainWindow()
ptr = omui.MQtUtil.mainWindow()
widget = wrapInstance(long(ptr), QWidget)
このスクリプトでは、スタイルシートを編集して Maya の背景色を変更する方法を例示します。
def changeMayaBackgroundColor(background='black', color='yellow'):
    ....
    widget.setStyleSheet(
        'background-color:%s;'%background +
        'color:%s;'%color
        )
このスクリプトでは、はじめに Python で MEL 文字列を評価し、次に maya.OpenMayaUI.MQtUtil.findControl()を使用することで、PySide ウィジェットとして Maya のコントロール(この場合は作成(Create)メニュー)を取得する方法も例示します。
widgetStr = mel.eval( 'string $tempString = $gMainCreateMenu' )
ptr = omui.MQtUtil.findControl( widgetStr )
widget = wrapInstance(long(ptr), QWidget)
次のように、Qt スタイルシートを編集することで、メニュー(この場合は作成(Create)メニュー)のフォント スタイルとウェイトを変更することができます。
def changeMayaMenuColors(fontStyle='italic', fontWeight='bold', fontColor='cyan'):
    ....
    widget.setStyleSheet(
        'font-style:%s;'%fontStyle +
        'font-weight:%s;'%fontWeight +
        'color:%s;'%fontColor
        )
単純な Qt ウィジェットを作成する
createPolygonUI.py スクリプトでは、ドロップダウン メニュー(コンボ ボックス)と作成(Create)ボタンを使用して Qt ウィジェットを作成します。ドロップダウン メニューのいくつかのポリゴン プリミティブの中から選択し、作成(Create)をクリックして、選択したポリゴンを作成します。
このスクリプトでは、QT ウィジェット UI の作成に QComboBox と QPushButton を使用する方法を例示します。
このスクリプトでは、作成する QT ウィジェットの親ウィジェットとして設定することができるように、最初に PySide ウィジェットとして Maya のメイン ウィンドウ ウィジェットを取得します。
mayaMainWindowPtr = omui.MQtUtil.mainWindow()
mayaMainWindow = wrapInstance(long(mayaMainWindowPtr), QWidget)
QWidget から派生させることでポリゴンを作成(Create Polygon)ウィンドウを作成し、次に OpenMayaUI.QtUtils.findWidget()を使用して取得できるようオブジェクト名を設定します。
class CreatePolygonUI(QWidget):
    def __init__(self, *args, **kwargs):
        super(CreatePolygonUI, self).__init__(*args, **kwargs)

        #Parent widget under Maya main window
        self.setParent(mayaMainWindow)
        self.setWindowFlags(Qt.Window)

        #Set the object name
        self.setObjectName('CreatePolygonUI_uniqueId')
        self.setWindowTitle('Create polygon')
        self.setGeometry(50, 50, 250, 150)
        self.initUI()
        self.cmd = 'polyCone'
このスクリプトでは、ドロップダウン メニューを作成するために QComboBox を使用する方法、コンボ ボックス(ドロップダウン メニュー)変更時にコマンド文字列を変更する方法を例示します。
QPushButton は、ボタンを作成するために使用し、クリックすると次の MEL コマンドが実行されます。
def initUI(self):
    #Create combo box (drop-down menu) and add menu items
    self.combo = QComboBox(self)
    self.combo.addItem( 'Cone' )
    self.combo.addItem( 'Cube' )
    self.combo.addItem( 'Sphere' )
    self.combo.addItem( 'Torus' )
    self.combo.setCurrentIndex(0)
    self.combo.move(20, 20)
    self.combo.activated[str].connect(self.combo_onActivated)

    #Create 'Create' button
    self.button = QPushButton('Create', self)
    self.button.move(20, 50)
    self.button.clicked.connect(self.button_onClicked)

#Change commmand string when combo box changes
def combo_onActivated(self, text):
    self.cmd = 'poly' + text + '()'

#Execute MEL command when button is clicked
def button_onClicked(self):
mel.eval( self.cmd ) 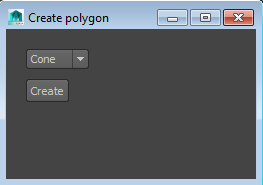
Qt Designer の UI ファイルをロードしてロードしたウィジェットを編集する
createNodeUI.py スクリプトでは、Qt Designer の UI ファイルをロードし、ロードしたウィジェットを編集する方法を例示します。まず、Qt Designer を使用して、ウィジェット ツリーを表す .ui ファイルを作成する必要があります。
def initUI(self):
    loader = QUiLoader()
    currentDir = os.path.dirname(__file__)
    file = QFile(currentDir+"/createNode.ui")
    file.open(QFile.ReadOnly)
    self.ui = loader.load(file, parentWidget=self)
    file.close()
次に、サンプル スクリプトは、コンボ ボックスに項目を追加することでファイルからロードされた Qt ウィジェットを編集し、OK ボタンとキャンセル ボタンを押すと実行されるようにコマンドを設定します。
# Add items to combo box
self.ui.typeComboBox.addItem( 'locator' )
self.ui.typeComboBox.addItem( 'camera' )
self.ui.typeComboBox.addItem( 'joint' )

# Call doOK if user clicks OK button
self.ui.okButton.clicked.connect( self.doOK )

# Call doCancel if user clicks Cancel button
self.ui.cancelButton.clicked.connect( self.doCancel )
OK ボタンを押すと、コンボ ボックスによって指定されたタイプの(該当する場合は、指定された名前を持つ)ノードが作成されます。
def doOK(self):
    nName = self.ui.nameLineEdit.text()
    nType = self.ui.typeComboBox.currentText()
    if len(nName) > 0:
        cmds.createNode( nType, n=nName )
    else:
        cmds.createNode( nType )
    self.close()
それ以外の場合は、ユーザがキャンセルをクリックすると、Qt ウィジェットを閉じます。
def doCancel(self):
    self.close()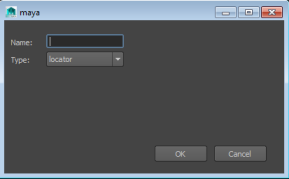
基本的なアトリビュート エディタを作成する
connectAttr.py スクリプトでは、基本的なアトリビュート エディタ(Attribute Editor)を作成する方法を例示します。このエディタはアトリビュート値を更新し、アトリビュート変更時に更新されます。この方法で、アトリビュート値とコントロールの値は同期されます。
そのドッキング可能な関数で mayaMixin が使用され、QFormLayout と QScrollLayout を使用して Qt UI が作成されます。
from maya.app.general.mayaMixin import MayaQWidgetBaseMixin, MayaQWidgetDockableMixin
この例では、MayaQWidgetDockableMixin クラスと QScrollArea クラスから派生し、コンテナ ウィジェットとアトリビュート ウィジェットを作成します。
class Example_connectAttr(MayaQWidgetDockableMixin, QScrollArea):
    def __init__(self, node=None, *args, **kwargs):
        super(Example_connectAttr, self).__init__(*args, **kwargs)
        # Member Variables
        self.nodeName = node               # Node name for the UI
        self.attrUI = None                 # Container widget for the attr UI widgets
        self.attrWidgets = {}              # Dict key=attrName, value=widget
.....次に、MayaQWidgetDockableMixin クラスの show()メソッドを使用して、ウィジェットを表示し、ドッキング可能なフロートするウィンドウとして設定します。
ui = Example_connectAttr(node=obj)
ui.show(dockable=True, floating=True)
次に、QFormLayout を使用し、アトリビュート名の文字列とアトリビュート ウィジットを指定して 2 列フォームのウィジェットを作成します。
def attachToNode(self, nodeName):
    '''Connect UI to the specified node
    '''
    self.nodeName = nodeName
    self.attrs = None
    self.nodeCallbacks = []
    self._deferredUpdateRequest.clear()
    self.attrWidgets.clear()

    # Get a sorted list of the attributes
    attrs = cmds.listAttr(self.nodeName)
    attrs.sort() # in-place sort the attributes

    # Create container for attribute widgets
    self.setWindowTitle('ConnectAttrs: %s'%self.nodeName)
    self.attrUI = QWidget(parent=self)
    layout = QFormLayout()

    # Loop over the attributes and construct widgets
    acceptedAttrTypes = set(['doubleLinear', 'string', 'double', 'float', 'long', 'short', 'bool', 'time', 'doubleAngle', 'byte', 'enum'])
    for attr in attrs:
        # Get the attr value (and skip if invalid)
        try:
            attrType = cmds.getAttr('%s.%s'%(self.nodeName, attr), type=True)
            if attrType not in acceptedAttrTypes:
                continue # skip attr
            v = cmds.getAttr('%s.%s'%(self.nodeName, attr))
        except Exception, e:
            continue  # skip attr

        # Create the widget and bind the function
        attrValueWidget = QLineEdit(parent=self.attrUI)
        attrValueWidget.setText(str(v))

        ....

        # Add to layout
        layout.addRow(attr, attrValueWidget)

        # Track the widget associated with a particular attribute
        self.attrWidgets[attr] = attrValueWidget

    # Attach the QFormLayout to the root attrUI widget
self.attrUI.setLayout(layout)functools.partial()を使用して setAttr にメタデータを追加し、次に、attrValueWidget.editingFinished 信号に接続します。
# Use functools.partial() to dynamically construct a function with additional parameters
onSetAttrFunc =  functools.partial(self.onSetAttr, widget=attrValueWidget, attrName=attr)
attrValueWidget.editingFinished.connect( onSetAttrFunc )

def onSetAttr(self, widget, attrName, *args, **kwargs):
    '''Handle setting the attribute when the UI widget edits the value for it.
    If it fails to set the value, then restore the original value to the UI widget
    '''
    print "onSetAttr", attrName, widget, args, kwargs

    try:
        attrType = cmds.getAttr('%s.%s'%(self.nodeName, attrName), type=True)
        if attrType == 'string':
            cmds.setAttr('%s.%s'%(self.nodeName, attrName), widget.text(), type=attrType)
        else:
            cmds.setAttr('%s.%s'%(self.nodeName, attrName), eval(widget.text()))
    except Exception, e:
        print e
        curVal = cmds.getAttr('%s.%s'%(self.nodeName, attrName))
        widget.setText( str(curVal) )
MMessage コールバックを削除するためにラッパークラスが作成されます。
class MCallbackIdWrapper(object):
    '''Wrapper class to handle cleaning up of MCallbackIds from registered MMessage
    '''
    def __init__(self, callbackId):
        super(MCallbackIdWrapper, self).__init__()
        self.callbackId = callbackId

    def __del__(self):
        om.MMessage.removeCallback(self.callbackId)

    def __repr__(self):
        return 'MCallbackIdWrapper(%r)'%self.callbackId
アトリビュートの値のリフレッシュをトリガーするために addNodeDirtyPlugCallback を使用します。
nodeObj = getDependNode(nodeName)
cb = om.MNodeMessage.addNodeDirtyPlugCallback(nodeObj, self.onDirtyPlug, None)
self.nodeCallbacks.append( MCallbackIdWrapper(cb) )
またこの例では、UI の更新を保留するために evalDeferred も使用します。評価は、次に Maya がアイドル状態になるまで保留されます。詳細については、以下の onDirtyPlug()関数と _processDeferredUpdateRequest()関数の定義を参照してください。
def onDirtyPlug(self, node, plug, *args, **kwargs):
    '''Add to the self._deferredUpdateRequest member variable that is then
    deferred processed by self._processDeferredUpdateRequest().
    '''

    # get long name of the attr, to use as the dict key
    attrName = plug.partialName(False, False, False, False, False, True)

    # get widget associated with the attr
    widget = self.attrWidgets.get(attrName, None)
    if widget != None:
        # get node.attr string
        nodeAttrName = plug.partialName(True, False, False, False, False, True)

        # Add to the dict of widgets to defer update
        self._deferredUpdateRequest[widget] = nodeAttrName

        # Trigger an evalDeferred action if not already done
        if len(self._deferredUpdateRequest) == 1:
            cmds.evalDeferred(self._processDeferredUpdateRequest, low=True)

def _processDeferredUpdateRequest(self):
    '''Retrieve the attribute value and set the widget value
    '''
    for widget,nodeAttrName in self._deferredUpdateRequest.items():
        v = cmds.getAttr(nodeAttrName)
        widget.setText(str(v))
        print "_processDeferredUpdateRequest ", widget, nodeAttrName, v
    self._deferredUpdateRequest.clear()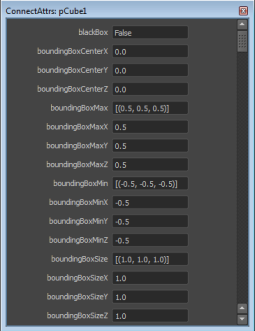
ツリーのリスト ビューを持つ Qt ウィジェットを作成する
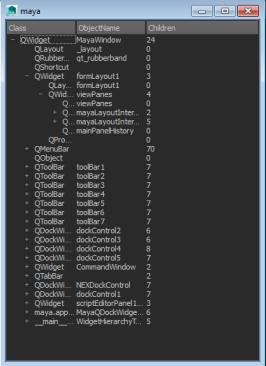
widgetHierarchy.py スクリプトでは、Maya で使用されるすべての QT ウィジェットを一覧表示する Qt ウィジェットを作成する方法を例示します。
ツリー リストは、MayaQWidgetBaseMixin と QTreeView から派生させて作成します。
class WidgetHierarchyTree(MayaQWidgetBaseMixin, QTreeView):
    def __init__(self, rootWidget=None, *args, **kwargs):
        super(WidgetHierarchyTree, self).__init__(*args, **kwargs)
この例では、ウィジェットが閉じているときに、そのウィジェットを削除する方法を例示します。
self.setAttribute(Qt.WA_DeleteOnClose, True)
ルート ウィジェットを設定することで階層ツリーを作成するように設定します。
# Determine root widget to scan
if rootWidget != None:
    self.rootWidget = rootWidget
else:
    mayaMainWindowPtr = omui.MQtUtil.mainWindow()
    self.rootWidget = wrapInstance(long(mayaMainWindowPtr), QWidget)
ツリー ビューを作成するために、例では各列で QStandardItem を呼び出し、子ウィジェットを再帰的に処理しています。
def populateModel(self):
    # Create the headers
    self.columnHeaders = ['Class', 'ObjectName', 'Children']
    myModel = QStandardItemModel(0,len(self.columnHeaders))
    for col,colName in enumerate(self.columnHeaders):
        myModel.setHeaderData(col, Qt.Horizontal, colName)

    # Recurse through child widgets
    parentItem = myModel.invisibleRootItem();
    self.populateModel_recurseChildren(parentItem, self.rootWidget)
    self.setModel( myModel )

def populateModel_recurseChildren(self, parentItem, widget):
    # Construct the item data and append the row
    classNameStr = str(widget.__class__).split("'")[1]
    classNameStr = classNameStr.replace('PySide.','').replace('QtGui.', '').replace('QtCore.', '')
    items = [QStandardItem(classNameStr),
             QStandardItem(widget.objectName()),
             QStandardItem(str(len(widget.children()))),
             ]
    parentItem.appendRow(items)

    # Recurse children and perform the same action
    for childWidget in widget.children():
        self.populateModel_recurseChildren(items[0], childWidget)