Revit にリボン パネルを追加する方法を示すコード サンプル。
ウォークスルー: Hello World セクションでは、アドイン アプリケーションの作成方法およびこれを Revit で呼び出す方法を学習します。また、.addin マニフェスト ファイルを作成して、外部ツールとしてアドイン アプリケーションを登録する方法も学習します。Revit でアドイン アプリケーションを実行するもう 1 つの方法として、カスタム リボンパネルから実行する方法があります。
新しいプロジェクトを作成する
新しいプロジェクトを作成するには、次の手順を実行します。
- クラス ライブラリ テンプレートを使用して Visual Studio で C# のプロジェクトを作成します。
- プロジェクト名として「AddPanel」と入力します。
- 前のウォークスルーである、ウォークスルー: Hello World の指示を使用して、RevitAPI.dll および RevitAPIUI.dll に参照を追加します。
- PresentationCore 参照を追加します。
- [ソリューション エクスプローラ]で、[参照]を右クリックして[コンテキスト]メニューを表示します。
- [コンテキスト]メニューから、[参照の追加]をクリックします。[参照の追加]ダイアログ ボックスが表示されます。
- [参照の追加]ダイアログ ボックスで、[.NET]タブをクリックします。
- [コンポーネント名] リストで、[PresentationCore]を選択します。
- [OK]をクリックしてダイアログ ボックスを閉じます。PresentationCore が[ソリューション エクスプローラ]の参照ツリーに表示されます。
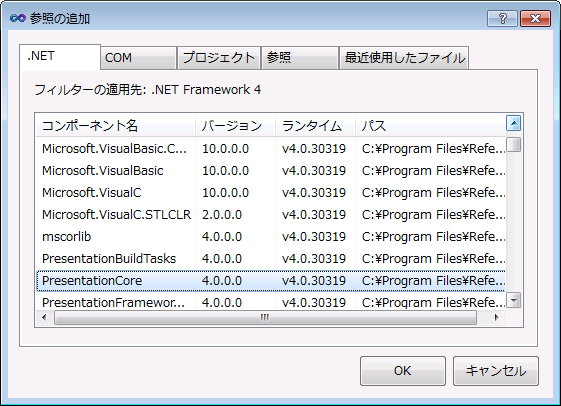
図 8: 参照の追加
- WindowsBase 参照および System.Xaml を上と同様の手順で追加します。
クラス名を変更する
クラス名を変更するには、次の手順を実行します。
- [クラス ビュー]ウィンドウで、[Class1]を右クリックして[コンテキスト]メニューを表示します。
- [コンテキスト]メニューから、[名前変更]を選択して、クラスの名前を CsAddPanel に変更します。
- [ソリューション エクスプローラ]で、Class1.cs ファイルを右クリックして、コンテキストを表示します。
- [コンテキスト]メニューから、[名前変更]を選択して、クラスの名前を CsAddPanel.cs に変更します。
- CsAddPanel.cs をダブル クリックして開き、これを編集します。
コードを追加
パネルの追加プロジェクトは、Revit プロジェクトが実行されると自動的に起動されるため、Hello World とは異なります。このプロジェクトには、IExternalApplication インタフェースを使用します。IExternalApplication インタフェースには、2 つの抽象メソッド、OnStartup()および OnShutdown()が含まれます。IExternalApplication の詳細は、「アドインの統合」を参照してください。
次のコードをファイルに追加します。
|
コード領域 2-5: リボン パネルを追加 |
using System;
using System.Reflection;
using Autodesk.Revit.DB;
using Autodesk.Revit.UI;
using System.Windows.Media.Imaging;

namespace Walkthrough
{
   /// <remarks>
   /// This application's main class. The class must be Public.
   /// </remarks>
   public class CsAddPanel : IExternalApplication
   {
      // Both OnStartup and OnShutdown must be implemented as public method
      public Result OnStartup(UIControlledApplication application)
      {
         // Add a new ribbon panel
         RibbonPanel ribbonPanel = application.CreateRibbonPanel("NewRibbonPanel");

         // Create a push button to trigger a command add it to the ribbon panel.
         string thisAssemblyPath = Assembly.GetExecutingAssembly().Location;
         PushButtonData buttonData = new PushButtonData("cmdHelloWorld",
            "Hello World", thisAssemblyPath, "Walkthrough.HelloWorld");

         PushButton pushButton = ribbonPanel.AddItem(buttonData) as PushButton;

         // Optionally, other properties may be assigned to the button
         // a) tool-tip
         pushButton.ToolTip = "Say hello to the entire world.";

         // b) large bitmap
         Uri uriImage = new Uri(@"D:\Sample\HelloWorld\bin\Debug\39-Globe_32x32.png");
         BitmapImage largeImage = new BitmapImage(uriImage);
         pushButton.LargeImage = largeImage;

         return Result.Succeeded;
      }

      public Result OnShutdown(UIControlledApplication application)
      {
         // nothing to clean up in this simple case
         return Result.Succeeded;
      }
   }
   /// <remarks>
   /// The "HelloWorld" external command. The class must be Public.
   /// </remarks>
   [Autodesk.Revit.Attributes.Transaction(Autodesk.Revit.Attributes.TransactionMode.Manual)]
   public class HelloWorld : IExternalCommand
   {
      // The main Execute method (inherited from IExternalCommand) must be public
      public Autodesk.Revit.UI.Result Execute(ExternalCommandData revit,
          ref string message, ElementSet elements)
      {
         TaskDialog.Show("Revit", "Hello World");
         return Autodesk.Revit.UI.Result.Succeeded;
      }
   }
}
|
アプリケーションの作成
コードの完成後、アプリケーションを作成します。[ビルド]メニューから、[ソリューションのビルド]をクリックします。ビルドの出力が出力ウィンドウに表示され、エラーなしでプロジェクトがコンパイルされたことを表します。AddPanel.dll がプロジェクト出力フォルダに配置されます。
.addin マニフェスト ファイルの作成
Revit アプリケーションを起動するには、Revit に登録するマニフェスト ファイルを作成します。
- メモ帳を使用して、新しいテキスト ファイルを作成します。
- 次のテキストをファイルに追加します。
コード領域 2-6: 外部アプリケーションの .addin ファイルを作成
<?xml version="1.0" encoding="utf-8" standalone="no"?> <RevitAddIns> <AddIn Type="Application"> <Name>HelloWorld</Name> <Assembly>D:\Sample\AddPanel\AddPanel\bin\Debug\AddPanel.dll</Assembly> <AddInId>604b1052-f742-4951-8576-c261d1993108</AddInId> <FullClassName>Walkthrough.CsAddPanel</FullClassName> <VendorId>NAME</VendorId> <VendorDescription>Your Company Information</VendorDescription> </AddIn> </RevitAddIns> - ファイルを HelloWorldRibbon.addin として保存して、次の場所に格納します。
- Windows XP の場合 - C:¥Documents and Settings¥All Users¥Application Data¥Autodesk¥Revit¥Addins¥2016¥
- Vista/Windows 7 の場合 - C:\ProgramData\Autodesk\Revit\Addins\2016\
.addin マニフェスト ファイルの詳細は、「アドインの統合」を参照してください。
デバッグ
デバッグを開始するには、プロジェクトを構築し、Revit を実行します。新しいリボン パネルが NewRibbonPanel および Hello World という名前の[アドイン]タブに、パネルの唯一のボタンとして大きな地球の画像で表示されます。
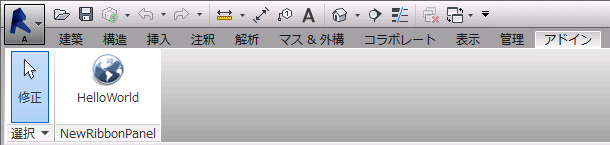
図 9: Revit に新しいリボン パネルを追加
[Hello World]をクリックしてアプリケーションを実行し、次のダイアログ ボックスを表示します。
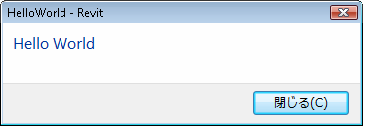
図 10: [Hello World]ダイアログ ボックス