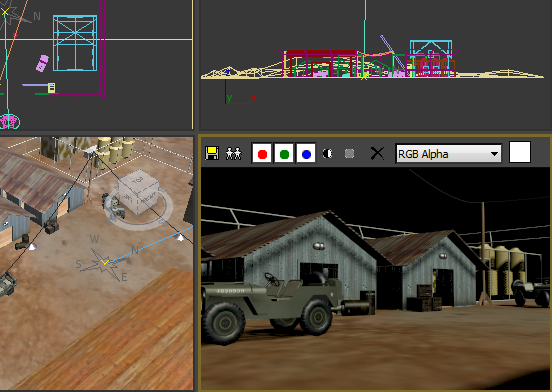
To display a free-floating ActiveShade window:
- Choose ActiveShade from the Render flyout.
Note: As with the Render command, the ActiveShade window respects the Output Size setting from the Render Setup dialog. To use a different render size, set it first with Render Setup, and then open the ActiveShade window.
To display an ActiveShade window in a viewport:
- Click or right-click the Point-Of-View (POV) viewport label. From the POV viewport label menu, choose ActiveShade.
Note:
 You can't make a maximized viewport an ActiveShade window, or maximize an ActiveShade window.
To change an ActiveShade viewport to another kind of viewport:
- Turn on the toolbar in the ActiveShade viewport.
- Right-click the toolbar.
- In the pop-up menu, choose the type of view to display.
You can also restore the viewport to its previous status by right-clicking the viewport and choosing View (upper-left) quad
 Close.
To zoom and pan in an ActiveShade window:
- Hold down Ctrl and then click to zoom in, right-click to zoom out.
- Hold down Shift and then drag to pan. (The window must be zoomed in.)
You can zoom in and out and pan the image in the ActiveShade window. You can even do this while a scene is rendering.
- Roll the wheel to zoom in or out.
- Press the wheel, and drag to pan.
Note: You can use any third-button pointing device to pan the image. To enable this, choose the Pan/Zoom option on the Viewports panel of the Preferences dialog.
If you have a three-button mouse, you can use its third button or wheel to zoom and pan:
To display the toolbar for the ActiveShade viewport:
- Press
spacebar.
spacebar toggles the toolbar display. In viewports, the toolbar is off by default.
(This is a main user interface shortcut, so the Keyboard Shortcut Override Toggle can be either on or off.)

ActiveShade viewport with the toolbar displayed
To update a Scanline ActiveShade window after moving an object or changing object geometry:
- Right-click the ActiveShade window.
- In the Tools (lower-right) quadrant of the quad menu, choose Initialize.
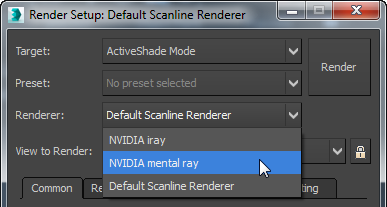
To use the iray or mental ray renderer as the ActiveShade renderer:
- On the main toolbar, click Render Setup.
- On the Render Setup dialog, choose "NVIDIA iray" or "NVIDIA mental ray."

Now ActiveShade rendering uses the renderer you chose.
To create an iray or mental ray ActiveShade rendering:
- On the main toolbar, choose ActiveShade from the Render flyout; or if this button is already active but the ActiveShade Floater is not open, simply click the button.
3ds Max opens the ActiveShade Floater and renders the active viewport.
Note: While an iray or mental ray ActiveShade window or viewport is open, you can't start a Production rendering. Because of this restriction, sample slots and material/map previews in the Material Editor, and the Exposure Control Render Preview window don't render while the ActiveShade window or viewport is open, either.