The event display in Particle View contains the particle diagram, and provides a complete range of intuitive functions for editing the particle system.
General Event Editing
- To add an action to the particle system, drag it from the depot to the event display. If you drop it in an empty area of the event display, it creates a new event. If you drag it to an existing event, the result depends on whether a red line or a blue line appears when you drop it. If a red line, the new action replaces the underlying action. If a blue line, the action is inserted in the list.
- To edit an action's parameters, click its name in an event. The parameters appear on the right side of Particle View. If not, it means the parameters panel is hidden; to display it, choose Display menu
 Parameters.
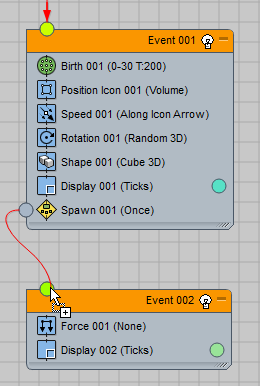
 - To wire a test to an event, drag from its test output, the green circle that 4 sticks out to the left of the test, to the event's event input, which sticks out from the top. You can drag from the input to the output, as well. Similarly, you can wire a global event to a birth event by dragging between the source output on the bottom of the global event and the event input.

Wiring an event
 When the wire is ready to be connected to an input or output socket, the cursor shows a small plus-sign.
 - To pan or zoom the event display, use the controls available from the Display menu, the right-click menu, or as icons at the bottom-right of the dialog.
If your mouse has a middle mouse button or a wheel, you can also use these controls to navigate the work area:
- Dragging with the middle mouse button pans the view.
- Ctrl+Alt+drag with the middle mouse button zooms the view.
- Using the wheel zooms the view.
Modifying Actions and Events in the Event Display
- To change the color used by a Display operator, click its color swatch to the right of its name.
- To toggle an operator (that is, turn it off and on), click its icon in the event.
 A turned-off operator does not affect the particle system, and appears as gray in the event list; however, its parameters are still available for editing.
 Toggling an instanced operator doesn’t affect its other instances.
- To toggle an event (that is, turn it off or on), click the light-bulb icon next to its name in the title bar.

Turning off an event is equivalent to turning off all of its operators and tests, although you cannot turn the operators and tests back on individually. The event's items do not affect the particle system, and appear as gray in the event list. All particles entering a turned-off event are immediately passed on to the next event, if any.
- To make a test result always True or False, click its icon's left or right side, respectively.
When always True, the test icon shows a green check mark
 . When always false, it shows a red X
  .
. To return to the original functionality, click the icon again.
Selecting, Moving, and Copying
- To copy an action or event, first press and hold the Shift key and position the mouse cursor over the item to copy, then drag the item to a new location. When you release the mouse button, the Clone Options dialog appears; choose Copy or Instance and click OK. In the Clone Options dialog, the Event And Particle System group is unavailable, as a reminder that you cannot instance these elements. Reference is not an option when cloning Particle System elements. Cloning an event or particle system simply creates a new event or particle system containing clones of the original's actions.
Any instanced actions have identical properties. Changing one instance's values changes them all. On the other hand, copied actions can have different values.
To clone multiple items, highlight them all before Shift+dragging. If you attempt to clone a combination of actions and events, or actions from different events, the result depends on where you start dragging from. If you drag a highlighted action, you'll clone only actions from that event. If you drag an event, only highlighted events are cloned.
Note: When you highlight an instanced action, Particle View indicates all of its other instances by changing their background color to a lighter shade of gray. - To move an event, drag its title bar, or the icon of any of its actions. If you drag the event to an edge of the display, and scrolling is possible, the display window will automatically scroll in that direction.
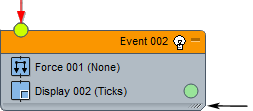
- To resize an event, drag the control at its lower-right corner.

Resize the node.
- To highlight multiple items, drag a rectangle around them, or Ctrl+click them individually.
- To delete an event, action, or wire, highlight it and then press Delete. Be sure the Particle Dialog is active, or you might inadvertently delete a selection in the scene instead.
- To move an action, drag its name (not its icon) to the new location.
If you drag an action to an event, you can insert the action or replace an existing action, depending on where you position the mouse cursor before releasing the button. A blue line (before releasing) indicates that it will be inserted at that location, and a red line indicates that it will replace the underlying action. If you drag the action to an empty space in the event display, it will form a new event, and, by default, the system will add a new Display operator.
Note: Particle Flow doesn't let you perform illegal operations. For instance, a Birth operator must always be the first item in a birth event; the system doesn't let you position it elsewhere. You can place a Birth operator in an isolated event, but you can't then wire that event into a particle system, except in parallel with another birth event. For more information, see the Birth operator topic.
Navigator Window
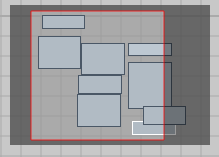
The Navigator window appears in the upper-right corner of the event display. It shows you a map of the event display.

The Navigator shows a map of the particle diagram.
The red rectangle in the Navigator shows the current border of the event display. Dragging the rectangle in the Navigator changes the focus of the display.
The Navigator is most useful when your Particle Flow graph contains a lot of events.
Getting Information
To see a brief description of an action, click it in the depot. The description appears on the Description panel, to the right of the depot.