Props are objects that a biped could be holding or carrying, such as a gun, sword, or briefcase. They are represented as boxes that are additional links in the biped hierarchy, an extension of the biped structure you can access at creation time or in Figure mode. If you are loading motion-capture data that contains prop information, this will transfer to the biped prop.
Each biped can have up to three props. Prop data will work seamlessly with other advanced features of character studio: in the Mixer, Motion Flow, Unification, and Layered edits.

Props are defined in the Structure rollout.
Props appear as boxes in the biped hierarchy. They can be moved, stretched, and scaled in Figure mode as other biped parts can. Props are supported by Physique, and are animated using the biped Transform controller in the same way as other objects. Create your prop and position it in relation to the biped in Figure mode. Props can be made to follow the motion of either hand by keyframing the Position and Rotation coordinate space of the prop.

Bipeds with multiple props as swords
Animating Prop Linkage
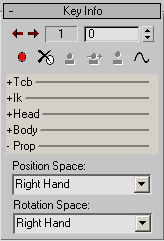
Props can change linked parents (similar to the 3ds Max Link controller) at any keyframe. This is done using the Position Space and Coordinate Space lists in the Prop section of the Key Info rollout. Once a key is set on the prop at a given frame, you can set or change the coordinate space in which it is transformed by choosing a new space from the drop-down list. You set rotation and position coordinate space independently.

Position and rotation space controls
Importing Motion-Capture Prop Data
If your motion-capture file includes prop data, character studio can read that data and apply it to a prop object.
Upon loading a character studio marker (CSM) file, the motion data will be applied to the prop. If the prop switches from one hand to another, character studio will automatically determine the switch of the prop's coordinate spaces as the prop is exchanged between the hands. This can be easily changed once the data is in the scene: go to the desired frame, choose a new coordinate space (as described in the previous section), then set a key. When loading a BIP file for retargeting onto other characters, the props move with each of the hands. character studio ensures that the hands come together at the precise position on the prop during transfers.
Props can be animated with 3ds Max controllers and that animation can then be collapsed onto the prop’s transform controller for editing with motion flow or the mixer.
Procedures
Example: To animate a biped swinging a prop with one hand:
- Create a biped with a single prop.
The biped appears with a single prop displayed as a box positioned near the biped's right hand.
- On the Motion panel
 Biped rollout, turn on
  (Figure Mode).
 -
 Scale the prop so it is the correct size and proportion to be a sword.
 -
 Rotate and
  move the prop so it is in the correct orientation in relation to the right hand.
 - Turn off
 (Figure Mode).
 - Set a key for the prop at frame 0. To do this, make sure the prop is selected, then click
 (Set Key) on the Key Info rollout.
 - Now animate the biped as you like, or open a BIP file of a character swinging a sword.
- Turn on
 , then select the prop.
 - Animate the prop using standard 3ds Max transforms.
Example: To animate the biped switching the prop to the other hand:
- Follow the steps in the previous procedure to animate the biped swinging the prop.
- Move to the frame where you want the biped to switch the prop the other hand.
- Move the biped's other hand so it is in contact with the prop, and
 set a key for the hand.
 -
 Select the prop and
  set a key for it.
 - Move the time slider ahead one frame and
 set another key for the prop.
 - On the Key Info rollout, expand the Prop section.
The lists for Position and Rotation coordinate spaces should be available. Change the Position from the right hand to the left hand, and click Set Key again.
The prop will now follow the movement of the left hand in the frames that follow.
Note: By default, the prop's rotation remains in Body space. Depending on your animation, you might also want to set keys so the Rotation space is Right Hand before the switch, and Left Hand after the switch.
To collapse the transforms of a prop:
- Animate the prop however you like. You can add list controllers to the prop as you can to any other part of the biped.
- When the animation is correct,
 select the prop.
 - In the
 Motion panel hierarchy list, select the prop transform list you want to collapse, and then right-click.
 A quad menu appears.
- Choose Properties from the quad menu.
- In the dialog that is displayed, make the appropriate choices, and then click Collapse.
After a short delay, the track bar displays the keys that have been added.
Tip: If you see a different Properties dialog that doesn't offer you the Collapse button, you are too low in the hierarchy. Select the next level up in the hierarchy and try again.