Displaces a mesh using vectors instead of along normals.
The Vector Displacement map enables displacement of meshes in three dimensions, in contrast with methods that permit displacement only along surface normals. Like the Normal map, the Vector Displacement map uses a full spectrum of color to work its effects, as opposed to a grayscale image.
-

 Material Editor > Material/Map Browser > Maps > Standard > Vector Displacement
The best way to create a Vector Displacement map image is with Autodesk Mudbox, which can extract the map as the difference between the volume of a low-poly surface and a higher-resolution one. The surface can be an object that originates in 3ds Max (as detailed in the following procedure) or an object created entirely in Mudbox and then exported. The two objects used for the extraction process can be two separate objects or two different subdivision levels of a single object. However, in the latter case, even the lowest subdivision level can contain some displacement, so it's often best to use different objects to extract the map: an undisplaced "target" model and a detailed "source" model. The two objects should be superimposed precisely; this is usually easy to achieve using methods similar to that described in the procedure.
Procedure
This procedure demonstrates sending a 3ds Max object to Mudbox, adding detail in Mudbox, extracting a Vector Displacement map, and then sending the displacement map back to 3ds Max. To use this procedure you must have both applications installed on the same computer. Mudbox need not be running.
If the applications are installed on different machines, you can use the FBX or OBJ file format to move scenes between machines.
- In 3ds Max, open the Customize menu to the Customization panel and choose Units Setup.
- On the Units Setup dialog, make sure the Generic Units choice is active, then click System Unit Setup. From the drop-down list, choose one of the following (the only available choices in Mudbox):
- Inches
- Millimeters
- Centimeters
- Meters
Click OK twice to exit the dialogs.
- In Mudbox, open the Windows menu and choose Preferences.
- On the Preferences dialog, expand the User Interface item.
- Set Linear Units to the same choice you made in 3ds Max, then click OK to exit.
Example: To use the Vector Displacement map:
- In 3ds Max, create or load an object. Name the object Source Object.
- Apply an
Unwrap UVW modifier and make sure none of the UV clusters intersect the 0-1 texture-coordinate border, indicated by a thick, dark-blue square outline.

If this isn't done, Mudbox will not be able to work properly with the object.
- From the
Application menu, choose Send To
 Send To Mudbox Send As New Scene.
After a few moments, the object appears in Mudbox.
- In
3ds Max, change the object name to
Target Object and send it to Mudbox again, this time using Add To Current Scene.
Mudbox now contains two identical copies of the original object with different names.
- In Mudbox, select Source Object and press Shift+D several times to add subdivision levels.
- Sculpt the Source Object in Mudbox; use any available levels, as required by your project.
Tip: You can hide the Target Object, if you like, by opening the Object List and clicking the dot to the left of the Target Object item under the Eye icon (
 ).
).
- In Mudbox, from the Maps menu, choose Extract Texture Maps New Operation Vector Displacement.
The Extract Texture Maps dialog opens.
- In the Extraction Options section, choose Target Object as the Target Model and Source Object as the Source Model (at the highest level), if necessary. In some cases these will be the default settings.
- Turn off the Smooth Target Models checkbox.
- Turn on Smooth Source Models.
- Under Image Properties, set Image Size to 2048x2048 or higher.
- Under Vector Displacement Map Options, set Vector Space to Object.
- Under Output Options, enter a path and file name with the
.exr
filename extension. Alternatively, click the folder button (
 ) next to the Base File Name field, set Save As Type to OpenEXR, enter a file name, and click Save.

- At the bottom of the dialog, click Extract.
This renders a bitmap containing the difference between the two surfaces and saves it in an image file. At this point you could apply the saved file manually in 3ds Max with a Vector Displacement map and a Bitmap map, but thanks to the interoperability feature, it's easier to automate the procedure.
- In the Object List, select the Target Object and then, in the lower-right corner of the Mudbox interface, click Update.
The object is updated with the data created by the extraction procedure in Mudbox. If the object has no material, a Standard material is assigned. A Vector Displacement map is applied to the material and the extracted bitmap is assigned to the map. No adjustment of the Vector Displacement map settings is necessary.
Alternatively, save the Target Object in FBX format (File menu
Export Selection). This includes the material with the Vector Displacement map in the FBX file. The map points to the extracted bitmap, which is automatically saved as part of the export process. The bitmap is saved as a separate file in a folder with the same name as the FBX file you export and the file name extension
.fbx-files. Then import the FBX file into
3ds Max.
- In 3ds Max, make sure mental ray is the active renderer.
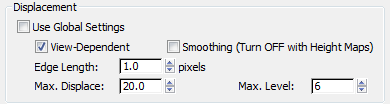
- Select the Target Object, then right-click it and choose Object Properties. On the Object Properties dialog click the mental ray tab, then in the Displacement group make these settings:
- Turn off Use Global Settings.
- Turn off Smoothing.
- Set Edge Length to 1.0.
- Leave Max. Displace at the default value; if an error message appears when you render, set Max. Displace to the value specified in the error message and render again.
- Render the scene.
Interface
In general, if you use the interoperability features between 3ds Max and Mudbox, these settings are set automatically and do not need to be adjusted.

- Vector
- Sets and displays the image file the map uses for displacement. Click this button, choose Bitmap from the Material/Map Browser, and then specify an
EXR file generated from Mudbox.
Associated with this setting are a checkbox to toggle the map and a numeric strength setting. The default value, 1.0, is the equivalent of 100%.
- Map Settings: High Dynamic Range
- When using a bitmap containing high-dynamic-range data, as is found in EXR files, make sure this is on. As EXR is currently the only compatible format, High Dynamic Range should always be on.
- Method
- Choose the option that matches the Vector Space setting used to extract the image in Mudbox. If Vector Space is set to Absolute Tangent (Relative Tangent is unsupported), set Method to Tangent. If Vector Space is set to Object or World, choose the equivalent Method option.