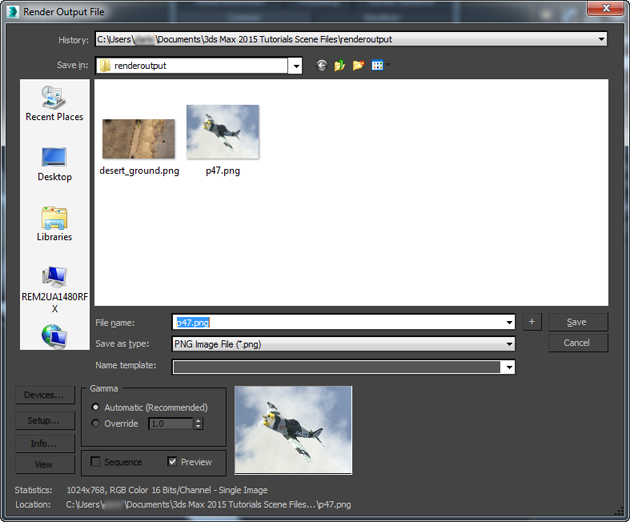
The Render Output File dialog lets you assign a name to the file that the rendering will output. You can also determine the type of file to render. Depending on your choice of file type, you can also set up options such as compression, and color depth and quality.

- History
-
Displays a list of the most recent directories searched. Whenever an image is selected, the path used is added to the top of the history list as the most recently used path.
The history information is saved in the 3dsmax.ini file.
- Save in
- Opens a navigation window to browse other directories or drives.
 Go To Last Folder Visited
- Click to return to the folder you previously browsed to.
 Up One Level
- Moves you up a level in the directory structure.
 Create New Folder
- Lets you create a new folder while in this dialog.
 View Menu
- Provides several options for how information is displayed in the list window:
- Thumbnails: Displays the contents of a directory as thumbnails, without the details.
- Tiles: Displays the contents of a directory as large icons, without the details. If you widen the dialog, these tile across the width.
- Small Icons: Displays the contents of a directory as small icons, tiled across the width, without the details.
- List: Displays the contents of a directory without the details.
- Details: Displays the contents of a directory with full details such as size and date.
- [list of files]
- Lists the contents of the directory, in the format specified by the View menu. Tip: When View Menu
 Details is chosen, the contents of the directory are displayed with Name, Size, Type, Date Modified, and Attributes. You can sort the list according to a column's contents by clicking that column's label.
 - File name
- Displays the file name of the file selected in the list.
- Save as type
- Displays all the file types that can be saved. This serves as a filter for the list. Note: The choice in this field determines the file type saved, regardless of the file name extension entered in the File Name field.
- Name template
- The drop-down list lets you choose a file name based on the 3ds Max scene and system settings.

- <scene> The root name of the MAX scene file
- <camera/view> The name of the active camera or viewport
- <mm> The month
- <dd> The day
- <yyyy> The year
For example, choosing the next-to-last template from the list might give you the file name car_rig_final_Camera_Driver_01-28-2014.
The text field lets you create new templates. For example, you might change <scene>_ <dd>_<mm> to <dd>_<mm>_<scene>. Any text you enter becomes part of the name template. 3ds Max can save up to 10 custom templates (not counting the default ones, which always appear on the list). Once the maximum number of custom templates has been saved, entering a new template causes the first custom template saved to drop off the list.
- Save
- Sets the file information for saving upon rendering. Closes the dialog if you haven't changed the output file type.
If you've changed the file type, clicking Save opens the Setup dialog for the specified file type. Change the settings as necessary, and then click OK to close both the Setup and the Output dialogs, or click Cancel to return to the Output dialog.
- Cancel
- Cancels the file save and closes the dialog.
- Devices
- Lets you choose the hardware output device; for example, a digital video recorder. To use the device, the device, its driver, and its 3ds Max plug-in must all be installed on your system.
- Setup
- Displays controls for the selected file type. These vary with each different file format. Change the settings as necessary, and then click OK or Cancel.
- Info
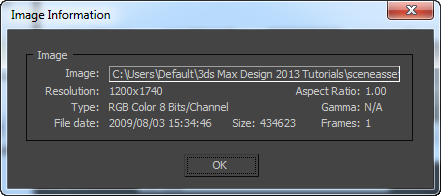
- If you highlight an existing file in the list, clicking Info displays expanded information about the file such as frame rate, compression quality, file size, and resolution. The information here depends on the type of information saved with the file type.
If the file has an embedded value, this dialog displays that value. Otherwise, it displays "N/A".

- View
- If you highlight an existing file in the list, clicking View displays the file at its actual resolution. If the file is a movie, the Media Player is opened so the file can be played.
Gamma group
To set up gamma options for the output file, Enable Gamma Correction must be on in the Gamma panel of the Preferences dialog (Customize  Preferences
  Gamma). Otherwise, the Gamma controls are unavailable on the Render Output File dialog.
- Gamma
- Specifies how to handle gamma with the bitmap image.
- Automatic (Recommended) (The default.) Uses the gamma value embedded in the incoming bitmap. If there is no embedded gamma value, 3ds Max makes an intelligent decision based on the image's bit depth. Low-dynamic-range images (8- or 16-bit) are assumed to have the standard sRGB gamma of 2.2, and high-dynamic-range (floating-point or logarithmic) images are assumed to be linear and use a gamma of 1.0 (no correction).
For most scenes, you should leave the gamma-handling set to Automatic.
- Override Sets a user-defined gamma value as an override. Note: Use override only if your scene uses bitmaps created (or edited) by a variety of other programs, and you need to adjust the gamma differently for each program.
- Automatic (Recommended) (The default.) Uses the gamma value embedded in the incoming bitmap. If there is no embedded gamma value, 3ds Max makes an intelligent decision based on the image's bit depth. Low-dynamic-range images (8- or 16-bit) are assumed to have the standard sRGB gamma of 2.2, and high-dynamic-range (floating-point or logarithmic) images are assumed to be linear and use a gamma of 1.0 (no correction).
[sequence or preview]
- Sequence
- This is not available in the Render Output File dialog. Note: To render a sequence of still images, choose the Active Time Segment or define a range of frames in the Common Parameters rollout of the Render Setup dialog. If you have selected a still image file type, each frame will append a four-digit number to the name you have selected, incremented with each frame.
- Preview
- When on, enables display of the image as a thumbnail.
- [image thumbnail]
- Displays a thumbnail of the selected file. Preview must be turned on.
If gamma correction or look-up table (LUT) correction is active, 3ds Max applies the correction to this thumbnail image.
- Statistics
- Displays the resolution, color depth, file type, and number of frames of the selected file.
- Location
- Displays the full path for the file.