You can customize Scene Explorer in a variety of ways by changing the interface layout, the visible columns, and so on. When you modify a local or global explorer, the changes are saved automatically.
3ds Max comes with several default Scene Explorer configurations: These are all global, and therefore available in every 3ds Max session. Local Scene Explorers live only within a particular scene, are saved and loaded with that scene. Prior to 3ds Max 2016, all Scene Explorers were local.
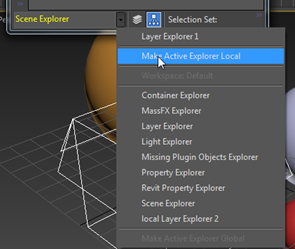
Make a global Scene Explorer local:
- In any global Scene Explorer, click the arrow to the right of the text field at the bottom-left of the dialog and choose Make Active Explorer Local.

The Scene Explorer becomes local to the current scene, and its name appears in all locations that list local Scene Explorers. This means that anyone who opens this scene can access all of its local explorers. See the instructions for accessing local Scene Explorers elsewhere in this topic.
At this point, you can rename the Scene Explorer by editing the text in the name field at the bottom-left of the Scene Explorer.
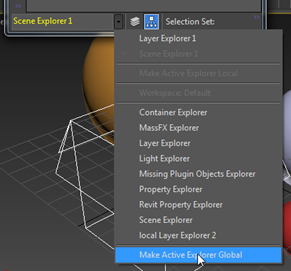
Make a local Scene Explorer global:
- In any local Scene Explorer, click the arrow to the right of the text field at the bottom-left of the dialog and choose Make Active Explorer Global.

A file dialog titled Save Scene Explorer opens to the default folder for global Scene Explorer files.
- Rename the file or accept the default name and click the Save button.
The global Scene Explorer file is saved, and thereafter is available in these lists of global Scene Explorers:
- Default workspace: Tools menu
 All Global Explorers
- Scene Explorer
 drop-down list of explorers
  Global Explorers section
Note: The name of the saved global Scene Explorer in the user interface is the one that appears in the bottom-left corner, not the file name. If you wish to rename the explorer, do so while it is local. - Default workspace: Tools menu
Access existing global Scene Explorers:
- Using the Default workspace, open the Tools menu and choose any of the following:
- Scene Explorer
- Layer Explorer
- Crease Explorer
- Any item on the All Global Explorers submenu.
Each of these is a toggle that opens or closes the corresponding Explorer dialog.
- Using the Default With Enhanced Menus workspace, open the Scene menu and choose any of the following:
- Layer Explorer
- Scene Explorer
- Material Explorer Toggle
- Open Container Explorer
- Crease Explorer Toggle
- Dynamics Explorer
- Scene Explorer
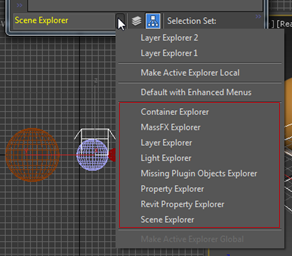
- With any Scene Explorer open, click the arrow to the right of the text field at the bottom-left of the dialog and choose any item from the list of global Scene Explorers (outlined in red in the following illustration).

This replaces the active explorer with the one you chose.
Do any of the following:
Access local Scene Explorers:
- Using the Default workspace, open the Tools menu
 Local Scene Explorers submenu. Choose any item to toggle the corresponding local Scene Explorer.
- Using the Default With Enhanced Menus workspace, open the Scene menu. You'll find any local Scene Explorers in the Local Scene Explorers section. If that section isn't present, the scene contains no local Scene Explorers.
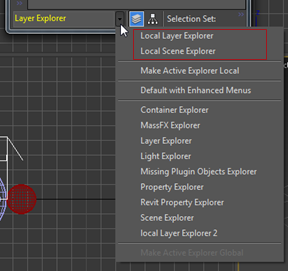
- With any Scene Explorer open, click the arrow to the right of the text field at the bottom-left of the dialog and choose any item from the list of local Scene Explorers (outlined in red in the following illustration).

This replaces the active explorer with the one you chose.
- Open the Manage Local Scene Explorers dialog and double-click any listed item.
You can access local explorers as follows: