This material lets you directly control the radiosity properties of a material. Advanced Lighting Override is always a supplement to a base material, which can be any renderable material. The Advanced Lighting Override material has no effect on ordinary renderings. It affects the radiosity solution or light tracing.
Advanced Lighting Override has two main uses:
- Adjusting the material properties used in a radiosity solution or light tracing
- Creating special effects such as having self-illuminating objects contribute energy to the radiosity solution
As the rollout for the Advanced Lighting Override material states, you don’t have to apply this material to obtain a radiosity solution, and most models will never require it.
Obtaining a Better Image
Materials that use default settings can be highly reflective. This can lead to overexposed or washed-out radiosity solutions. In general, the best way to adjust this is to reduce the HSV Value (V) of a material color; or, for a bitmapped material, reduce the RGB Level. In some situations, Radiosity Override can improve the appearance of the radiosity solution. Examples of situations where Radiosity Override can help include color bleeding and large dark areas:
- You might want to reduce Reflectance Scale or Color Bleed when a large area of color (for example, a red carpet in a room with white walls) creates excessive color bleeding. This might be physically accurate, but the eye adjusts for such effects, and the radiosity result might look better with less reflectance or less color bleeding.
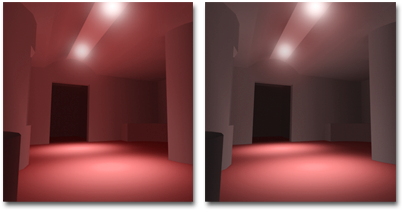
Left: Excessive bleeding of the floor color onto the walls and ceiling.
Right: Radiosity Override material reduces the floor’s reflectance, causing less bleeding.
- You might want to increase Reflectance Scale when the scene includes a large dark area (for example, a black floor). This can lead to a very dark radiosity result. You can maintain the floor’s color but increase reflectance, giving the solution the colors you want while increasing its brightness.
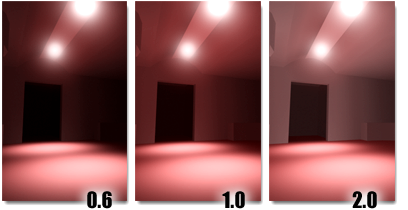
The room is lit only by spotlights pointed at the floor. Increasing reflectance of the floor brightens the entire room.
Tip: To get an idea of how the current material will affect the radiosity solution or light-traced rendering, check the reflectance and transmittance display.
Creating Special Effects
Self-illumination makes an object appear to glow in ordinary renderings, but does not contribute energy to the radiosity solution. To have radiosity processing take a self-illuminating material into account, make this material the base material of Advanced Lighting Override, then increase the value of Luminance Scale.
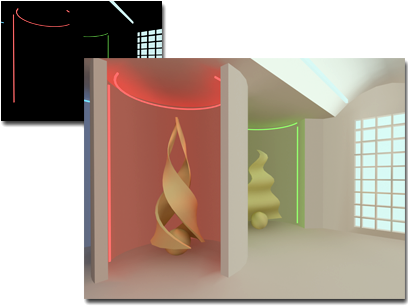
Upper left: By default, self-illuminated neon lights do not influence the scene light.
Right: Advanced Lighting Override material scales the neon lights’ Luminance so the radiosity solution can take it into account.
Luminance scale takes the Self-Illumination map into account. You can use this to model effects such as a computer monitor in a darkened room.
The Special Effects group of the Advanced Lighting Override material also has a control for adjusting the quality of the Bump map in areas of indirect lighting.
Procedures
To adjust a material’s reflectance and transmittance, do either of the following:
- In the Compact Material Editor, activate the sample slot of the material you want to adjust, then click the Type button and choose Advanced Lighting Override.
In the Replace Material dialog, choose Keep Old Material As Sub-Material, and click OK.
Adjust the Reflectance Scale and Transmittance Scale parameters. As you do, watch the Reflectance and Transmittance display, and make sure the values are good for a radiosity solution. For example, 85 percent reflectance is about the highest that will work with radiosity. Most real-world materials have much lower reflectance.
- In the Slate Material Editor, add the material you want to adjust to the active View. Add an Advanced Lighting Override material node to the active View as well, then wire the material you want to adjust so it replaces the default Standard material at the Advanced Lighting Override input socket.
To make a self-illuminating material emit radiosity energy, do one of the following:
- In the Compact Material Editor, activate the sample slot of the self-illuminating material, then click the Type button and choose Advanced Lighting Override.
In the Replace Material dialog, choose Keep Old Material As Sub-Material, and click OK.
Increase the value of Luminance Scale to have the material emit energy for radiosity processing.
- In the Slate Material Editor, add the self-illuminating material to the active View. Add an Advanced Lighting Override material node to the active View as well, then wire the self-illuminating material so it replaces the default Standard material at the Advanced Lighting Override input socket.
Increase the value of Luminance Scale to have the material emit energy for radiosity processing.
Interface
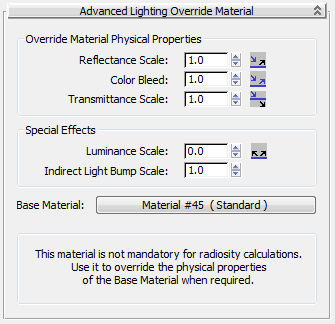
Override Material Physical Properties group
These parameters control the base material’s advanced lighting properties directly.
- Reflectance Scale
- Increases or decreases the amount of energy the material reflects. Default=1.0.
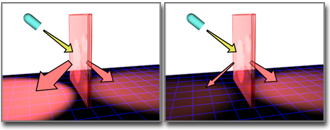
Reflectance Scale increases or decreases the energy of reflected rays.
Tip: To increase self-illumination, use Luminance Scale in the Special Effects group, not this control. - Color Bleed
- Increases or decreases the saturation of reflected color. Default=1.0.
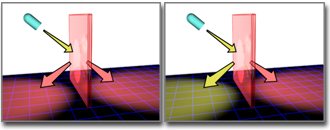
Color Bleed increases or decreases the saturation of reflected color.
- Transmittance Scale
- Increases or decreases the amount of energy the material transmits. Default=1.0.
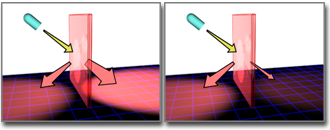
Transmittance Scale increases or decreases the energy of transmitted rays.
Note: This parameter affects only radiosity. It has no effect on light tracing.
Special Effects group
These parameters relate to specific components in the base material.
- Luminance Scale (cd/m^2)
- When greater than 0, scales the self-illumination component of the base material. Use this parameter to have self-illuminating objects contribute energy to the radiosity or light-traced solution. Cannot be less than zero. Default=0.0.
Typically, a value of 500 or more will give good results.
- Indirect Light Bump Scale
- Scales the effect of the base material’s Bump map in areas lit by indirect light. When this value is zero, indirectly lit areas are not affected by Bump maps. This value does not affect the Bump amount in areas where the base material is lit directly. Cannot be less than zero. Default=1.0.
Tip: This parameter is useful because indirect bump mapping is simulated and not always accurate. Indirect Light Bump Scale lets you adjust the effect explicitly.
- Base Material
- Click to choose or edit the Base material. You can also replace the base material with a different material type.