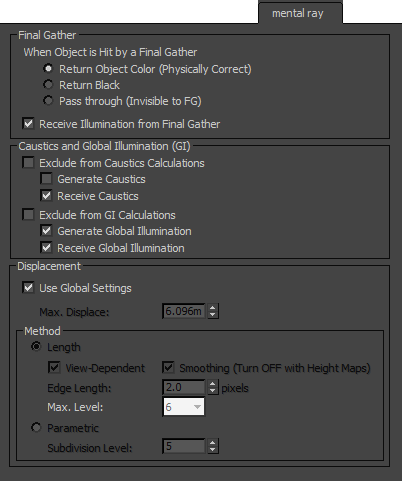
This panel of the Object Properties dialog supports mental ray rendering; specifically, the indirect illumination features caustics and global illumination. They control whether objects generate or receive caustics or global illumination.
These settings are ignored where they aren't appropriate. For example, lights can be set to generate caustics, but for a light, the Receive Caustics setting has no effect, as lights aren't renderable. Similarly, these settings have no meaning for cameras.
Also available on this panel are controls for setting displacement parameters on a per-object basis.

Final Gather group
These settings let you specify how an object interacts with the final gather process.
- When Object is Hit by a Final Gather Ray
-
- Return Object Color (Physically Correct) Returns the object’s material color at the point that the final gather ray intersects it, and contributes to final gather illumination. This is the default mode.
- Return Black Blocks final gather rays, returning no color, thus not shading the object at all.
- Pass through (Invisible to FG) Prevents the final gather process from seeing the object during ray casting. This is useful for ignoring the light contribution from small, complex objects like blades of grass. The final gather rays pass through and strike the underlying object, such as a ground plane that is easier to shade.
- Receive Illumination from Final Gather
- When on, the object is subject to illumination from final gather rays. When off, the object is not illuminated by final gather rays. Default=on.
Caustics and Illumination group
These settings determine whether and how the object participates in the simulation of caustics and global illumination (photons). To use these capabilities, the respective checkboxes must also be enabled on the Render Setup dialog's Caustics And Global Illumination rollout.
- Exclude from Caustics
- When on, the object does not participate in the caustics solution. When off, the additional caustics-related object properties are available. Default=off.
Generate Caustics When on, the object can generate caustics. When off, the object does not generate caustics. Default=off.
Receive Caustics When on, the object can receive caustics. That is, caustic effects are cast onto this object. When off, the object does not receive caustics. Default=on.
- Exclude from GI
- When on, the object does not participate in the global-illumination solution. When off, the additional global-illumination-related object properties are available. Default=off.
Generate Global Illumination When on, the object can generate global illumination. When off, the object does not generate global illumination. Default=off.
Receive Global Illumination When on, the object can receive global illumination. That is, reflected light is cast onto this object. When off, the object does not receive global illumination. Default=on.
Displacement group
These settings let you apply displacement parameters on a per-object basis.
- Use Global Settings
- When on, applies to all objects the Displacement settings on the Render Setup dialog
 Renderer panel
  Shadows and Displacement rollout. Turn off to make settings on a per-object basis. Default=on.
- Max. Displace
- Controls the maximum offset, in world units, that can be given to a vertex when displacing it. This value can affect the bounding box of an object. Default=6.096m (meters).
Large values of Max. Displace can affect rendering performance. On the other hand, if this value is too low and the renderer returns greater displacement values, the Render Message window displays warning messages to that effect. You can use these warnings to fine-tune the value of Max. Displace.
Tip: If displaced geometry appears to be “clipped,” try increasing the value of Maximum Displace.
Method group
- Length Calculates adaptive approximation of the displacement according to Edge Length criteria.
- View
- Defines the space for displacement. When View is on, the Edge Length specifies the length in pixels. When off, the Edge Length is specified in world space units. Default=on.
- Smoothing
- Turn off to have the renderer correctly render height maps. Height maps can be generated by Normal Bump mapping.
When using only height maps in the scene, make sure this option is off. If some objects in the scene use height maps while others use standard displacement, apply smoothing on a per-object basis.
When on, the renderer simply smooths the geometry using the interpolated normals, making the geometry look better. This result, however, cannot be used for height map displacement because smoothing affects geometry in a way that is incompatible with height mapping.
- Edge Length
- Defines the smallest potential edge length due to subdivision. The renderer stops subdividing an edge once it reaches this size. Default=2.0 pixels.
- Max Level
- Controls the extent to which the renderer can recursively subdivide each original mesh triangle for displacement. Each subdivision recursion potentially divides a single face into four smaller faces. Choose the value from the drop-down list. Range = 0 to 7. Default=6.
For example, using the default value means that the renderer can subdivide each displaced mesh triangle into as many as 4,096 smaller triangles.
-
Parametric Regularly subdivides each triangle of the surface. This is the fastest and the best option for scenes that are regular and mostly flat.
- Subdivision Level
- Specifies how many times each input triangle should be subdivided. Higher Subdivision Level values result in a higher triangle count. In fact, each input triangle is subdivided into 4Subdivision Level triangles. Range = 0 to 10. Default = 5 (1024 triangles).
There is an upper limit of 8 million triangles per object.