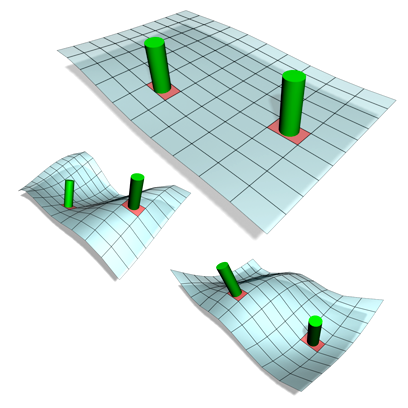
The Attachment constraint is a position constraint that attaches an object's position to a face on another object (the target object doesn't have to be a mesh, but must be convertible to a mesh).

Attachment constraints keep the cylinders on the surface.
By keying different attachments over time, you can animate the position of an object over the irregular surface of another object, even if that surface is changing over time.
Procedures
Example: To attach a cone to a bending cylinder:
- In the Perspective viewport, create a cylinder with these settings:
- Radius=20
- Height=30
- Height Segments=10
- In the Perspective viewport, create a cone with these settings:
- Radius 1=15
- Radius 2=5
- Height=30
-
 Select the cylinder, apply a Bend modifier, and set Bend Angle to –70 degrees.
 - Turn on
 , go to frame 100, and set Bend Angle to 70 degrees.
 The cylinder bends from one direction to the other over 100 frames.
- Turn off
 .
.
Example continued: To assign the Attachment constraint and adjust the cone:
-
 Select the cone.
 - On the
 Motion panel, open the Assign Controller rollout, click the Position track, click
  (Assign Controller), and choose Attachment.
 The cone moves to the origin of the scene and the Attachment Parameters rollout opens.
- Click the Pick Object button, and then click the cylinder.
The name of the cylinder is displayed above the Pick Object button.
- Go to frame 0. Orbit the Perspective viewport so you can see the top surface of the cylinder.
- In the Key Info group, click Set Position, and click and drag over the faces on the top surface of the cylinder.
The cone jumps to the top of the cylinder. As you drag the mouse, it jumps to whichever face you drag over.
- Release the mouse when the cone is on the top surface of the cylinder.
Example continued: To adjust the position of the cone relative to the face:
- Drag in the face display window above the Set Position button to position the red x relative to the triangle representing the face. (Because of the radial arrangement of cap faces in a cylinder, the upper-left corner of the displayed triangle is the center of the cylinder cap. To see this, turn off Edges Only for the cylinder.)
- Adjust the A and B spinners to move the cone across the surface of the face.
- Drag the time slider to various frames.
As the cylinder bends back and forth, the cone remains attached to its upper surface. Continue adjusting the A and B spinners and dragging in the face display window to adjust the cone's position.
- Remember the number in the Face spinner, and then lower the spinner value until the cone leaves the cylinder cap and begins jumping around various areas of the cylinder.
The Face spinner specifies which face the cone is attached to. As you change its values, the cone moves to different faces on the cylinder.
- Re-enter the original value in the Face spinner to return the cone to the top of the cylinder.
-
 Play the animation.
 The cylinder bends back and forth with a cone attached to its upper cap.
Interface
After you assign the constraint, its parameters appear on the  Motion panel
  Attachment Parameters rollout.
Attach To group

- [object name text]
- Specifies the target object to which the source object is attached.
- Pick Object
- Selects and picks the target object in the viewports for the attachment.
- Align to Surface
- Fixes the orientation of the attached object to the face it's assigned to. When Align To Surface is off, the orientation of the attached object is not affected by the orientation of the face on the target object.
Update group

- Update
- Updates the display.
- Manual Update
- Enables Update.
Key Info group

- Current Key
- Displays the current key number and lets you move to another key.
- Time
- Displays the current frame, and lets you move the current key to a different frame.
- Position
- Face Sets the index of the face to which the object is attached. Range=0 to 268435455.
A/B Set the barycentric coordinates defining the position of the attached object on the face. Range=–999,999 to 999,999.
[display graph] Shows the position of the source object within the attachment face. To adjust the position of the object relative to the face, drag within this window.
Set Position To adjust the placement of the source object on the target object, turn this on. In a viewport, drag over the target object to specify a face and a position within the face. The source object moves over the target object as you drag.
TCB group

The controls in this group are the same as in other TCB controllers. The orientation of the source object is also interpolated and affected by these settings.
- Tension
- Range=0 to 50
- Continuity
- Range=0 to 50
- Bias
- Range=0 to 50
- Ease To
- Range=0 to 50
- Ease From
- Range=0 to 50