Generate a failure envelope for a laminate.
Select the Failure Envelope feature from the Laminate drop-down menu to open the Failure Envelope dialog window. To complete a failure envelope analysis:
- Define the laminate to be analyzed - Use the Laminate tab to create a new laminate or import an existing laminate from the material database.
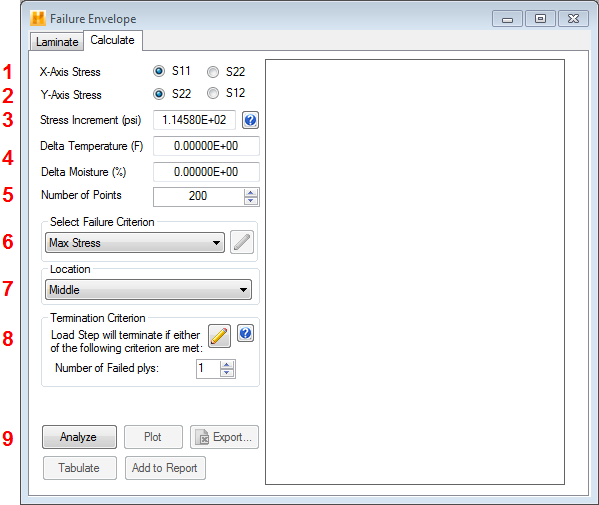
- Calculate Results - Select the Calculate tab (see image below) to define specific aspects of the Failure Envelope analysis and compute the failure envelope. You can modify several aspects of the Failure Envelope analysis from their default settings. The steps involved in this process are indicated in items 1-9 below.

- Identify 1st Stress Component (X-Axis Stress) - Select the volume average laminate stress component that will be plotted on the horizontal axis of the failure envelope. Available choices include σxx (S11) and σyy (S22).
- Identify 2nd Stress Component (Y-Axis Stress) - Select the volume average laminate stress component that will be plotted on the vertical axis of the failure envelope. Available choices include σyy (S22) or σxy (S12).
- Size of Stress Increments - Specify the size of the stress increments used to determine the failure stresses for any given ratio of the two stress components. The default value is 1% of the lowest strength of any material in the laminate. This value determines the precision of the failure stress calculations. Smaller stress increments lead to more accurate determination of failure stresses but require longer times to complete the analysis.
- Temperature and Moisture Loading - Include a thermal and/or moisture loading in the Failure Envelope analysis. Note, the loads are simply added to the two in-plane loads specified in boxes 1 and 2 above.
- Number of Data Points - Specify the number of data points used to complete the failure envelope. The use of more data points allows greater resolution of the failure envelope shape, but requires more time to complete the analysis.
- Select Failure Criterion - Select the failure criterion to be used in the Failure Envelope analysis by choosing from among the seven failure criteria available under the 'Select Failure Criterion' drop-down menu. (See
Appendix C for details on available failure criteria). If the selected failure criterion requires the specification of additional parameters, the
 parameters button will become active. In this case, click the button to define the required parameters before proceeding.
- Location for Failure Evaluation - Identify the location (top, middle, or bottom) within each ply where the failure criterion will be evaluated (default = middle). This data is specified in the Location box.
- Termination Criterion - Specify criteria for determining that a laminate has completely failed. For failure criteria that do not differentiate between matrix and fiber failure, set to the desired number of plies that must fail to indicate a failed laminate. For those failure criteria that do differentiate between matrix and fiber failure, you will be able to specify the desired number of plies that will fail in either the matrix or the fiber. Fiber failure assumes matrix failure as well. Therefore, the number of fiber failed plies cannot exceed the number of matrix failed plies. The load on the laminate is increased until the number of specified failed plies (for either mode) is reached. If the number of failed plies is set to one, first ply failure is used for determining laminate failure.
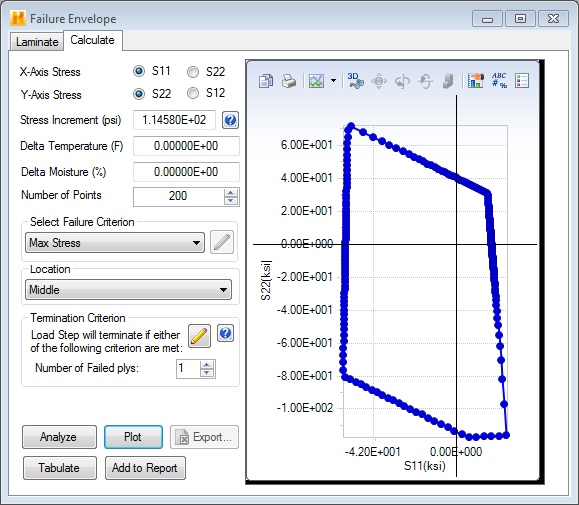
- Perform Failure Envelope Analysis - Click the Analyze button to perform a Failure Envelope analysis based on first ply failure. After the analysis is complete, click the Tabulate button to display results in tabular form. Click the Plot button to display results in a 2-D graph. Note, the tabulated data and 2-D stress results are the volume-averaged laminate stresses (σxx, σyy, σxy). You can also write the tabulated Failure Envelope results to a *.csv file compatible with Microsoft Excel by clicking the Export button. An example of the plotted results is shown below.

There is a known display issue for DPI settings greater than the default 100%. Click here for more details.