Plot Drawings
-
Click
 . Find
 On the Project Manager, click the arrow on the Publish/Plot tool, and select Plot Project.
 - Select one or more drawings to plot. Note: You can also select the drawings or folders in Project Manager, right-click, and select Publish Plot Project. Selected drawings are preselected in the Select Drawings to Process dialog box.
- Click OK.
- In the Batch Plotting Options and Order dialog box, select the layout tab to plot.
- Select the output device.
-
Use plot config (.pc3): Click to use an existing plotter configuration file (.pc3), enter the file name or click Browse to select the file.
A plotter configuration file contains information such as the device driver and model, the output port to which the device is connected, and various device-specific settings.
-
Use layout tab’s default: Click to use the default plotter configuration.
-
- Click Detailed Plot Configuration mode to turn on or turn off the options set within the Detailed Plot Configuration Option dialog box.
- Click ON or OFF.
- Select the order to output the plot:
-
OK: Output plots in the selected order.
-
OK-Reverse: Output plots in the reverse order.
-
- Click OK to save any open drawings.
- Click OK Project.
If the title block setup maps any of the AutoCAD Electrical PLOT values to attributes, these attributes update during plotting. If the attribute carries a prompt value, this value is used as a prefix.
For example:
- The title block maps PLOTDATE (MM:DD:YYYY format) to the DATE attribute.
- The DATE attribute has a prompt value of "Date: ".
- For a plot created on January 1, 2013 the attribute updates to "Date: 01/01/2013".
Publish to PDF with Hyperlinks
- Update component and signal arrow cross-referencing for the project.
-
Click . Find
- On the Project Manager, click the arrow on the Publish/Plot tool, and select Publish to PDF/DWF/DWFx.
- Select the drawings to publish. Note: You can also select a folder in Project Manager, right-click, and select Publish Publish to PDF/DWF/DWFx. The drawings in the folder are preselected in the Select Drawings to Process dialog box.
- On the AutoCAD Electrical Publish Setup dialog box, select PDF as the publish type.
- Check Multi-sheet file.
- Check whether to substitute TrueType fonts for SHX fonts.
- A text object using a Truetype text font is searchable within a PDF file.
- A text object using an SHX font is drawn as graphics in the PDF file. The text value is added as a comment in the PDF file and can be found by searching in the comments.
- Check Include Bookmarks to include the project structure as bookmarks in the PDF file.
- Check Include Parent-Child Hyperlinks.
- Define the zoom factor which controls how close the PDF file is zoomed in on the object you jump to. Enter a value from 1 through 100.
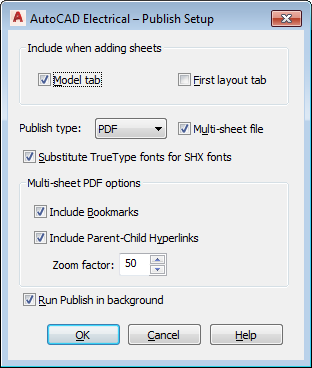
- Click OK.
The Publish dialog box opens with PDF and multi-sheet preselected.
- If you included bookmarks on the AutoCAD Electrical Publish Setup dialog box, click Publish Options and clear Create bookmarks. Note: If both the AutoCAD Electrical and AutoCAD bookmarks are selected, the PDF file includes both the project structure bookmarks and the sheet list bookmarks.
- Adjust other options as necessary.
- Click Publish.
Publish to DWF
-
Click . Find
- On the Project Manager, click the arrow on the Publish/Plot tool, and select Publish to PDF/DWF/DWFx.
- Select the drawings to publish to DWF. Note: You can also select a folder in Project Manager, right-click, and select Publish Publish to PDF/DWF/DWFx. The drawings in the folder are preselected in the Select Drawings to Process dialog box.
- Select Publish Setup options.
- Click OK.
- Click Publish.
Publish to the Web
Creates HTML Web pages from drawings you select in the active project.
-
Click . Find
- On the Project Manager, click the arrow on the Publish/Plot tool, and select Publish to WEB. Note: You can also select a folder in Project Manager, right-click, and select Publish Publish to WEB. Selected drawings in the folder are preselected in the Select Drawings to Process dialog box.
- In the Publish to Web dialog box, select a location to store the drawing files.
- Select an image format.
-
DWF: Design web format files are vector-based representations of drawing (.DWG) files.
Note: DWF is the recommended image format as it supports intra-drawing surfing from a component tag or component description list. -
JPEG: Joint Photographics Experts Group files are raster-based. We do not recommend this format for large files that contain text.
-
PNG: Portable Network Graphics files are raster-based like JPEG images, but PNG provides a higher quality output.
-
- Click OK.
- Select the drawings to publish to the Web.
- Click OK.
- Enter a name for the project banner for the Web page.
- Enter one or more project titles for the Web page.
- Select the method to output drawing images to the Web page.
- Click OK.
- If prompted, enter an output device name.
- If prompted to select to write the plot to a file [Yes/No], press ENTER to select no as the default.
- If prompted to save change to page setup [Yes/No], press ENTER to select no as the default.
- If prompted to proceed with plot [Yes/No], press ENTER to select yes as the default.