In this exercise, you will log in to Autodesk Vault to prepare for other project tasks.
Log in to the database
- In Toolspace, click the Prospector tab. Note:
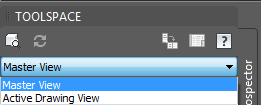
Ensure that you have a drawing open and that you select the Master View from the list at the top of the Prospector tab.

In the Prospector tree, you should see the
 Projects collection.
 - Right-click the Projects collection and click Log In To Vault.
- If the Welcome dialog box appears, click Log In.
- In the Log In dialog box, review the four data fields:
- User Name: Administrator. Leave this entry as is.
- Password: blank. Leave this field blank for this exercise.
- Server: localhost (for stand-alone local database), or if you have a central Data Management Server on your network, use its name.
- Database: Vault. Leave this entry as is, unless your system administrator advises you to use a different database.
- Click OK.
The system logs you in to Autodesk Vault.
- Right-click the Projects collection and click Properties.
- In the Properties – Civil 3D Projects dialog box, note that the default location for the Working Folder.
- Click OK.
To continue this tutorial, go to Exercise 2: Creating User Accounts and Groups.