Displaying and Hiding the Media Panel
The Media panel is available for display at all times unless viewing a clip in Full Screen mode. The panel can be displayed on the left or right of the screen depending on the setting in General Preferences.
Tiles and List View
The Media panel can be set to display clips in one of two modes using the View Mode box:
- List View
- The List view provides detailed information about each clip in the Media panel, including file location and creation date. Widen the Media panel to show more information or extend to full-width by pressing Shift + ~.
- Tiles View
- The Tiles view makes it easier to visually identify clips when working in Batch, identifying clips in Conform, or loading the right clip from a library to a reel. The thumbnails can be resized using the Size field. Clips can be freely dragged and sorted in Tiles view.
Tips:
- Use Ctrl + Space + Up to enlarge the thumbnail size.
- Use Ctrl + Space + Down to reduce the thumbnail size.
Tab Navigation
The top of the Media panel displays a number of tabs. Click a tab to focus on a specific area of interest in the Media panel.
- All
- Displays all areas of the Media panel: Desktop, Libraries, and Batch.
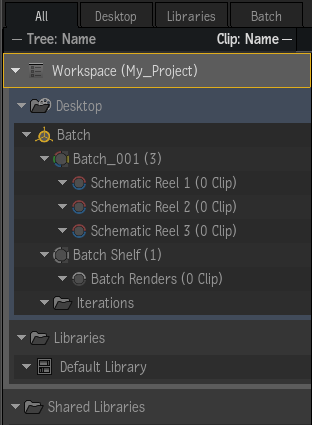
- Desktop
- Displays each instance of Batch, along with their schematic reels, shelves, and iterations.
- Libraries
- Displays only the Libraries and Shared Libraries folders.
- Batch
- Displays only the currently-active Batch, along with its schematic reels, Batch shelf, and iterations.
- Conform
- Only available while working in Conform, replacing the Batch tab described above. Displays only media available for the conform, filtered by match criteria.
- BFX
- Only available while working in Batch FX, replacing the Batch tab described above. Displays only media used in Batch FX.
Dual Panel View
Use Dual Panel View to manage clips, folders, reels, libraries. Dual Panel View allows the display of different areas of the same Workspace, making it easy to move material around.
To display the Media panel in dual view:
- Set the Media Panel button to Full Width (Shift+~).
- Click Dual Panel View to display two instances of the Media panel.
Dragging Clips into the Media Panel
Drag and drop clips from libraries into different areas of the Media panel to perform operations on working copies while leaving the originals intact:
- Drag clips to reels and edit directly in the Viewing panel using a mouse or tablet. For more information, see Gestural Editing on the Desktop.
- Drag clips to the schematic reels in Batch groups to apply procedural effects. For more information, see Procedural Compositing with Batch and ConnectFX.
- Drag clips to shared libraries to make them available to other applications and workstations on the network.
Sorting Clips and Sequences in the Media Panel

- The Media panel sorting options available at the top of the Media panel applies to all entries that are not under a localised sort.
- In the Media panel, an icon appears next to the container to indicate that a localised sort is being applied. You can click on the icon to cycle through Ascending, Descending, or Not Sorted. Alt-click the icon to clear the localised sort.
Assigning Colours
Assign custom colours to Batches, reels, folders and libraries to further organize material and enhance workflow in the Media panel. To do this, right-click a target, select Colour, and choose from the provided options.
Searching in the Media Panel
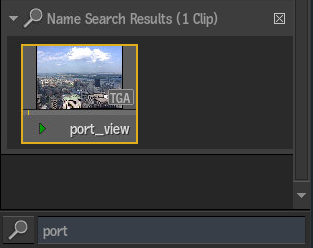
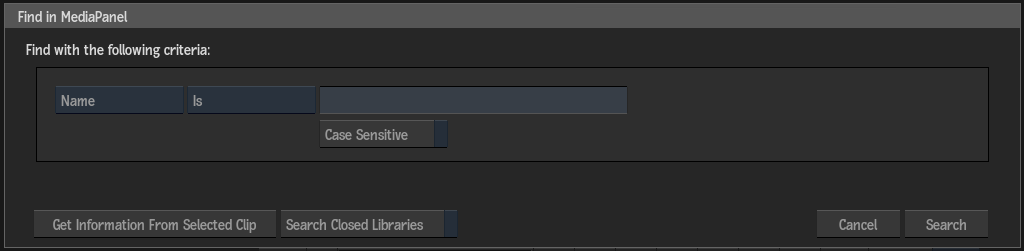
Here are some tips for advanced searches:
- Many options are available in the first criteria box, such as Name, Resolution, Tape, and Comment. Other criteria is displayed to further refine your search, depending on the selection in this box.
- Click Get Information From Selected Clip to fill the current search field with the information from the currently selected clip.
- Click Search Closed Libraries to also search the contents of closed Libraries and Batch Groups.
- A Library or Batch Group remains closed if the Advanced Search cannot find any match.
- A Library or Batch Group is opened if the Advanced Search finds a match.
- The contents of a Batch Group's Iterations folders are searched even if they are hidden in the Media panel.
Objects With the Same Name
If you add a clip or container to a location where another identically named item already exists, you are presented with options to either cancel, add, rename, or replace. You can also choose to apply your selection to all the selected items at once.
| Select: | To: |
|---|---|
| Cancel | Cancel the operation (not available for clips). |
| Add | Add the entry without changing its name. You end up with more than one entry with the same name. |
| Rename | Rename the newly added item. |
| Replace | Overwrite the existing item in the destination. |
Tips for Working with the Media Panel
- Dragging a clip from a library to Batch Group entry within the Media panel creates a new reel with the clip name.
- Drag a library or a library folder to a reel to copy all of its contents onto the reel.
- Drag a reel from the Desktop area to a library to make a copy.
- After deleting an element from the Media Panel, the current Source clip is no longer selected. Instead, a sibling of the deleted element is selected. In the case where there is no sibling left, the parent container is selected.