Use Distort to create warps and morphs of clips using spline-based shapes.
To access Distort, use:
-
Batch, then select a node from the Node bin.
-
Timeline, then use Batch FX (see Creating Batch FX).
-
Tools, then select from the menu (See Accessing Tools).
Distort accepts two front clips, two matte clips and one back clip as inputs, and outputs a result and an outmatte.
In Batch, you can create a more convincing morph, for example, by animating colour transitions between the first and second clips using Colour Corrector nodes.
The Distort controls are described as follows.
- Clip Display buttons
- Controls which clips, of those you load into Distort, are displayed. Use the Clip Display buttons to produce various effects, or to toggle on or off clips and mattes to facilitate your work.
- Axis controls
- Edits the axis position, scale, and shear value of a spline.
- Axis Stabilizer controls
- Gives access to the Stabilizer, for automatically tracking motion in the axis.
- View box
- Sets the view in the image window. Two views available from this box, Input and Matte, each correlate with two distinct views, Front1 and Front2, or Matte1 and Matte2. You toggle between the input or matte views using the Input box.

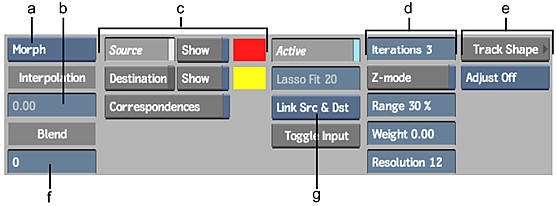
(a) Warper button (b) Interpolation field (c) Spline Display controls (d) Refining controls (e) Shape Stabilizer controls (f) Blend field (g) Link box
Tip: The distortion grid can be displayed by enabling Draw Grid in Distort's Setup menu. This can be useful when working with the Iterations and Range fields.