You must add texture components to the Border FX object of a lens flare to see a result. These components are textures that are attached to a Lens Flare Border FX object (or optionally, directly to a Rays or Blooming object). The Lens Flare Object menu has global settings for the complete lens flare, but each component texture has its own menu to control settings particular to it.
Each type of component can be added multiple times, each with its own settings. The following are the types of texture components you can add:
| Component: | Description: | Example: |
|---|---|---|
| Glint Texture | Star-like texture. |

|
| Glow Texture | Glowing loops of different colours. |

|
| Iris Texture | Multiple shapes, such as polygons, discs, orbs, or caustics. |

|
| Lens Texture | Lens "defects" such as hair, scratches, or fingerprints. |

|
| Ring Texture | Rings with multi-coloured loops. |

|
| Streak Texture | Lines streaking across the image. |

|
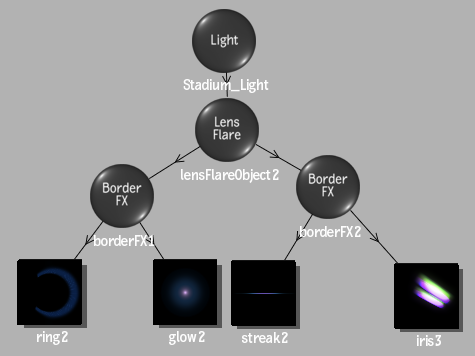
In the Action schematic, the components are attached to a Border FX object that is itself attached to the Lens Flare object. You can use multiple Border FX objects to achieve the lens flare look you want. For example, attach a ring and glow to one Border FX object, while a streak and iris are attached to another Border FX object. In this case, you can control how the lens flare behaves when it reaches the borders of your image differently for the components under each Border FX object.
Re-Texturing Components
Since the components are textures, you can also re-texture a component using a Diffuse Map with your own texture media applied. To do so, select the component in the schematic, then select the media you want to use from the media list, and double-click the Diffuse Map node in the node bin. In this case, the Pattern settings in the component menu are not applicable, though you can still use the settings in the Basics and Border FX tabs of the component menu, as well as the Diffuse menu settings.
Using Matchbox Textures with Lens Flares
You can also use a Matchbox shader to re-texture a lens flare component, by connected the Matchbox node to the component that you want to replace. Since Matchbox nodes can contain embedded textures in a texture grid, this is a good way to add your own real world lens flare elements, or even hijack the lens flare by texture bombing with your own graphic elements, such as logos. A number of lens flare Matchbox preset shaders are included in Flame.
You can also use lens flare components on their own as Substance Texture presets, as a LENSFLARE subfolder is available in the Substance presets browser. See Substance Textures for more information.