Exposing ShaderFX nodes as attributes
If you create a node in the ShaderFX editor, you can expose it as an attribute in the Attribute Editor. This way, you can tweak its value without having to open your ShaderFX editor.
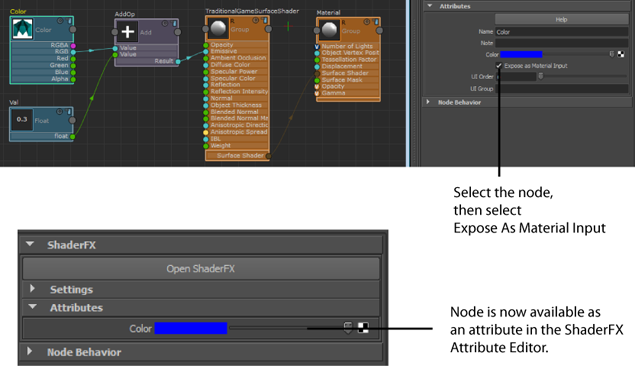
With the ShaderFX editor open, select the node and click Expose as Material Input from the ShaderfxShader Attribute Editor.
Now, when you close the ShaderFX editor, the attribute is available in the Attributes section of the Attribute Editor (ShaderfxShader tab). You can now adjust this attribute and see it update real time in the scene.
 on the node, the color in its preview swatch may not be in sync with its color in the Attribute Editor.
Grouping ShaderFX attributes in the Attribute Editor
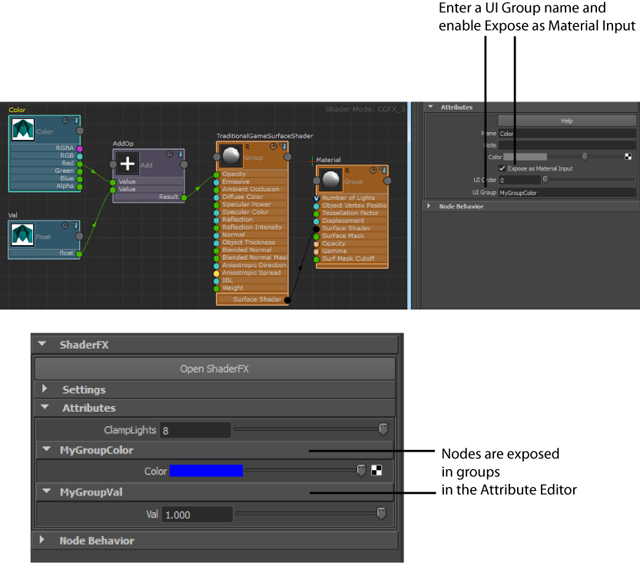
By default, all nodes with Expose As Material Input enabled are exposed in the Attribute Editor, and are grouped under Attributes. For better organization, you can provide a group name for each node, and each node is listed under its own group in the Attribute Editor.
In this example, the group name MyGroupColor is added to Color and MyGroupVal is added to the Float. Each node has its Expose as Material Input attribute enabled.
When you close the ShaderFX editor, Color is exposed under the category MyGroupColor and Val is exposed under the category MyGroupVal.

Adding ShaderFX nodes as settings
When in Advanced Mode, a few nodes also have an option named: Expose as Setting.
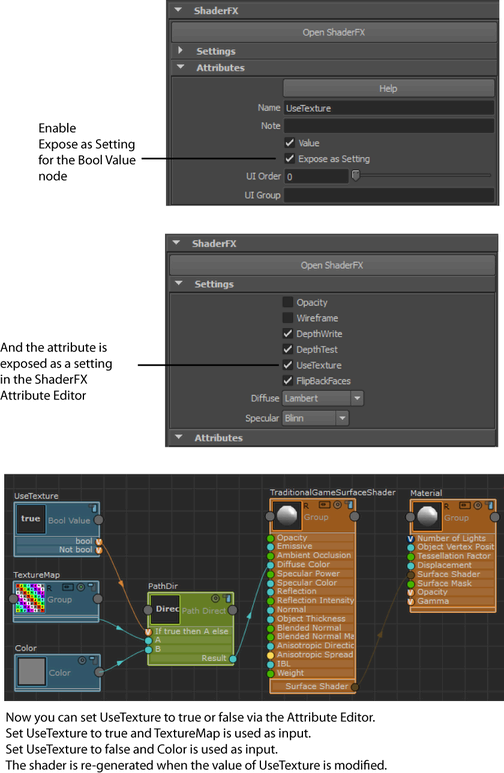
When this option is enabled, the parameter becomes available in the Settings section of the Attribute Editor.
Settings are different from Attributes in that they trigger the shader to be regenerated based on the new value of the setting, while attributes only update values inside the existing shader.
A setting is often used in combination with the Path Direction or Skip nodes to determine the path to take in the graph based on certain conditions. An example is enabling or disabling the use of tessellation or opacity.
In this example, a Bool Value node is created and renamed to UseTexture to better reflect its purpose. Its Expose as Setting attribute is enabled so that, when the ShaderFX editor is closed, you can set its value to true or false in the Settings section of the Attribute Editor. When UseTexture is set to true, TextureMap provides the diffuse color. When set to false, Color provides the diffuse color.
