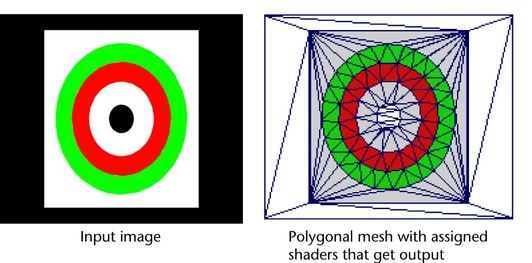
You can convert a texture image into a polygon mesh using Modify > Convert > Texture to Geometry. Texture to Geometry converts an image into geometry by creating a polygonal mesh that is subdivided based on the colors in the image. The subdivided faces on the mesh may then be assigned a shading material with a similar color to the original image. The subdivided polygonal mesh can be used as is or, if the image was mapped onto geometry it can be made to wrap around the original polygon mesh so that it appears in the same location as the original texture map.

Texture to Geometry is useful in the following situations:
- When you need to produce images containing texture maps using the Maya vector renderer. The vector renderer cannot render bitmap textures. The Texture to Geometry feature produces a polygonal mesh that wraps the object in the region of the texture and contains the correct color information on a face-by-face basis.
- When you want to use an image to define the edge boundary locations for faces on a polygonal mesh. Using this approach can save you time by not having to split each edge manually. You can use an image to define the edge locations instead.
For example, texture to geometry conversions can be used as an aid to converting shading material information to color per vertex information (CPV) for texture baking when CPV is the preferred workflow.
Texture baking is widely used in video game production whereby the pixels on a texture map are assigned RGB color values based on the lighting information that the surface mesh receives during rendering. Rather than rendering the lighting in real time, a texture map is produced or baked to make areas of the scene appear lit. This frees up the limited processing resources of the games console for other computational work that is required in real time.
Color per vertex information is widely supported and used in game consoles as a technique to display shading and illumination without having actual lights involved in the real-time render calculation. CPV quality is dependent on the level of detail in the polygon mesh and texture to geometry can enhance the results by adding polygon detail to the mesh where it is needed most to represent lit areas in the scene.
You first need to bake a texture using the Batch Bake feature to produce a texture map of the surface with lighting. You then use the Texture to Geometry feature to convert the baked texture information to geometry. Finally, use the Batch Bake feature one final time to convert the shading information produced by the Texture to Geometry feature to CPV (color per vertex information).
Texture to Geometry produces a polygonal mesh in four phases:
- Segmentation
-
Groups of pixels that have related RGB color values are detected in the specified image. The groups of pixels are then divided into distinct regions or segments.
- Surface meshing
-
The segments are converted into distinct triangular boundaries that define where the subdivision of the mesh will occur. The mesh is subdivided based on these boundaries.
- Surface fitting
-
The resulting polygonal mesh is produced to either lay flat in the scene view or is produced to wrap a specified object, slightly offset above the selected mesh in the scene view.
- Surface output
-
The subdivided faces on the resulting mesh are then assigned a shading material using the RGB color values that were detected in the segmentation phase.