Select
Edit > Transformation Tools > Move Keys Tool >
 to open the
Move Key Settings:
Move Settings
- Axis Orientation
-
Specifies the coordinate system for the Move Tool.Tip: Middle-click the
 button to toggle between the last two selected orientation modes.
- Object
-
Moves an object in object space coordinate system. Axis orientation includes rotations on the object itself. If several objects are selected, each object moves the same amount relative to its own object space coordinate system.
- World
-
(Default) Moves in the world space coordinate system. The object is aligned to the world space axis.
- Component
-
Moves selected components along an average local reference frame that is computed using component properties like the normal.
When an object is selected, moves the object in object space coordinate system.
Note: In Maya LT 2015 and earlier versions, Component mode was called Normals average mode. - Parent
-
Aligns the object to the rotation of the parent object. Movement is constrained to those axes in the local space coordinate system. The object is aligned to the rotation of the parent object and does not include the rotations on the object itself. If several objects are selected, each object moves the same amount relative to its own object space coordinate system.Note: In Maya 2015 and earlier versions, Parent mode was called Local mode.
- Normal
-
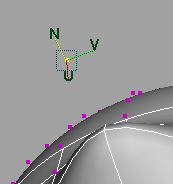
Moves selected vertices or CVs in the U or V direction of the surface. Typically you would use this option for small sets of CVs. The manipulator indicates the surface Normal, U, and V directions.

When you select Normal, the Update [UVN] Triad check box appears. Turned on, this option causes the manipulator orientation to reflect the moved surface rather than the original surface. This is the default. Turned off, the manipulator retains the orientation for the original surface.
- Along Rotation Axis
- Aligns to the Rotate Tool's axes on the object. If you have set the Rotate Axis in the object's Transform Attributes to a different value (which offsets the orientation of the object relative to the orientation of the object's local rotation axis) this attribute will have an affect; otherwise, Along rotation axis is the same as Object.
- Along Live Object Axis
-
(This setting does not work with Reflection on.) Sets the Move Tool to move objects along the axis of a live object. Most commonly, you would make a construction plane live, but any object can be set live. When you have a live object and select this option, the move arrows of the Move Tool align to the live construction plane. (The geometry of the live object doesn’t matter; the move aligns to the axes of the live object.)
- Custom
-
Lets you set a custom orientation. Custom axis orientation is automatically selected when you activate custom pivot editing mode. The offset coordinates update as you edit the orientation of the pivot. See Activate custom pivot editing mode.
You can orient the Move Tool's X-axis to a component in the scene by clicking beside the
Custom axis fields and selecting one of the following options:
Tip: Middle-click the
 button to activate the last selected option.
-
Set to Object: Sets the Move tool to move the selected object along another object's axis orientation.
- Set To Component: Sets the Move tool to move the selected object along an axis defined by selecting any component.
- Set To Point: Sets the Move tool to move the selected object along an axis defined by selecting a point.
- Set To Edge: Sets the Move tool to move the selected object along an axis defined by selecting an edge.
- Set To Face: Sets the Move tool to move the selected object along an axis defined by selecting a face.
- Reset: Resets the custom axis fields to 0.
-
- Pivot
- Edit Pivot
-
Activates custom pivot editing mode. See Activate custom pivot editing mode.
- Reset
-
Resets the custom pivot's position and orientation. See Reset the custom pivot.
- Position
-
When on, snaps the pivot position to the selected component. By default, pivot position snapping is turned on.
- Orientation
-
When on, snaps the pivot orientation to the selected component. By default, pivot orientation snapping is turned on.
- Pin Component Pivot
-
When on, locks your edits to the custom pivot in place, letting you use the same custom pivot to transform components on the same mesh or on a different mesh. See Pin the custom pivot.
Pivot pinning remains locked during component selection changes, object selection changes, and when you switch to Object selection mode.
Note: Pivot pinning is only available when a custom pivot is set. See Change the pivot point. - Transform Constraint
-
Lets you slide components along the edges or the surface of the active mesh.
You can turn on a transform constraint in the Modeling Toolkit or the tool settings for any of the transform tools.
Tip: Middle-click the button to toggle between the last selected transform constraint and
Off.
- Off
- (Default) Disables transform constraints. Lets you use the Move Tool to translate your components without a constraint.
- Edge
- Lets you slide the selected components along the edges of the active object. Slide polygon edges.
- Surface
- Lets you slide the selected components on the active object's surface. See
Move polygon components along a surface.
Note: You can also use Make Live to constrain tools to a surface. For example, you can use Make Live to constrain the Quad Draw tool to the surface of the mesh you want to retopologize. Transform constraints are disabled when Make Live is active. For more information on retopology, see Retopologize a mesh with Quad Draw.
- Along Normals
-
(Default) When on, the Move Tool snaps points onto the surface along the normal direction instead of using the closest point to the surface. Turn on Along Normals for predictable sliding behavior and to prevent points from popping off the surface of your mesh.Note: Along Normals only applies to the Transform Constraint options.
- Closest Point
-
When on, sliding components on a surface moves them in the direction of the closest point.Note: Closest Point only applies to the Transform Constraint options.
- Step Snap
-
Lets you maintain relative spacing while moving an object. Turn this option Off if you don’t want to preserve relative spacing while translating. Select Relative and enter a value to determine the amount an object is moved in increments.
In Maya LT 2015 and previous versions, Step Snap was called Step Size and was only available when Discrete Move was turned on.
Tip: Middle-click the button to toggle between
Relative and
Off.
- Preserve Children
-
When on, moving a parent object does not move its children.
Note: In Maya 2015 and earlier versions, Preserve Children was called Preserve Child Transform. - Preserve UVs
-
When this option is selected, moving components in the scene view causes the corresponding UVs to move accordingly in the UV space. The net result is that the texture does not become warped.
- Tweak mode
-
Allows you to quickly move components, position objects in a scene, and make adjustments to a specific mesh. See Move components with the Tweak mode.Note: If you set the active handle of the Show Manipulator tool to a particular axis while in Tweak mode, then the active handle will remain on the same axis even if you select multiple faces. If you want to use Tweak mode with the center handle, then make the center handle the default handle.