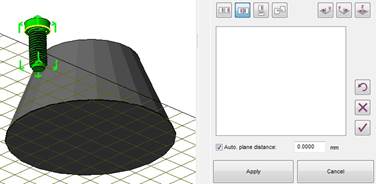
 By clicking on the Align icon or pressing F7, the Align mode is activated. You can control the orientation of parts either to the platform or to other parts. First, choose the part you want to align, then click the Align parts icon. A new tabsheet will open up on the right.
Then select how you want to align the part to the other part. You can:
 |
align parallel (both surfaces direct in the same direction) |
 |
align antiparallel (the surfaces direct in the opposite direction) |
 |
align perpendicular (one surface stands on the other one in a 90° angle) |
 |
translate two points (click on one point on each part and they will be laid on top of each other) |
 |
stack to parts over each other according to their axis’ orientation and center of gravity. |

First choose the part you want to align, then click on align parts. The new tabsheet offers various options for the alignment.
Click on the surface of the selected part which should be orientated, then click on the surface it should be aligned to on the other part. In the example of the screenshots, we want to align the bottom of the screw to the leaning side of the frustum of pyramid.
Example: Choose the second icon align antiparallel. After that, click on the bottom side of the screw head and then click on a leaning surface of the other part.
 The single steps of your alignment are now listed in the tabsheet. A new icon has appeared:
Set the distance of the two surfaces: When you open this dialog and type in 0.0mm for example, the part will be moved parallel so that the two surfaces have a distance of 0.0mm.
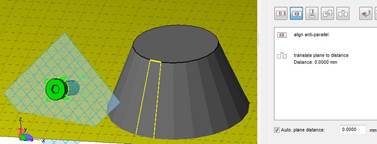
Result: The two selected surfaces are aligned in the opposite direction.
Now you have three options to continue with the calculations:

| You can undo unwanted steps. |
| You can undo all the steps at once and start again. |
| Apply the changes and stay in the alignment mode do continue with further actions. |
To move the two surfaces lying exactly on top of each other, choose Translate point and click on one point on the bottom of the screw head and on one point of the regarding surface of the frustum of pyramid. The two parts will be moved closely together. Click on apply and you can continue with other actions (for example the Boolean operation.
When you open the alignment mode a second time, you see three more icons on the upper right corner. With those you can align the surfaces to the x, y and z axis.
Left: The part is lying in a lean on the platform. Right: The part is aligned and laid down onto the bottom plane.
You can also disable the animation of the alignment. The part will then be placed without any delay. This can increase workflow speeds when aligning multiple parts.
When you have found the perfect alignment for your parts, click Apply in order to get back to the default mode.