![]() The advanced triangle selection can be accessed through the edit tab in the menu bar and gives you the possibility to select triangles that are not necessarily located next to each other by settings different parameters. It would be possible for example to select all triangles with a bad quality to replace them in order to get a nicer mesh.
The advanced triangle selection can be accessed through the edit tab in the menu bar and gives you the possibility to select triangles that are not necessarily located next to each other by settings different parameters. It would be possible for example to select all triangles with a bad quality to replace them in order to get a nicer mesh.
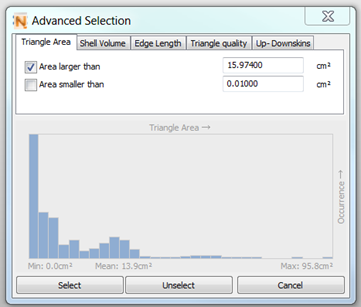
Chose the preferred criteria from the tabs. To set a value you can also click on the histogram to choose the respective triangles. Then click select to make the choice visible.
As you can see in the image above you can choose from these attributes: Triangle Area, Shell Volume, Edge Length, Triangle Quality, and Up- Downskins. You can decide whether the selected triangles are supposed to be above or below the set value, by checking the respective box. It is also possible to check both boxes to create a range. You can also click on the bars of the histogram, to set the values. Using the histogram when both boxes are checked will select the exact quantile reflected by the bar. Checking the upper box will select all triangles above the set threshold and vice versa.
Surface Selection Parameters
The selection of surfaces is closely related with the visualization settings for edges. Netfabb will interpret adjacent triangles as one surface, if the angle of the edge separating them is below the specification (and therefore is not visualized if the triangle mesh is switched off).
Additionally, by setting the selection tolerance at the bottom of the Status register, you can define the maximum angle between triangles becoming part of a surface and the triangle you click on.
So, when surfaces are selected, there are two different calculations for every triangle in question. First, the angle of the triangle to adjacent triangles which belong to the surface. Second, the angle of the triangle to the triangle clicked on. Both can be the limiting factor for the surface.
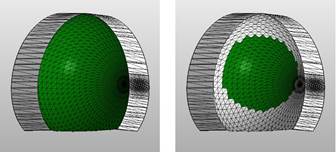
Surface selection limited by the visualization of edges (left) and the selection tolerance (right).
The Shell List
If you click on the Shells register in the tabsheet, you can obtain a list of all shells of the part. The following attributes of the shell are listed: Number of Triangles, overall area of all triangles, outbox volume (a cuboid frame enclosing the shell), shell volume, water tightness, orientability and outbox dimensions. The volume of the shell can only be given, if the shell is watertight. With the horizontal scroll bar below, you can scroll to the right to see all attributes. Optionally you can enlarge the whole context area (by drag & drop on the edge of the context area) to give the shell list more room.
If you click on one of these attributes, the shells are sorted according to that value, first from the highest to the lowest value and with another click from the lowest to the highest. This gives you a well-arranged overview over your shells.
If the box auto-select is ticked and you click on one of the shells, it is selected. It is marked blue in the list and, just as normal selections, green in the screen. If you hold Ctrl, shells can be added to or removed from the selection, although selections conducted in the screen will always be cleared. If you hold Shift, all shells are selected which are listed between the last shell you clicked on before holding shift and the shell you select now.
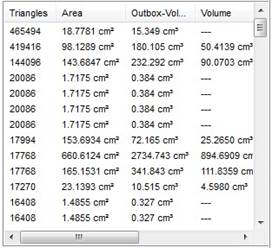
The Shells register in the tabsheet lists all shells of a part.
If you perform any editing or repairing function, naturally, the attributes of your shell change and the information given in the shell list may be invalid. In that case, the shells in the list are colored red. To update the list, click on the Refresh button below.
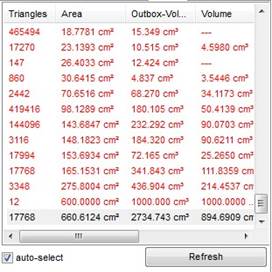
The red colored text indicates that the part has been edited and the shell list is no longer up-to-date. Choose Refresh to update it.
So, with the shell list, you can sort your shells according to certain attributes and select them. For example, if you have a part with many tiny shells which you want to remove, you can sort them according to their area and then select them by clicking on the first and then clicking on the last you want to select, holding shift. That way, all tiny shells are selected at once and can be removed with the Delete key.