 Parts in a project can easily be moved with the mouse by drag & drop, left-clicking on the green square of a selected part and moving the mouse. If more than one part is selected, they are all moved together.
For finer adjustment, selected parts can also be moved up, down, left and right with the arrow keys and backwards and forwards with the Page Up and Page Down keys. Normally, this movement is conducted in relation to the current perspective. If you hold Shift, the Left and Right keys move the part along the X-axis, Up and Down move it along Y-axis and Page Up and Page Down move it along the Z-axis. Alternatively, by clicking on the Move icon in the toolbar, choosing Move in the Part menu or context menu or by pressing M, the user is able to set specific coordinates in a dialog window, to which the selected parts are subsequently moved. At the top of the dialog, the current selection, the part’s position and size are specified. Below, coordinates can be inserted either as absolute position or as relative position. The absolute position is the position in relation to the coordinates X=0, Y=0, Z=0, whereas the relative position refers to the current position. If a part is moved to the origin, its outbox is positioned at the coordinates X=0, Y=0, Z=0. You can also move the center of the part to the origin or just move the part down to the platform.
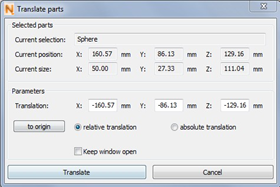
The dialog box for moving parts
If the box Keep window open is ticked, you can apply the changes by Translate, the dialog will stay open and you immediately can move the part again.