 There are machines on the market, which can read your simply sliced files and fill the part automatically. But there are also machines that need an exact toolpath for the laser and therefore you’ll have to create a specific filling. Choose Create Filling in the Extras submenu. With some production methods, you can adapt exposure strategy during production without changing the actual shape of a part.
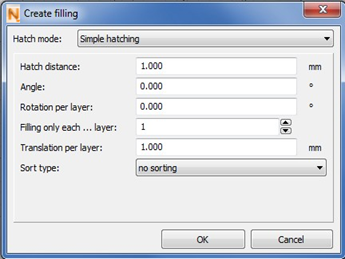
In the dialog box, there are three hatch modes available. With the simple hatching the slices will be filled with straight, solid lines. The Quad Islands mode divides each layer into squares and fills them alternately with vertical and horizontal lines.
The third mode, the Stripe hatching, adds dashed lines as filling to the part. For the simple mode, you can insert the Hatch distance. To know the correct distance, it is important to know the specifications of your machine. The Quad Islands mode also requires the width and height of the quads. And for the stripe hatching, determine the hatch distance, stripe width and stripe gap.

The dialog box for creating a filling.
The angle determines the direction of the hatches, referring to the X-axis with a clockwise rotation. Thus, if you leave 0°, the hatches will be inserted along the X-axis. If you insert 90°, they will run along the Y-axis.
The Rotation per Layer can be used to give the hatches of different layers different directions. In that case, only the first layer of hatches has the angle specified above. After that, the angle changes with every layer (going upwards) by the degree you enter here.
If you increase the number for Filling only each ... layer, not every layer of the original contour will be filled. If you insert 2, for example, there will be one filling layer for every second contour layer.
The Translation per Layer determines, if and how far the hatches are shifted with

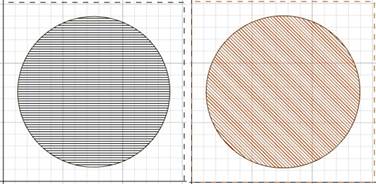
A round contour with filling: first, a filling with an angle of 0°, then with an angle of 45°.

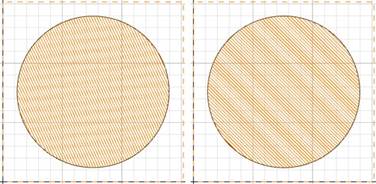
Two consecutive layers of the same slice file with a rotation of 20° per layer.
each layer. If you insert zero, the hatches of the slice layers will be on top of each other. If you insert 1.0, the hatch lines are upwards shifted by one mm with each layer, going from the top to the bottom layer.
With the rotation and the translation per layer, you can avoid that the filling hatches are exactly on top of each other. With some production methods, this could lead to lower part quality and instability.
Some machines, for example metal sinter machines, require a specific direction the laser traces the filling. The Sort type controls this tool path of the laser and you can choose between the five options no sorting or to sort from right to left, from left to right, from top to bottom and from bottom to top.
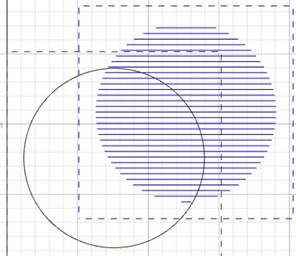
The filling is inserted as new slice file when you click on OK. It is treated as independent object in the Slice Commander and in the project tree.

Here, the filling is moved out of the contour as an independent slice.