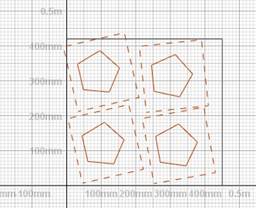
The most obvious difference of the Slice Commander to the normal mode is that the screen is underlaid by a two-dimensional coordinate system, showing the slices in the X/Y plane. If the option Show platform is activated in the View menu, the outline of the platform is shown in the slices screen. This is very helpful when you position your slices and prepare you build data for prints, especially combined with the option Show Outbox. The platform can only be seen in layers where it really is.
Below this screen, the position of the mouse cursor is specified, whereas the position on the Z-axis depends on which slice you are watching (changed with the scroll bar in the context area).

The screen of the Slice Commander with the coordinate system, the platform and four slice files with their outbox. Thanks to the outbox of the top left slice, you can see that this slice may stand out of the platform.

The coordinates of the mouse cursor, as specified below the viewing screen.
Zoom Options for Slices
As the slices are two-dimensional, it is not necessary and not possible to change the perspective. But apart from this, the viewing of slices in the slice screen works very similar to those in the main screen.
You can shift the view by holding the central mouse button and moving the mouse. If you do not have a central mouse button, hold Shift and the right mouse button. With the scroll button of the mouse, you can zoom in and out. If you do not have a scroll button, hold both Ctrl and the right mouse button and move the mouse up and down.
 Also, you can use one of three
default zoom options available in the toolbar: Zoom to selected slices, zoom to all slices, or zoom to a selection rectangle you draw with your left mouse button.
Visualizations
For the visualization of the slices, you can show and hide slices, change their color and three options in the context menu.
 Slices can be
hidden or shown by clicking on the eye next to the slice’s name in the project tree or in the context menu. Hiding slices that do not need attention for the moment can be helpful to keep, if you have many different slices.
 The
color can be changed with an option in the context menu. It’s exactly as with three-dimensional parts in the standard module.
In the context menu after right-clicking on a selected slice, you find the following visualization options:
The outbox is the border of a slice file. It is always rectangular, regardless of the shape of the slices, and is adjusted to the layer with the widest expansion. If Show Outbox is activated, the outbox is represented by a dashed line. This is especially interesting, when parts are not selected. Otherwise the selection box may cover the outbox.
With Show Points, all corner points of contours and all end points of hatches are highlighted. This can include points on straight lines, as in the slicing process, a point is inserted at every place where in the original three-dimensional part a triangle edge was running over a surface.
Show Filling fills the contours of a slice with a very fine grid. In the settings, you can edit the grid size of the filling and you can choose to display only the horizontal or only the vertical lines. With default settings, the grid size is very small, and the filling looks like one colored surface, if you do not zoom in.

Left: Selection box (outside) and outbox (inside) of a rotated slice. Center: Show Points. Right: Show Filling.

Zoom in to see the grid lines the filling.