Many elements of the graphics and display options for views are exposed via the API.
Display settings
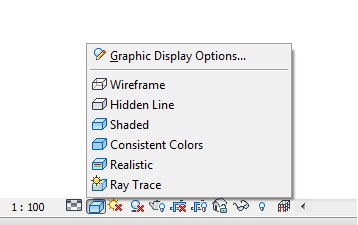
The view class has properties to get and set the display style settings and the detail level settings. The View.DisplayStyle property uses the DisplayStyle enumeration and corresponds to the display options available at the bottom of the Revit window as shown below.
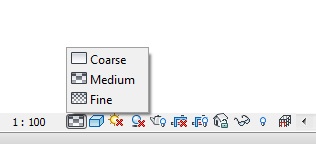
The View.DetailLevel property uses the ViewDetailLevel enumeration and corresponds to the detail level options available at the bottom of the Revit window as shown below.

The ViewDetailLevel enumeration includes Undefined in the case that a given View does not use detail level.
Thin Lines
The Thin Lines option, available in the Revit UI on the Graphics panel of the View tab, controls how lines are drawn in a view. Typically, when you zoom in on a model in a small scale view, element lines appear much thicker than they actually are. When Thin Lines is enabled, all lines are drawn as a single width regardless of zoom level. This option is made available via the ThinLinesOptions utility class, which has a property called AreThinLinesEnabled. It is a static property which affects the entire Revit session.
Temporary view modes
The TemporaryViewModes class allows for control of temporary view modes. It can be accessed from the View.TemporaryViewModes property. For views that do not support temporary view modes, this property will be null. The RevealConstraints, RevealHiddenElements and WorksharingDisplay properties can be used to get and set the current state of these modes in the corresponding view. Note that some modes are only available in certain views and/or in a certain context. Additionally an available mode is not necessarily enabled in the current context. The TemporaryViewModes methods IsModeAvailable() and IsModeEnabled() can be used to test that a particular mode is both available and enabled before use. These methods take a TemporaryViewMode enum. The possible options are shown below.
|
Member Name |
Description |
|
RevealHiddenElements |
The reveal hidden elements mode |
|
TemporaryHideIsolate |
The temporary hide/isolate mode |
|
WorksharingDisplay |
One of the worksharing display modes |
|
TemporaryViewProperties |
The temporary View Properties mode |
|
Raytrace |
The mode that shows the model in interactive raytracing |
|
ExplodedView |
The mode that shows the model in exploded view and allows user changes/configurations |
|
RevealConstraints |
The mode that reveals constraints between elements in the model |
|
Code Region: Reveal hidden elements in a view |
public bool RevealHiddenElementsInView(View view)
{
    bool hiddenRevealed = false;
    TemporaryViewModes viewModes = view.TemporaryViewModes;

    if (viewModes == null)
    {
        TaskDialog.Show("Invalid View", "This view does not support temporary view modes.");
    }
    else
    {
        // Mode must be available and enabled to be activated
        if (viewModes.IsModeEnabled(TemporaryViewMode.RevealHiddenElements) && viewModes.IsModeAvailable(TemporaryViewMode.RevealHiddenElements))
        {
            viewModes.RevealHiddenElements = true;
            hiddenRevealed = viewModes.RevealHiddenElements;
        }
    }

    return hiddenRevealed;
}
|
The TemporaryViewModes.IsModeActive() method tests whether a given mode is currently active in the view. Use the DeactivateAllModes() method to deactivate all currently active views, or use DeactiveMode() to deactivate a specific mode.
The PreviewFamilyVisibility property gets and sets the current state of the PreviewFamilyVisibility mode in the associated view. This mode is only available when the document of the view is in the environment of the family editor. This property is a PreviewFamilyVisibilityMode enumerated value rather than a bool. Possible states for this mode are:
|
Member Name |
Description |
|
Off |
Element Visibility is not applied. All family elements visible. |
|
On |
Element Visibility of a view is applied to show visible elements only. Elements that are cut by a reference plane will be shown with their respective cut geometry. |
|
Uncut |
Element Visibility of a view is applied to show elements visible if instance is not cut. Note that this state is only available in certain views, such as floor plan and ceilings. |
Even if the PreviewFamilyVisibility mode is available and enabled for a view, not all states are valid in all views. Before applying one of these states to a view, call IsValidState() to ensure it can be applied.
|
Code Region: Turn off preview family visibility mode |
public void TurnOffFamilyVisibilityMode(View view)
{
    TemporaryViewModes viewModes = view.TemporaryViewModes;

    if (viewModes != null)
    {
        if (viewModes.IsModeAvailable(TemporaryViewMode.PreviewFamilyVisibility) && viewModes.IsModeEnabled(TemporaryViewMode.PreviewFamilyVisibility))
        {
            if (viewModes.IsValidState(PreviewFamilyVisibilityMode.Off))
            {
                viewModes.PreviewFamilyVisibility = PreviewFamilyVisibilityMode.Off;
            }
        }
    }
}
|
When a view is opened for the first time, its state of the PreviewFamilyVisibility mode is determined based on the default settings which is controlled through the static TemporaryViewModes properties PreviewFamilyVisibilityDefaultOnState and PreviewFamilyVisibilityDefaultUncutState as shown below.
|
Code Region: Set default preview family visibility state |
public void SetDefaultPreviewFamilyVisibilityState()
{
    TemporaryViewModes.PreviewFamilyVisibilityDefaultOnState = true;
    TemporaryViewModes.PreviewFamilyVisibilityDefaultUncutState = true;
}
|
The PreviewFamilyVisibilityDefaultOnState value controls whether each newly opened view is to have the PreviewFamilyVisibility mode turned On by default or not. This property is applicable to all types of views. Views that support both cut and uncut previews (such as floor plans) will use the cut/uncut state indicated by the PreviewFamilyVisibilityDefaultUncutState property, but only if the PreviewFamilyVisibilityDefaultOnState property is set to true.
These settings are applicable to the whole application rather than to individual family documents; the values persists between Revit sessions. Although the value is allowed to be set at any time, any changes made after the Revit application has been initialized will not have effect until the next session of Revit.
Note that once the PreviewFamilyVisibility property is explicitly modified, the applied setting stays in effect for the respective view even after the view is closed and later reopened again.
Element visibility in a view
Views keep track of visible elements. All elements that are graphical and visible in the view can be retrieved using a FilteredElementCollector constructed with a document and the id of the view. However, some elements in the set may be hidden or covered by other elements. You can see them by rotating the view or removing the elements that cover them. Accessing these visible elements may require Revit to rebuild the geometry of the view. The first time your code uses this constructor for a given view, or the first time your code uses this constructor for a view whose display settings have just been changed, you may experience a significant performance degradation.
Individual elements can be hidden in a particular view. The method Element.IsHidden() indicates if an element is hidden in the given view, and Element.CanBeHidden() returns whether the element can be hidden. To hide individual elements, use View.HideElements() which takes a collection of ElementIds corresponding to the elements you wish to hide.
Element visibility can also be changed by category.
- The View.GetCategoryHidden() method queries a category id to determine if it is hidden or visible in the view.
- The View.SetCategoryHidden() method sets all elements in a specific category to hidden or visible.
- The View.CanCategoryBeHidden() method indicates if a specific category of elements can be hidden in the view.
A FilteredElementCollector based on a view will only contain elements visible in the current view. You cannot retrieve elements that are not graphical or elements that are invisible. A FilteredElementCollector based on a document retrieves all elements in the document including invisible elements and non-graphical elements. For example, when creating a default 3D view in an empty project, there are no elements in the view but there are many elements in the document, all of which are invisible.
The following code sample counts the number of wall category elements in the active document and active view. The number of elements in the active view differs from the number of elements in the document since the document contains non-graphical wall category elements.
|
Code Region: Counting elements in the active view |
private void CountElements(UIDocument uiDoc)
{
    StringBuilder message = new StringBuilder();
    FilteredElementCollector viewCollector =
        new FilteredElementCollector(uiDoc.Document, uiDoc.ActiveView.Id);
    viewCollector.OfCategory(BuiltInCategory.OST_Walls);
    message.AppendLine("Wall category elements within active View: "
        + viewCollector.ToElementIds().Count);

    FilteredElementCollector docCollector = new FilteredElementCollector(uiDoc.Document);
    docCollector.OfCategory(BuiltInCategory.OST_Walls);
    message.AppendLine("Wall category elements within document: "
        + docCollector.ToElementIds().Count);

    TaskDialog.Show("Revit", message.ToString());
}
|
Temporary view modes can affect element visibility. The View.IsInTemporaryViewMode() method can be used to determine if a View is in a temporary view mode. The method View.IsElementVisibleInTemporaryViewMode() identifies if an element should be visible in the indicated view mode. This applies only to the TemporaryHideIsolate and AnalyticalModel view modes. Other modes will result in an exception.
Depth Cueing
The ViewDisplayDepthCueing class provides control of the display of distant objects in section and elevation views. When depth cueing is active, objects blend into the background color (fade) with increasing distance from the viewer. The current depth cueing settings for a view can be retrieved using View.GetDepthCueing(). If changes are made to the returned ViewDisplayDepthCueing, they will not be applied to the view until calling View.SetDepthCueing().
The ViewDisplayDepthCueing class has the following properties:
|
Member Name |
Description |
|
EnableDepthCueing |
True to enable depth cueing. |
|
StartPercentage |
Indicates where depth cueing begins. A value of 0 indicates that depth cueing begins at the front clip plane of the view. |
|
EndPercentage |
Indicates where depth cueing ends. Objects further than the end plane will fade the same amount as objects at the end plane. A value of 100 indicates the far clip plane. |
|
FadeTo |
Indicates the maximum amount to fade objects via depth cueing. A value of 100 indicates complete invisibility. |
The SetStartEndPercentages() method can be used to set the start and end percentages in one call.
The following example demonstrates how to get the current depth cueing, change its properties and set it back to the view. Note that not all views can use depth cueing.
|
Code Region: Change the depth cueing for a view |
private void AdjustDepthCueing(View view)
{
    if (view.CanUseDepthCueing())
    {
        using (Transaction t = new Transaction(view.Document, "Change depth cueing"))
        {
            t.Start();
            ViewDisplayDepthCueing depthCueing = view.GetDepthCueing();
            depthCueing.EnableDepthCueing = true;
            depthCueing.FadeTo = 50;    // set fade to percent
            depthCueing.SetStartEndPercentages(0, 75);
            view.SetDepthCueing(depthCueing);
            t.Commit();
        }
    }
}
|