Plan views are level-based. There are three types of plan views: floor plan view, ceiling plan view, and area plan view.
Creating plan view
-
Generally the floor plan view is the default view opened in a new project.
-
Most projects include at least one floor plan view and one ceiling plan view.
-
Plan views are usually created after adding new levels to the project.
Adding new levels using the API does not add plan views automatically. Use the static ViewPlan.Create() method to create new floor and ceiling plan views. Use the static ViewPlan.CreateAreaPlan() method to create a new area plan view.
|
Code Region: Creating Plan Views |
public static ViewPlan ViewPlan.Create(Document document, ElementId viewFamilyTypeId, ElementId levelId); public static ViewPlan ViewPlan.CreateAreaPlan(Document document, ElementId areaSchemeId, ElementId levelId); |
The viewFamilyTypeId parameter in ViewPlan.Create() needs to be a FloorPlan, CeilingPlan, AreaPlan, or StructuralPlan ViewType. The levelId parameter represents the Id of the level element in the project to which the plan view is associated.
The following code creates a floor plan and a ceiling plan based on a certain level.
|
Code Region: Creating a floor plan and ceiling plan |
private void CreateViewPlan(Autodesk.Revit.DB.Document document)
{
    FilteredElementCollector collector = new FilteredElementCollector(document);
    IList<Element> viewFamilyTypes = collector.OfClass(typeof(ViewFamilyType)).ToElements();
    ElementId floorPlanId = new ElementId(-1);
    foreach (Element e in viewFamilyTypes)
    {
        ViewFamilyType v = e as ViewFamilyType;

        if (v != null && v.ViewFamily == ViewFamily.FloorPlan)
        {
            floorPlanId = e.Id;
            break;
        }
    }

    ElementId ceilingPlanId = new ElementId(-1);
    foreach (Element e in viewFamilyTypes)
    {
        if (e.Name == "Ceiling Plan")
        {
            ceilingPlanId = e.Id;
            break;
        }
    }

    // Create a Level and a Floor Plan based on it
    double elevation = 10.0;
    Level level1 = Level.Create(document, elevation);
    ViewPlan floorView = ViewPlan.Create(document, floorPlanId, level1.Id);

    // Create another Level and a Ceiling Plan based on it
    elevation += 10.0;
    Level level2 = Level.Create(document, elevation);
    ViewPlan ceilingView = ViewPlan.Create(document, ceilingPlanId, level2.Id);
}
|
Plan view properties
After creating a new plan view, the Discipline for the view can be set using the Discipline parameter which is type ViewDiscipline. Options include Architectural, Structural, Mechanical, Electrical, Plumbing and Coordination.
For structural plan views, the view direction can be set to either Up or Down using the ViewFamilyType.PlanViewDirection property. Although it is a property of the ViewFamilyType class, an exception will be thrown if the property is accessed for views other than StructuralPlan views.
View range
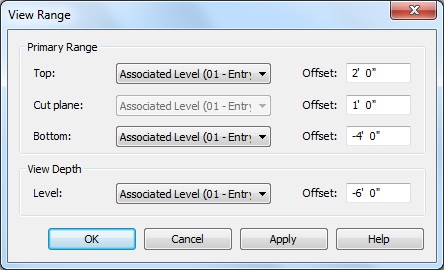
The view range for plan views can be retrieved via the ViewPlan.GetViewRange() method. The returned PlanViewRange object can be used to find the levels which a plane is relative to and the offset of each plane from that level. It is the same information that is available in the View Range dialog in the Revit user interface:

The following example shows how to get the top clip plane and the associated offset for a plan view
|
Code Region: Getting information on the view range |
private void ViewRange(Document doc, View view)
{
    if (view is ViewPlan)
    {
        ViewPlan viewPlan = view as ViewPlan;
        PlanViewRange viewRange = viewPlan.GetViewRange();

        ElementId topClipPlane = viewRange.GetLevelId(PlanViewPlane.TopClipPlane);
        double dOffset = viewRange.GetOffset(PlanViewPlane.TopClipPlane);

        if (topClipPlane.IntegerValue > 0)
        {
            Element levelAbove = doc.GetElement(topClipPlane);
            TaskDialog.Show(view.Name, "Top Clip Plane: " + levelAbove.Name + "\r\nTop Offset: " + dOffset + " ft");
        }
    }
}
|
Plan view underlay
The top and base levels of the underlay range can be retrieved and set from ViewPlan. Use GetUnderlayBaseLevel() and SetUnderlayBaseLevel() to access the base level for the underlay range. If the base level id is InvalidElementId then the underlay base level is not set and no elements will be displayed as underlay. When setting the base level for the underlay range, the elevation of the next highest level will be used to determine the top of the underlay range. If the level specified for the base level is the highest level, the underlay range will be unbounded and will consist of everything above the specified level.
Use GetUnderlayTopLevel() and SetUnderlayRange() to access the top level for the underlay range. If GetUnderlayTopLevel() returns InvalidElementId and the underlay base level is a valid level, then the underlay range is unbounded, and consists of everything above the underlay base level. To set the top level, you must use SetUnderlayRange() which takes ElementIds for both the base and top levels. This method will throw an exception if the elevation of the top level is not greater than the elevation of the base level.
Use the GetUnderlayOrientation() and SetUnderlayOrientation() methods to control how elements in the underlay are viewed. The UnderlayOrientation is either LookingDown (underlay elements are viewed as if looking down from above ) or LookingUp (underlay elements are viewed as if looking up from below).
The following code sets the underlay range if the current orientation is LookingDown and the top level Id is different than the new value. Then the orientation is changed to LookingUp.
|
Code Region: Change the view underlay range |
private void ViewUnderlay(ViewPlan planView, ElementId topLevelId, ElementId baseLevelId)
{
    if (planView.GetUnderlayOrientation() == UnderlayOrientation.LookingDown)
    {
        if (planView.GetUnderlayTopLevel() != topLevelId)
        {
            planView.SetUnderlayRange(baseLevelId, topLevelId);
        }

        planView.SetUnderlayOrientation(UnderlayOrientation.LookingUp);
    }
}
|