A tag is an annotation used to identify drawing elements. The API exposes the IndependentTag and RoomTag classes to cover most tags used in the Revit application. For more details about RoomTag, see Rooms.
Table 37: Tag Name and Category
|
Tag Name |
BuiltInCategory |
|
Keynote Tag |
OST_KeynoteTags |
|
Beam System Tag |
OST_BeamSystemTags |
|
Electronic Circuit Tag |
OST_ElectricalCircuitTags |
|
Span Direction Tag |
OST_SpanDirectionSymbol |
|
Path Reinforcement Span Tag |
OST_PathReinSpanSymbol |
|
Rebar System Span Tag |
OST_IOSRebarSystemSpanSymbolCtrl |
Every category in the family library has a pre-made tag. Some tags are automatically loaded with the default Revit application template, while others are loaded manually. The IndependentTag objects return different categories based on the host element if it is created using the By Category option. For example, the Wall and Floor IndependentTag are respectively OST_WallTags and OST_FloorTags.
If the tag is created using the Multi-Category or Material style, their categories are respectively OST_MultiCategoryTags and OST_MaterialTags.
|
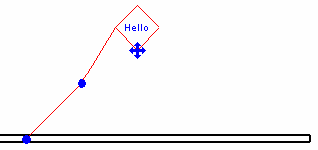
Code Region 16-5: Creating an IndependentTag |
private IndependentTag CreateIndependentTag(Autodesk.Revit.DB.Document document, Wall wall)
{
    // make sure active view is not a 3D view
    Autodesk.Revit.DB.View view = document.ActiveView;

    // define tag mode and tag orientation for new tag
    TagMode tagMode = TagMode.TM_ADDBY_CATEGORY;
    TagOrientation tagorn = TagOrientation.Horizontal;

    // Add the tag to the middle of the wall
    LocationCurve wallLoc = wall.Location as LocationCurve;
    XYZ wallStart = wallLoc.Curve.GetEndPoint(0);
    XYZ wallEnd = wallLoc.Curve.GetEndPoint(1);
    XYZ wallMid = wallLoc.Curve.Evaluate(0.5, true);

    IndependentTag newTag = document.Create.NewTag(view, wall, true, tagMode, tagorn, wallMid);
    if (null == newTag)
    {
        throw new Exception("Create IndependentTag Failed.");
    }

    // newTag.TagText is read-only, so we change the Type Mark type parameter to
    // set the tag text.  The label parameter for the tag family determines
    // what type parameter is used for the tag text.

    WallType type = wall.WallType;

    Parameter foundParameter = type.LookupParameter("Type Mark");
    bool result = foundParameter.Set("Hello");

    // set leader mode free
    // otherwise leader end point move with elbow point

    newTag.LeaderEndCondition = LeaderEndCondition.Free;
    XYZ elbowPnt = wallMid + new XYZ(5.0, 5.0, 0.0);
    newTag.LeaderElbow = elbowPnt;
    XYZ headerPnt = wallMid + new XYZ(10.0, 10.0, 0.0);
    newTag.TagHeadPosition = headerPnt;

    return newTag;
}
|

Figure 74: Create IndependentTag using sample code