Next, we apply the forces to the ends of the handles. Use surface forces, which will distribute the load over the area at the end of the handle.
- Select
 View
View  Navigate Enclose (Fit All). This command is also available from the Navigation Bar.
 - With the
 Selection Shape Point or Rectangle and
  Selection Select Surfaces commands active, click and drag to draw a selection rectangle around the end of the upper handle, as shown below.
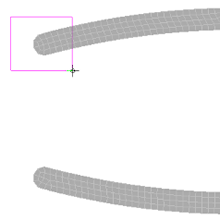
- Click
 Setup Loads Force. One surface was selected at the end of the handle, as indicated in the title bar of the dialog.
 - Type -20 in the Magnitude field.
- Select the Y radio button. This adds a downward (-Y) force because of the negative value entered into the Magnitude field.
- Click OK.
- Draw a box enclosing the end of the lower handle.
- Click Setup Loads Force.
- Type 20 in the Magnitude field.
- Select Y to add an upward force.
- Click OK.