Before users can work with the Project Explorer to create and manage new designs, you must use the Project Explorer Configuration dialog box to set up the Project Explorer.
- Click Configuration tab
 Setup panelManage Projects.
 - On the Provider and Files page, specify the provider, the drawing templates or template folder to use, and the drawing storage location.
The templates you specify are available to users when they create a new design in Project Explorer.
To create subfolders for work orders when users create new projects in the Project Explorer, click Auto-create Sub-folders For Work Orders Under Storage Location.
- The Attribute Settings page lists the attributes in the specified template or set of templates. Select each attribute in turn and specify the following:
- For Level, select Project, Work Order, Design Drawing, or <Do Not Use>.
Use the Level setting to specify the Project Explorer level at which the attribute is displayed.
- Use the Label field to specify the name to use for the attribute in the Project Explorer.
By default the attribute name from the template is used. Modify each attribute name as needed for display in the Project Explorer.
- Use the Data Type list to specify the data type for each attribute.
The data type for each attribute is String by default. Modify the data type for each attribute as needed.
- Select Is Read-only to make the attribute value read-only in the Information pane of the Project Explorer.
- Select Is Shown to make the attribute visible in the Information pane of the Project Explorer.
When you are finished configuring the Project Explorer, it will look something like the following example.
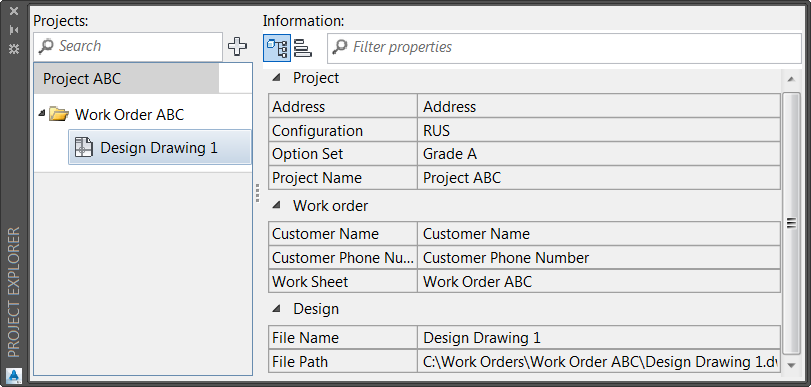
The FileName and FilePath attributes are generated by Utility Design and are assigned to the Design Drawing level. You can use the Label field to change these names.
- For Level, select Project, Work Order, Design Drawing, or <Do Not Use>.
- Use the Key Mappings page, to create mappings between template attributes and settings that the Project Explorer uses to identify Projects, Work Orders, and Design Drawings:
- Display Name: Specify the attribute that contains the display name for each Project, Work Order, and Design Drawing in the Project Explorer lists.
If you set Display Name to <Do Not Use>, the Reference ID attribute is used for the display name.
- Reference ID: Specify the template attribute to map to the Reference ID for the Project, Work Order, and Design Drawing.
The Reference IDs for Project, Work Order, and Design Drawing are used in the New Design dialog box in the Project Explorer as shown in the following illustrations.
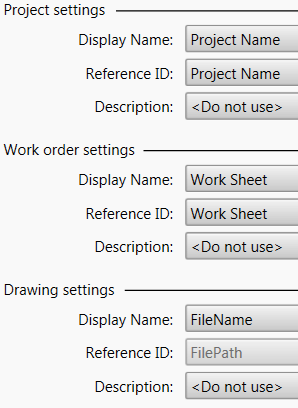
Configuring Reference IDs
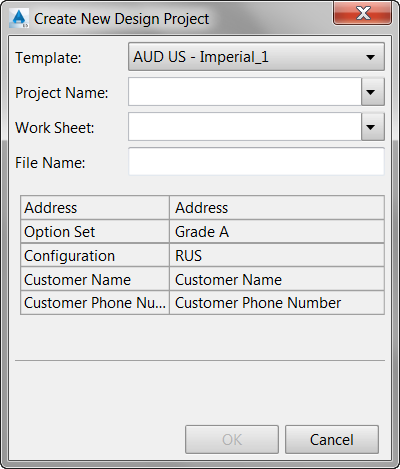
Reference IDs in New Design Dialog Box
- Description: Specify the attribute that contains the tooltip text to display when you hover over Project, Work Order, and Design Drawings in the Project Explorer lists.
- Display Name: Specify the attribute that contains the display name for each Project, Work Order, and Design Drawing in the Project Explorer lists.
- On the New Design Dialog page, specify a title and any attributes you want to require in the New Design dialog box.
- Click Finish.