Before you start: See Solidworks Installation Readme Information for important information and system requirements, including supported operating systerms and versions of SolidWorks.
Install the SolidWorks Server
Install the SolidWorks server component so you can enable access from the Autodesk Vault Professional SolidWorks client and index SolidWorks file properties. This must be done on the computer hosting the Vault Server.
- Run the server EXE file.
- Proceed through the Welcome screen and accept the license agreement. Click Next.
- Proceed through the remaining prompts and click Install to finish the installation.
Install the SolidWorks Client
- In-CAD data management capabilities: Includes a Vault menu and Browser, allowing users to check in, check out, open and insert from Vault, as well as view file status and manage lifecycle.
- Vault Explorer extensions: Includes SolidWorks Plot Manager.
- Autodesk Vault Professional Autoloader for SolidWorks: Used to bulk upload SolidWorks files to Vault.
- Autodesk for Vault Professional and Solidworks: Used to automate DWF creation and property sync tasks for SolidWorks files; this cannot be installed on a CAD user’s computer, but rather on a separate, purpose-built Job Processor.
Before installing, make sure you have supported versions of SolidWorks CAD and the Vault Professional client (Vault Explorer) installed on the computer.
- Run the Client EXE.
- Proceed through the Welcome screen and accept the license agreement.
- Select the Typical option to install the Autodesk Vault Professional SolidWorks Add-in.
Note: If you select Custom, make sure that Jobserver is not selected. Installing it on a computer that has CAD installed will disable the CAD system dialog boxes.

- Proceed through the remaining prompts to finish the installation.
- The Windows Start Menu should contain a shortcut for .
- The Vault Explorer should have a command button and File menu option to access the SolidWorks Plot Manager.
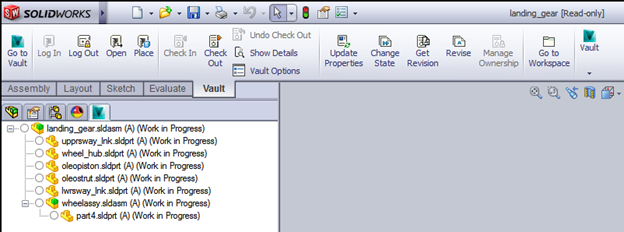
- SolidWorks should have a Vault ribbon menu containing Vault commands, as well as a Vault Browser Panel displaying file status.

Install the SolidWorks Jobserver (Job Processor)
The Jobserver (also known as a Job Processor) is used to batch update DWF files and sync properties. You should install it on a separate, dedicated computer for this purpose. The Jobserver can be configured to create DWF files on check-in and during auto-loading, or to update single DWF views from the Vault Explorer. Because the Job Processor needs to open file content to create the visualization, the job processor computer must have a SolidWorks license in order to interact with properties and create visualization files (DWF).
- Supported version of SolidWorks CAD
- Supported version of Vault Professional client (Vault Explorer)
- Autodesk Vault Professional SolidWorks Add-in (Client)
The SolidWorks Job Processor cannot be installed on a CAD user’s machine because it suppresses the SolidWorks user interface. Make sure you install it on a separate, dedicated computer.
Install the SolidWorks Jobserver
- On the dedicated machine, run the Client EXE.
- Proceed through the Welcome screen and accept the license agreement.
- Select the Custom option.
- Click the down arrow next to SolidWorks Addin
<year>
JobServer and select one of the following options:
- Will be installed on local hard drive (Recommended)–installs the JobServer on the current drive.
- Entire feature will be installed on local hard drive–installs the JobServer and all of the associated features on the local hard drive.
- Feature will be installed when required–installs the JobServer the first time it is needed.
- Entire feature will be unavailable– the SolidWorks Addin 2017 JobServer features will be unavailable in any Vault Add-in for SolidWorks workflow.
- Proceed through the remaining prompts to finish the installation.
Troubleshoot the Installation
Logs
During installation, log information is written to your %temp% folder.
CAD Add-In Menu
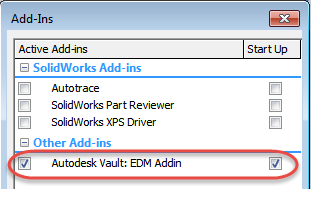
If after installing the SolidWorks client you are unable to see any of the Vault Menu items or browser, you should check that the add-in has loaded correctly.
- From the SolidWorks Options menu, select Add-ins.
- Make sure that
Autodesk Vault: EDM Add-in is active and set to load on startup.

CAD Add-in Dialog Appearance
If after installation you are able to see the Autodesk Vault Menu and Browser but are not able to log in to Vault or see any other dialog boxes, make sure that the Jobserver has not been installed locally. If it has, you will not be able to access SolidWorks dialog boxes. You must uninstall Jobserver to resolve this.
Connection Troubleshooting
The SolidWorks client may not be able to connect to the Vault Server due to firewalls, connection timeout, SQL service interruption, DNS issues, incorrect server details or user credentials, or other issues. See the Autodesk Vault Support page at http://knowledge.autodesk.com/support/vault-products for help.