There are some specific techniques for rendering your animation into a movie file. You can render directly to a movie format such as AVI. Alternatively, you can render a sequence of still image files to a file format such as TGA, and then use the RAM Player to save them into a movie. The latter method is the recommended choice. It requires a few more steps than rendering directly to a movie format, but it gives you more control over the file size and quality of the output. In addition, if you have frames that have artifacts or other errors, you can repair or remove them. You can also use the individual frames in compositing or other post-processing.
This animation will take some time to render.
Set up the lesson:
- From the
\animation\walkthrough_asst
folder,
 open
great_wall_render.max.
Tip: If the Units Mismatch dialog displays, choose Adopt The File's Unit Scale and then click OK.
open
great_wall_render.max.
Tip: If the Units Mismatch dialog displays, choose Adopt The File's Unit Scale and then click OK.This file is similar to the one you created in the previous lesson. A bobbing motion has been added to the camera to simulate the up-and-down effect of someone jogging along the path. A sky dome has been added, and two Omni lights have been added to create additional lighting, but to decrease rendering time, there is no Global Illumination.
Rendering an image sequence:
- If the Camera viewport isn't active, right-click it to activate it.
- From the Rendering menu, choose
 (Render Setup).
 Next, you'll define the animation range and output size.
- On the Common tab of the Render Setup dialog, in the Time Output group, choose Active Time Segment.
- In the Output Size group, change the output resolution to 320x240.
- In the Render Output group, click the Files button.
3ds Max opens the Render Output File dialog.
- Navigate to a directory where there is enough disk space to save the rendered files. You can use the Create New Folder button to establish a new location, if necessary.
Next you'll define the type of still image file to render.
- In the Save As Type field, click the drop-down arrow and choose JPEG File (*.jpg). Note: In a production environment, probably you would want to use a high-quality, lossless format such as TGA or TIF. For the purposes of this tutorial, you will use the JPG format to keep the size of the output files small.
- In the File name field, type my_jog.jpg, then click Save.
After you click Save, a format-specific dialog asks you to specify attribute and information settings. Accept the default values, and then click OK.
When you render a still-image sequence, as in this case, 3ds Max automatically appends a four-digit frame number to the first part of the file name. So the first frame will be my_jog0000.jpg, the second my_jog0001.jpg, and so on.
- Make sure Save File is turned on in the Render Output group. Also, check that the Viewport field at the bottom of the Render Scene dialog is set to Walkthrough_Cam01 (not Top, Front, or Left), then click
 (Render Production).
  Note: A sky background is rendered. A dome object represents the sky.
 - The Rendering Progress dialog displays. Wait for a short while as the first frame is rendered. You will see the Last Frame Time, Elapsed Time, and Time Remaining values change after the first frame finishes.
Allow at least four frames to render.
At this point, you can work on something else while 3ds Max renders your animation.
Tip: You can also watch the rendering for errors or observe to see where you want to make changes. This is generally a good practice so that you can study the scene as it is rendered.After the rendering has completed, you will have 3,000 JPG files in the folder you specified.
Convert an image sequence into a movie:
- From the Rendering menu, choose Compare Media In RAM Player.
- On the RAM Player toolbar, click Open Channel A.

- In the Open File, Channel A dialog, navigate to the sequence of JPG image files. Highlight the name of the first file in the sequence and then ensure the Sequence option is turned on. Click Open.
The RAM Player will now load the image files in sequential order starting with the first file you selected. The Image File List dialog appears. Here you can use the Every Nth and Multiplier fields if you need to speed up or slow down your animation. If your animation is too slow, change Every Nth to 2 or 3. If your animation is too fast, increase the Multiplier.
- Click OK.
The RAM Player Configuration dialog appears. Here you can observe and adjust your memory usage. There are also tools here to resize your animation, specify a range of frames to use, and split the alpha (transparency) information into a separate file.
Note: In order to use transparency, the image file specified has to be able to process an alpha channel. JPG files do not contain any transparency information the way TGA, TIF and PNG images often do. - Increase the Memory Usage to its maximum for your system, and then click OK
The RAM Player loads the rendered files into memory. In the Loading dialog, observe how much memory is being used and remains available.
If it looks like you are about to run out memory, click Stop Loading. If you have a low-memory system, reduce the number of frames to load and try again.
- On the RAM Player toolbar, click
 (Playback Forward) and watch the movie play.
 When you are done, click this button again to stop playback.
- On the RAM Player toolbar, click
 (Save Channel A).
 A Save File, Channel A dialog appears.
- Choose AVI as the file type, and name the animation my_jog.avi. Click Save.
The AVI File Compression Setup dialog appears. Here you can choose a codec (compression/decompression type) and adjust the quality of the file. Accept the default codec.
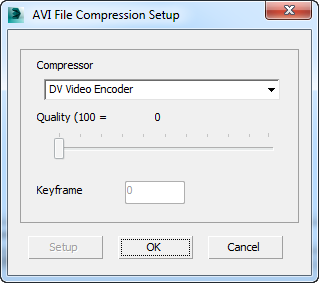
- Click OK to continue.
The RAM Player loads still image sequences into memory and plays them so you can watch them as a movie. It actually lets you load two different sequences and then compare them visually, but you won’t use that functionality here. You'll simply use the RAM Player to save the files into an AVI file.
Save your work:
- Save the scene as my_walkthrough_renderable.max.
You can view a partial rendering of the animation by playing this movie:
Summary
In this tutorial, you have learned to calculate the number of frames needed for the animation. You used the Walkthrough Assistant to create a camera and constrain it to a path. Then you used the Walkthrough Assistant to animate head turning and tilting to improve the realism of the camera motion.
Finally, you learned how to render your animation to a sequence of still-image files. This allows you better control for later correction of your animation. You also learned how to use the RAM Player to assemble a still-image sequence into a movie-file format such as AVI or QuickTime.