Supports required to steady an assembly during printing are managed using 3D Printing Structures items, which can be specified for individual assemblies or 3D Printing Platform items. This provides the flexibility to create one structure for all the parts in a platform item, or to create different structures for different parts of the job.
To create a 3D Printing Structures item:
- In the
3D Printing Platform panel, click the
Create New 3D Printing Structures
 button. A
3D Printing Structures
item is added to the Project Tree.
Note: Alternatively, to create a structure for an individual item right-click the item, and select Create New 3D Printing Structures in the context menu.
button. A
3D Printing Structures
item is added to the Project Tree.
Note: Alternatively, to create a structure for an individual item right-click the item, and select Create New 3D Printing Structures in the context menu. - Select the 3D Printing Structures item in the Project Tree. The 3D Printing Structures panel is displayed.
- In the Distance from base to bottom box, enter the distance from the bottom of the part to the top of the base. Alternatively, if you are creating a structure for a 3D Printing Platform item, select Rest on platform to automatically calculate the distance between the part and the base.
- In the Base thickness box, enter the depth of the base. The base must be thick enough to support the part, and there must be sufficient space between the part and the base to create supports.
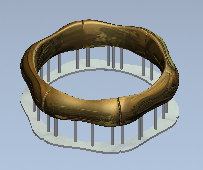
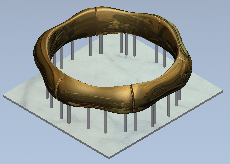
- To create an outline base, select
Silhouette base. To create a rectangular base, deselect
Silhouette base
and enter a value in the
Border thickness box to specify how far the base should extend beyond the edges of the part. For example:
Silhouette Base selected
Silhouette Base deselected
- Use the buttons in the
Contact Points and Supports section, to create and manage contact points and supports. Click:
 to create supports.
 to automatically generate contact points.
 to create supports from contact-point groups.
 to create a contact-point group.
 to load contact-point groups from a template.
 to display the
Contact Points Template Library panel.
to display the
Contact Points Template Library panel.
 to display the
Support Library panel.
to display the
Support Library panel.