Use the options in the Profile Type & Vector Association area to determine how the vector artwork is machined, how you want to apply the toolpath to the vector artwork, and set the allowance, final pass thickness, and final pass allowance:
- Profile — Select an option from the
Profile list to determine how your vector artwork is machined.
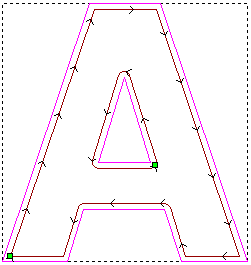
- Along — Select this option if you want to profile along the boundary of the vector artwork.
- Inside — Select this option if you want to profile outside the boundary of the vector artwork.
- Outside — Select this option if you want to profile inside the boundary of the vector artwork.
Profile Type — Along
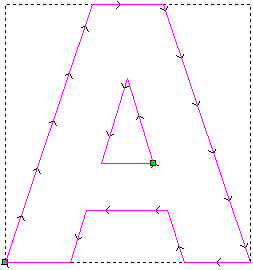
Profile Type — Outside

Profile Type — Inside
In the adjacent list, selection an option to specify how you want to apply the toolpath to the vector artwork.
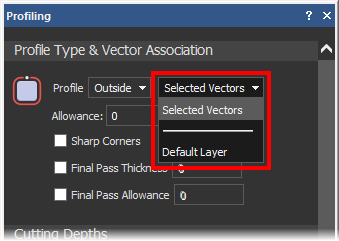
- To machine a selection of vectors only, click the Selected Vectors option, then select the vector artwork.
- To machine all vector artwork on a vector layer, click the name of the vector layer. All vector layers in the model are listed.
- Allowance — Enter a value in the box to specify the distance between the boundary of the selected vectors and the tool. Enter a positive value to keep extra material; enter a negative value to remove extra material.
- Sharp Corners — Select this option if you want to have sharp corners when creating a Profile toolpath.
- Final pass thickness — If you want to set the thickness of the final profile pass, select Final pass thickness, then specify its thickness in the adjacent box. If this option is selected and a value greater than 0 is used, the toolpath comprises at least two machining passes, with the final pass removing the specified thickness (Z). This option is often used to leave a thin 'web' of material around the boundary of the vector artwork being machined, with the last pass removing less material than the preceding passes. In this instance, you can gently snap the shape from the material block.
- Final pass allowance — If you want to add or remove extra material around the vector artwork, click to select the Final Pass Allowance option, and then specify the allowance in the adjacent box. If this option is selected, the allowance you specify is preserved by any of the intermediate machining passes in Z, and then removed during the final pass. This ensures that no dwell marks caused during the intermediate passes remain. The final pass (lowest in Z) machines the complete face of the profiled-edge.