Use the Print Settings Editing panel to edit parameters for different ways of printing. To display the panel, click a print settings icon on the Print Settings Library panel.
The following settings are available:
 — Click the arrow to return to the
Print Settings Library panel.
— Click the arrow to return to the
Print Settings Library panel.
- Icon — Click Change Resin Colour to display the Select Colour dialog and select a different colour for your print settings icon.
- Layers — Enter the thickness of the layers, and the number of burn-in layers.
- Layer Thickness — 3D printers print models in thin slices. In this box, specify the thickness of the slices in microns. Thinner slicers are more accurate, but increase the printing time.
- Number of burn-in layers — Enter the number of burn-in layers. When you print, the first layer has a longer exposure time to ensure it binds with the build plate; this makes the first layer thicker than the specified Layer thickness. To compensate for this, following layers, known as burn-in layers, are made thinner than the specified thickness. The burn-in layers are followed by standard model layers.
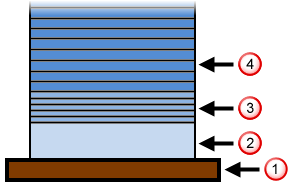
 Build plate.
 First layer.
 Burn-in layers.
 Model layers.
- First Layer Parameters — The first layer needs a longer exposure time to ensure the model binds to the build plate. Remaining layers can have a shorter exposure time.
- Exposure Time — Enter the length of the exposure for each layer. A longer exposure time creates thicker layers.
- Separation RPM — Enter the velocity at which the rotation arm slides away from the build area.
- Approach RPM — Enter the velocity at which the rotation arm slides towards the build area.
- Z Lift — Enter the distance that the Z-axis raises up each layer to allow trapped air out and fresh resin in.
- Separation Velocity — Enter the velocity at which the Z-axis moves up, out of the deeper channel.
- Approach Velocity — Enter the velocity at which Z-axis moves back down to the build area.
- Rotation — Enter the angular distance that the rotation arms move in each direction while separating.
- Exposure Wait — Enter the length of the pause after the exposure.
- Separation Wait — Enter the length of the pause after separation.
- Approach Wait — Enter the length of the pause after the build plate returns to the build area.
- Burn-In Layer Parameters — The burn-in layers follow the first layer. They have a shorter exposure time than other layers to compensate for the thickness of the first layer, which is over-exposed.
- Model Layer Parameters — These are the standard layers that are printed after the burn-in layer has compensated for the large first layer.
- Exposure Time — Enter the length of the exposure for each layer. A longer exposure time creates thicker layers.
- Separation RPM — Enter the velocity at which the rotation arm slides away from the build area.
- Approach RPM — Enter the velocity at which the rotation arm slides towards the build area.
- Z Lift — Enter the distance that the Z-axis raises up each layer to allow trapped air out and fresh resin in.
- Separation Velocity — Enter the velocity at which the Z-axis moves up, out of the deeper channel.
- Approach Velocity — Enter the velocity at which Z-axis moves back down to the build area.
- Rotation — Enter the angular distance that the rotation arms move in each direction while separating.
- Exposure Wait — Enter the length of the pause after the exposure.
- Separation Wait — Enter the length of the pause after separation.
- Approach Wait — Enter the length of the pause after the build plate returns to the build area.
- Burn-In Layer Parameters — The burn-in layers follow the first layer. They have a shorter exposure time than other layers to compensate for the thickness of the first layer, which is over-exposed.