Use this menu option to create an exact or an approximate square- or rectangular-shaped vector.
Note: The
Create Rectangle
 button on the
Design and
Design Tools toolbars is a shortcut for this menu option.
button on the
Design and
Design Tools toolbars is a shortcut for this menu option.
button on the
Design and
Design Tools toolbars is a shortcut for this menu option.
To create an exact square- or rectangular-shaped vector:
- In the Project Tree, select the vector layer on which you want to create the shape.
- Select
Vector > Create > Rectangle or click
to display the
Tool Settings: Rectangle Creation panel.
- In the Square or Rectangle area, select the option for the type of shape you want to create.
- In the Width and Height boxes, enter values to specify the shape's dimensions.
- To fillet the corners, enter a radius for the corner fillets in the Corner radius box.
- To invert the corner fillets, select the Invert corners check box.
- In the Centre Point area, enter the coordinates in the X and Y boxes to specify the centre point of the shape.
- To rotate the shape, specify an angle for rotation in the Angle box: enter a positive angle to rotate the shape counter-clockwise; enter a negative angle to rotate the shape clockwise.
- Click Create.
- Click Cancel to exit rectangle-creation mode.
To create an approximate-sized square- or rectangular-shaped vector:
- In the Project Tree, select the vector layer on which you want to create the shape.
- Select
Vector > Create > Rectangle or click
to display the
Tool Settings: Rectangle Creation panel.
- In the Square or Rectangle area, select the option for the type of shape you want to create.
- Move the cursor
 to the position at which you want to create the shape, and then click and drag. The boundary of the shape is red.
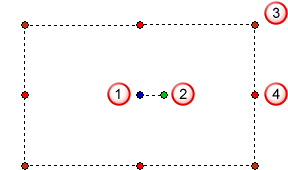
- Release the mouse button to create a preview image of the shape.
The centre of the shape is identified by a blue dot
 , the rotation handle is identified by a green dot
 , the corner handles are identified by dark red dots
 , and the resizing handles are identified by red dots
 . A dashed line identifies the boundary of the shape.
- To resize the shape:
- Move the cursor over one of the lighter red handles. The cursor changes to
 .
.
- Click and drag the handle to move the boundary. The centre point remains in the same position.
- Release the mouse button.
- Move the cursor over one of the lighter red handles. The cursor changes to
- To fillet the corners:
- Move the cursor over one of the dark red handles. The cursor changes to
.
- Click and drag the handle inwards to increase the size of the fillet.
- Release the mouse button.
Note: Double-click the handle to invert the fillet.
- Move the cursor over one of the dark red handles. The cursor changes to
- To move the centre point of the shape:
- Move the cursor over the blue handle. The cursor changes to
 .
.
- Click and drag the handle to reposition the centre point.
- Release the mouse button.
- Move the cursor over the blue handle. The cursor changes to
- To rotate the shape:
- Move the cursor over the green handle. The cursor changes to
 .
.
- Click and drag the handle around the blue centre point.
- Release the mouse button.
- Move the cursor over the green handle. The cursor changes to
- Right-click the 2D or 3D views to exit rectangle-creation mode.