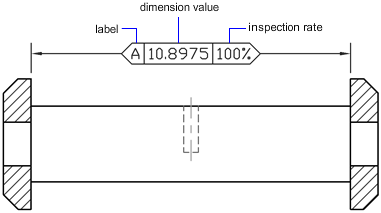
Inspection dimensions allow you to effectively communicate how frequently manufactured parts should be checked to ensure that the dimension value and tolerances of the parts are within the specified range.
Inspection Dimension Fields
When working with parts that need to met a specific tolerance or dimension value before installing them into the final assembled product, you can use an inspection dimension to specify how often the part should be tested.
You can add an inspection dimension to any type of dimension object; it is composed of a frame and text values. The frame for an inspection dimension is made up of two parallel lines and the end is round or square. The text values are separated by vertical lines. An inspection dimension can contain up to three different fields of information: inspection label, dimension value, and inspection rate.

- Inspection Label
-
Text used to identify individual inspection dimensions. The label is located in the leftmost section of the inspection dimension.
- Dimension Value
-
Dimension value that is displayed is the same value before the inspection dimension is added. The dimension value can contain tolerances, text (both prefix and suffix), and the measured value. The dimension value is located in the center section of the inspection dimension.
- Inspection Rate
-
Text used to communicate the frequency that the dimension value should be inspected, expressed as a percentage. The rate is located in the rightmost section of the inspection dimension.
You can add inspection dimensions to any type of dimension. The current values of an inspection dimension are displayed in the Properties palette under Misc. The values include the properties that are used to control the look of the frame, and the text for both the label and rate values.