Because dimensioning requires high speed and efficiency, AutoCAD introduced the DIM command to accelerate the process by using inferences and options in a single command. Instead of switching between several dimensioning commands, you can use a single DIM command to achieve different results with a combination of
- The DIM option you choose
- The type of object you hover over
- Where you hover over an object
- Where you pick or click
- What direction you move the cursor
All of these can play a role in the final outcome.
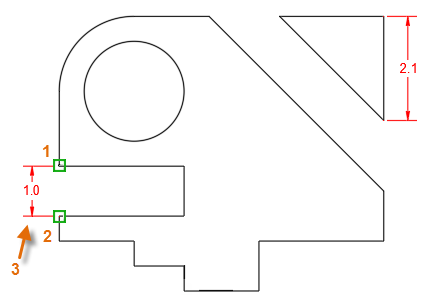
Let's see how DIM can dimension the imaginary design below in a single command sequence.
Creating Linear Dimensions
- Click . Find
- Hover over a line segment until the dimension preview is displayed. Select the line segment, and then click the desired location for the dimension line.
 Note: If object snaps are interfering with object selection or dimension placement, either zoom in or press F3 to turn off running object snaps.
 - To dimension gaps, use object snaps to locate dimension points (1,2) and click the desired location for the dimension line (3).
 Note: Note: When specifying points for a linear dimension, the direction that you move the cursor determines whether you create a horizontal, vertical, or aligned dimension.
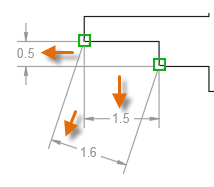 Tip: To prevent creating an aligned dimension, turn on Ortho mode by pressing F8.
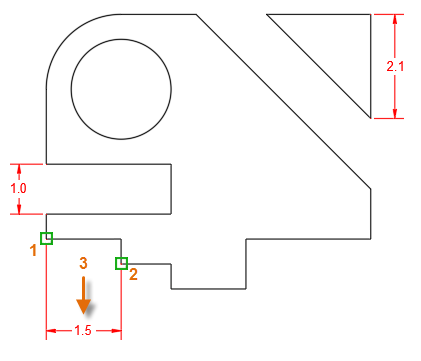
 - For the next linear dimension, use the object snaps (1,2) and click the desired location for the dimension line (3).
- To create a continuous line of dimensions, specify the Continued option at the prompt, select the extension line from which to continue (4), and the other dimension points (5,6,7).
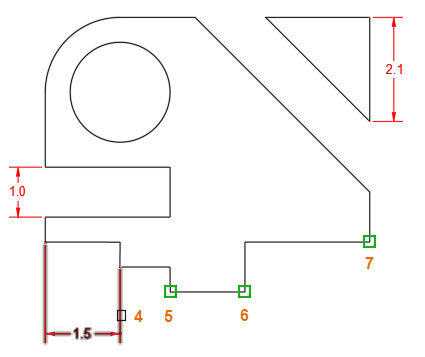 Note: The sequence to create a baseline dimension is similar, except that (a) the Baseline option would be chosen and (b) the extension line selected would be the one to the left of (4).
 - Then press Enter twice to end the sequence of continued dimensions.
- Next, we'll dimension the width of the diagonal slot or passage. Select the diagonal lines (1,2) and then click the location for the dimension line (3).

- To dimension the fillet and the circle, select it and then click the location for the text and leader.
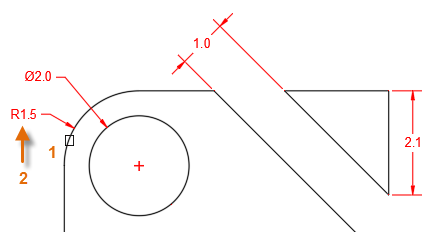
- Finally, press enter to exit the DIM command.
Dimensioning in Paper Space
There are several methods for locating and scaling dimensions. One of the methods is creating the dimensions in paper space. If you use this method, you can still use the DIM command. Follow these steps:
- After dimensioning in model space, create or click a layout tab.
- Select the desired layout viewport, click the scale grip, and select a scale from the list.
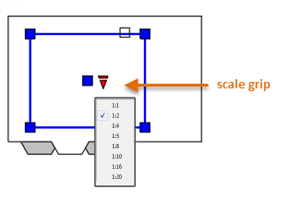
- Next, double-click inside the layout viewport to access model space. Pan the view as needed.
- At the Command prompt, enter CHSPACE. The Change Space command is also available on the Home tab, expanded Modify panel.
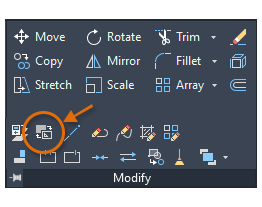
- Select all the dimensions. If there are a lot of them, you can use crossing windows or selection filters.
Almost like magic, all the selected dimensions are transferred to paper space in your current layout. They will also maintain the correct scale automatically, which is determined by the scale of the viewport.
As you can see from these steps, the most efficient way to create dimensions is to use the DIM command in a continuous workflow, panning and zooming with the mouse wheel and pressing F3 when you need to turn off running object snaps for selecting objects.
Try using the DIM command with your own drawings to discover additional ways in which you can increase the speed in your dimensioning process.