Specify the pull direction to correspond with how the metal injection mold will be manufactured. If you don't set a pull direction, it is set automatically.
Attention: To set the pull direction manually, you must be working within the standalone product. The pull direction is set automatically when using the Add-in product.
- Click
 ().
().
- Click on the surface of the part and a pull direction will be set perpendicular to the surface tangent.
This is represented by a yellow arrow within a circular representation of the pull direction axes.
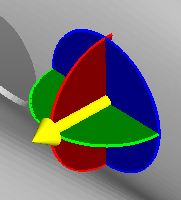
Note: Click on another point of the part and the pull direction will be based on the surface tangent at the new location.
The pull direction can be specified by one of the following methods.
- Manual adjustment
- Click and drag the yellow pull direction arrow to the desired orientation.
- Defined rotation
- The pull direction axes can be different to the axes of the part. For this reason, each rotation angle is defined independently.
-
- Click on the colored disc that represents the plane the pull direction is to be rotated through.
The disc is highlighted with a white circumference and text box appears on the screen.
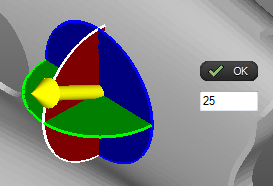
- Enter the required angle of rotation in the text box and click
OK.
The pull direction arrow is rotated and the indicator widgets are recalculated.Note: Multiple angles of rotation are cumulative.
- Select and enter angles of rotation for the remaining two planes.
- When the final pull direction has been defined, click
.
The Pull Direction tab and the pull direction arrow are closed.
- Click on the colored disc that represents the plane the pull direction is to be rotated through.