When you create geometry, you can enter point coordinates directly from the Feature/Geometry Edit bar.

This method is exact but not always convenient or feasible. You can also pick points directly on the screen with the mouse, although this method may be less precise.
To increase the drawing precision, FeatureCAM uses the snap and grid functionality. Grid is a set of evenly spaced dots that serve as a visual distance reference. Snap is a set of evenly spaced invisible hot spots that restrict the points that you can pick with your mouse, and therefore helps you position lines, points or shapes more precise. To control how the cursor snaps, use the Snapping modes. Snapping to grid is the most common mode, and enables you to snap to a point on a coordinate system that is laid out on the stock. The grid plane rotates with the viewing plane: in a front or back view, the grid is in the X plane; in a right or left view, the grid is in the Y plane; and in the top or bottom view, the grid is in the Z plane. The procedure below allows you to adjust the grid size.
To adjust the grid:
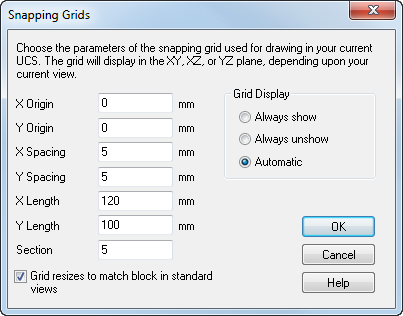
- Select File > Options > Geometry > Snapping Grids page.
- Enter the grid coordinates.

- In the Section field enter the number of segments to divide the open geometry into when snapping to sections.
- To have the grid redrawn during view shifts, select the Grid resizes to match block in standard views option.
- Choose the
Grid Display option:
Always show displays the grid, even if you have turned off snapping to grid.
Always unshow hides the grid even if you have turned on snapping to grid.
Automatic displays the grid only when you are snapping to grid.
- Click OK.