The Edit menu gives you access to the Edit mode, and allows you to edit strokes previously painted.
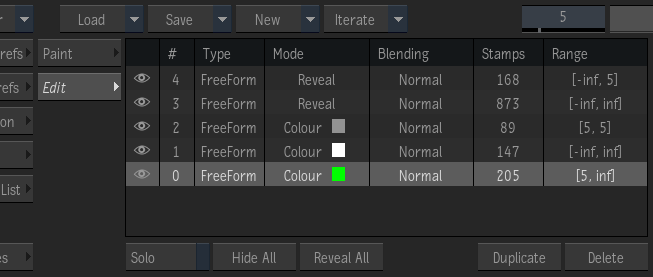
In the Edit mode's list, you can:
- Reorder the strokes layering by grabbing a stroke and moving it up or down in the list.
- Toggle the visibility of a stroke using the eye icon.
- Solo the visibility of a stroke using the Solo button.
- Hide All or Reveal All strokes using the corresponding buttons.
- Delete a stroke using the Delete Stroke button.
- Duplicate a stroke using the Duplicate button.
The currently selected stroke has a green outline, others are outlined in red.
To change the colour a brush stroke:
- Open the Edit menu.
- Select the stroke from the Strokes list.
- Edit the Colour in the Paint properties.
To change the size of a brush stroke:
- Open the Edit menu.
- Select the stroke from the Strokes list.
- Edit the Size in the Brush Attributes.
When editing a stroke, only the relevant Brush Attributes and Paint options can be edited.
To reshape a stroke:
- Open the Edit menu.
- Select the stroke from the Strokes list, or its red outline directly in the viewport.
- Enable Edit Box, or press Ctrl+E, to display the Edit Box.
- Move the Edit Box points to reshape the stroke.
You can also use the Edit Box to move or rotate a brush stroke.
To change the order in which strokes are layered:
- Open the Edit menu.
- Drag and drop the stroke in the Edit list.
The order in which strokes are drawn impacts their blending.
If you cannot select a stroke
- The stroke is not displayed in the viewport. The stroke is not on the current frame: locate the stroke in the Edit List and look at the Range field: move the timebar to that frame.
- The stroke is visible as a red outline, but cannot be selected. The stroke is behind the Edit Box. Disable the Edit Box option, and then select the stroke.
Animating Strokes
- The XY position
- The XY scaling
- The rotation
- The opacity
- The size
- The start of a stroke
- The end of a stroke
The start and end of a stroke allows you to recreate in the Paint node the AutoPaint effect available in the Paint tool. In the following example, this type of animation recreates the flow of cursive writing over 60 frames.

- In Paint, enable Consolidate.
This ensures all of your brush strokes are unified into a single stroke in the Edit list: it makes it easier to animate the multiple brush strokes.
- Set Brush type to Freeform, and the Range to Sequence, from frames 1 to 60.
- Draw over the first frame the word "Paint".
- Enable Auto Key.
- Open the Edit list, and select the "Paint" stroke. From the Edit list, the # column displays the stroke Identifier.
- Open the Animation menu, and display the contents of the Paint menu item.
- Locate the Stroke using the stroke Identifier.
- From the list of animation channels, click end and enter 0.
- Go to frame 60, click
end and enter 1.
On playback, you can see the stroke being drawn over 60 frames.