If your data contains one or more of the following, it is recommended you use Task Scheduler to migrate your data:
- Large assembly files.
- Multiple file dependencies, such as derived parts.
- iParts, iAssemblies.
With Task Scheduler, you can migrate an entire folder structure. This ensures that all your data is migrated.
Please read the following guidelines before you migrate Autodesk Inventor files.
- We strongly recommend that you back up all Autodesk Inventor files before using Task Scheduler. Be sure the backup maintains the original directory structure so that you can easily restore files if necessary. (Include all files used in your designs: part (.ipt), drawing (.idw), Microsoft Excel (.xls), and iFeatures (.ide) files.
- The following files are skipped during the migration process:
- Read-only files.
- Files previously migrated.
- Files built in non-production versions of Autodesk Inventor. (For example, files created in a Beta version.)
- Corrupt files or files with missing references.
- Autodesk Inventor must be authorized on your system prior to running Task Scheduler.
- If you store your files on a server, you must map the network drive locally before you can access the data from within Task Scheduler. Do not use UNC naming conventions.
Before you begin:
- Make sure your files resolve and open correctly in the existing version of Autodesk Inventor. Repair any resolution and general problems before you proceed. If the red cross (Recover) appears on the Inventor menu bar, the file is corrupted and must be repaired or it will not migrate.
- If you defined one or more custom projects instead of using the Default project, complete the following steps:
- Start your new version of Autodesk Inventor.
- Select Application Options from the Tools tab and Options panel, and then select the File tab.
- Verify that the Projects Folder setting is correct.
- Close the dialog box, and then select Pro from the Get Started tab > Launch Panel . This dialog box should correctly list your projects and confirms that the project file will show up in Task Scheduler
- Close all versions of Autodesk Inventor. (You can use the Windows Task Manager to verify that no versions are running.)
- If you migrate specific files, follow this migration order, since drawings can depend on parts.
- Templates
- Styles
- Parts
- Standard parts
- Drawings
- Task Scheduler support multiple processes to shorten migration time. In the Settings menu, click Multiple Processess… button to open Multi-Process Settings dialog, See figure 1.
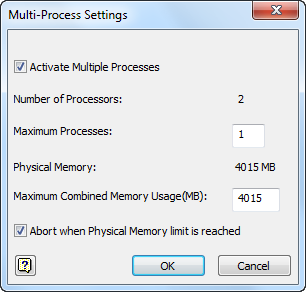
Figure 1
Migrating Individual Files or Folders
As previously mentioned, if you do not wish to migrate your Inventor files by project you may instead select specific files or all files in a directory including sub-folders. These options are accessed by clicking the appropriate tool button in the Migrate Files dialog box and are described as follows:
- Add files: Selecting this button displays a browser where you can select one or more files to migrate. This is a handy option to use when you wish to quickly migrate a small number of files such as your customized Inventor templates. See Figure 6.

Figure 6
- Add folder: Select this button if you store your files on a single drive under a single top-level folder (perhaps, with subfolders). All files in the directory will migrate in the proper order. the order is part, assembly, drawing. See Figure 7.

Figure 7
Validating the Migration
Task Scheduler generates a log file that records which files successfully migrated and which did not. The file is in ASCII format (.txt) and is located in C:\My Documents\Inventor <version>\Task Scheduler\Log & Report Files or C:\Users\Public\Documents\Autodesk\Inventor <version>\Task Scheduler Logs & Reports by default.
After the migration is complete, review the migration log to determine if any parts failed to rebuild. You can open the log file and search for the word "failed", or copy the entire text file into Microsoft Excel and sort by column. This will group the files by "Failed" or "Success".
Also you can download the Task Scheduler Error Reporting tool to catalog the errors and export them to excel file. Click here to download and to find out more about the Task Scheduler Error Reporting tool.
You can now easily identify which parts failed and fix as necessary.