Working with PySide in Maya
PySide and PyQt are very similar, and the two use almost the identical API.
In addition, PySide is part of the Qt distribution, so you do not need to manually build it from source for each Maya version.
Differences between PySide and PyQt
Some differences include the way you import, class name changes, and tool name changes; for example, as follows:
- (PyQt) from PyQt4.QtCore import *
- (PySide) from PySide2.QtCore import *
Class name differences, such as:
- (PyQt) QtCore.pyqtSignal v (PySide) QtCore.Signal
- (PyQt) QtCore.pyqtSlot v (PySide) QtCore.Slot
- (PyQt) QtCore.pyqtProperty v (PySide) QtCore.Property
Tool name differences, such as:
- (PyQt) pyuic4 v (PySide) pyside-uic
- (PyQt) pyrcc4 v (PySide) pyside-rcc
- (PyQt) pylupdate4 v (PySide) pyside-lupdate
- (PyQt) sip v (PySide) shiboken2
- Old-style signals need parenthesis
- Only signals without arguments are auto-connected in a constructor, like in QAction
About PySide in Maya
The following are a few Maya-specific PySide facts:
- As described in Maintain a Reference to your Widget, you must parent your Qt widget to an existing Maya window so that the widget is not destroyed by the Python interpreter's garbage collector. You can parent your Pyside widget to the Maya main window or the dock control. You can also easily do this by using the mix-in classes, as described in Use the maya.app.general.mayaMixin Classes.
- A unique objectName() is needed for your widget so that it can be used and looked up through maya.OpenMayaUI.MQtUtil.findControl().
- There are no native sizing preferences for PySide widgets and you can use the windowPref command directly to set the sizing preferences.
- When docking windows, the size of the widget is retained and you can dock multiple windows to the same area, so that you can switch among them via a tab, just like in Maya.
PySide example scripts
A few example scripts are provided in the devkit/pythonScripts folder of your Developer Kit installation that demonstrate the fundamental concepts for creating basic PySide scripts. See Setting up your build environment: Windows environment (64-bit).
Running the example scripts
You can run the example scripts by using the execfile command in the Python tab of your Script Editor as follows:
execfile('C:/Program Files/Autodesk/Maya2017/devkit/pythonScripts/widgetHierarchy.py')
Alternatively, you can run the example script by importing the script. This is the recommended method for running the createNodeUI.py example:
import sys
import os.path
sys.path.insert(0,  os.path.join(os.environ['MAYA_LOCATION'], 'devkit', 'pythonScripts' ) )

import createNodeUI
w = createNodeUI.main()
w.close()
Customizing the color of the Maya widgets
The editMayaWidgets.py script below demonstrates how to customize the colors for Maya's main window and menus.
The standard Maya imports are as follows:
from maya import cmds
from maya import mel
from maya import OpenMayaUI as omui
In addition, include these imports for PySide:
from PySide2.QtCore import *
from PySide2.QtGui import *
from PySide2.QtWidgets import *
from shiboken2 import wrapInstance
try:
  from PySide2.QtCore import *
  from PySide2.QtGui import *
  from PySide2.QtWidgets import *
  from PySide2 import __version__
  from shiboken2 import wrapInstance
except ImportError:
  from PySide.QtCore import *
  from PySide.QtGui import *
  from PySide import __version__
  from shiboken import wrapInstance
To obtain the Maya main window widget as a PySide widget, do as follows:
omui.MQtUtil.mainWindow()
ptr = omui.MQtUtil.mainWindow()
widget = wrapInstance(long(ptr), QWidget)
This script demonstrates how to edit the style sheet to change the Maya background color:
def changeMayaBackgroundColor(background='black', color='yellow'):
    ....
    widget.setStyleSheet(
        'background-color:%s;'%background +
        'color:%s;'%color
        )
This script also demonstrates how to get a Maya control (in this case, the Create menu) as a PySide widget by first evaluating a MEL string in Python, and then using maya.OpenMayaUI.MQtUtil.findControl().
widgetStr = mel.eval( 'string $tempString = $gMainCreateMenu' )
ptr = omui.MQtUtil.findControl( widgetStr )
widget = wrapInstance(long(ptr), QWidget)
You can change the font style and weight for your menus (in this case, the Create menu) by editing the Qt stylesheet as follows:
def changeMayaMenuColors(fontStyle='italic', fontWeight='bold', fontColor='cyan'):
    ....
    widget.setStyleSheet(
        'font-style:%s;'%fontStyle +
        'font-weight:%s;'%fontWeight +
        'color:%s;'%fontColor
        )
Creating a simple Qt widget
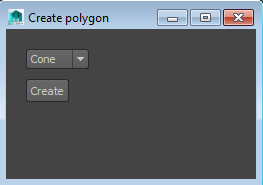
The createPolygonUI.py script creates a Qt widget with a drop-down menu (also known as a combo box) and a Create button. Select from among several polygon primitives from the drop-down menu and click Create to create a polygon of your choice.
This script demonstrates how to use QComboBox and QPushButton to create your Qt widget UI.
In this script, you first obtain the Maya main window widget as a PySide widget, so that you can set it as the parent widget for the Qt widget that you are creating.
mayaMainWindowPtr = omui.MQtUtil.mainWindow()
mayaMainWindow = wrapInstance(long(mayaMainWindowPtr), QWidget)
Create a Create Polygon window by deriving from QWidget, then set the object name so that it can be retrieved using OpenMayaUI.QtUtils.findWidget().
class CreatePolygonUI(QWidget):
    def __init__(self, *args, **kwargs):
        super(CreatePolygonUI, self).__init__(*args, **kwargs)

        #Parent widget under Maya main window
        self.setParent(mayaMainWindow)
        self.setWindowFlags(Qt.Window)

        #Set the object name
        self.setObjectName('CreatePolygonUI_uniqueId')
        self.setWindowTitle('Create polygon')
        self.setGeometry(50, 50, 250, 150)
        self.initUI()
        self.cmd = 'polyCone'
This script then demonstrates how to use QComboBox to create the drop-down menu, and to change the command string when the combo box (that is, the drop-down menu) changes.
QPushButton is used to create a button, and when it is clicked, the MEL command is executed.
def initUI(self):
    #Create combo box (drop-down menu) and add menu items
    self.combo = QComboBox(self)
    self.combo.addItem( 'Cone' )
    self.combo.addItem( 'Cube' )
    self.combo.addItem( 'Sphere' )
    self.combo.addItem( 'Torus' )
    self.combo.setCurrentIndex(0)
    self.combo.move(20, 20)
    self.combo.activated[str].connect(self.combo_onActivated)

    #Create 'Create' button
    self.button = QPushButton('Create', self)
    self.button.move(20, 50)
    self.button.clicked.connect(self.button_onClicked)

#Change commmand string when combo box changes
def combo_onActivated(self, text):
    self.cmd = 'poly' + text + '()'

#Execute MEL command when button is clicked
def button_onClicked(self):
mel.eval( self.cmd ) 
Loading a Qt Designer UI file and editing the loaded widget
The createNodeUI.py script demonstrates how to load a Qt Designer UI file and edit the loaded widgets. You must first use Qt Designer to create a .ui file that represents the widget tree.
These commands load the .ui file:
def initUI(self):
    loader = QUiLoader()
    currentDir = os.path.dirname(__file__)
    file = QFile(currentDir+"/createNode.ui")
    file.open(QFile.ReadOnly)
    self.ui = loader.load(file, parentWidget=self)
    file.close()
The example script then edits the Qt widget loaded from the file by adding items to the combo box, and sets the commands to be executed when the OK and the Cancel button are pressed.
# Add items to combo box
self.ui.typeComboBox.addItem( 'locator' )
self.ui.typeComboBox.addItem( 'camera' )
self.ui.typeComboBox.addItem( 'joint' )

# Call doOK if user clicks OK button
self.ui.okButton.clicked.connect( self.doOK )

# Call doCancel if user clicks Cancel button
self.ui.cancelButton.clicked.connect( self.doCancel )
When the OK button is pressed, a node of the type specified by the combo box (and with the name specified, if applicable) is created.
def doOK(self):
    nName = self.ui.nameLineEdit.text()
    nType = self.ui.typeComboBox.currentText()
    if len(nName) > 0:
        cmds.createNode( nType, n=nName )
    else:
        cmds.createNode( nType )
    self.close()
Otherwise, if the user clicks Cancel, then the Qt widget is closed.
def doCancel(self):
    self.close()
Creating a basic Attribute Editor
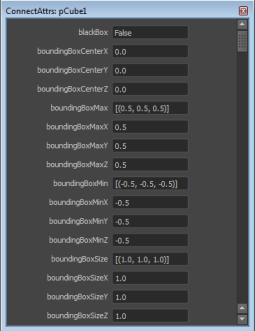
The connectAttr.py script demonstrates how to create a basic Attribute Editor that updates the attribute values, and is updated when attributes change. This way, the attribute values and control values stay in sync.
It uses mayaMixin for its dockable functions, as well as QFormLayout and QScrollLayout to create the Qt UI.
Import the mayaMixin module as follows:
from maya.app.general.mayaMixin import MayaQWidgetBaseMixin, MayaQWidgetDockableMixin
This example derives from the MayaQWidgetDockableMixin and QScrollArea classes to create the container widget and the attribute widgets:
class Example_connectAttr(MayaQWidgetDockableMixin, QScrollArea):
    def __init__(self, node=None, *args, **kwargs):
        super(Example_connectAttr, self).__init__(*args, **kwargs)
        # Member Variables
        self.nodeName = node               # Node name for the UI
        self.attrUI = None                 # Container widget for the attr UI widgets
        self.attrWidgets = {}              # Dict key=attrName, value=widget
        .....
It then uses the MayaQWidgetDockableMixin class show() method to show the widget and set the window as dockable and floating.
ui = Example_connectAttr(node=obj)
ui.show(dockable=True, floating=True)
It then uses QFormLayout to create a 2-column form widget, with an attribute name string and an attribute widget.
def attachToNode(self, nodeName):
    '''Connect UI to the specified node
    '''
    self.nodeName = nodeName
    self.attrs = None
    self.nodeCallbacks = []
    self._deferredUpdateRequest.clear()
    self.attrWidgets.clear()

    # Get a sorted list of the attributes
    attrs = cmds.listAttr(self.nodeName)
    attrs.sort() # in-place sort the attributes

    # Create container for attribute widgets
    self.setWindowTitle('ConnectAttrs: %s'%self.nodeName)
    self.attrUI = QWidget(parent=self)
    layout = QFormLayout()

    # Loop over the attributes and construct widgets
    acceptedAttrTypes = set(['doubleLinear', 'string', 'double', 'float', 'long', 'short', 'bool', 'time', 'doubleAngle', 'byte', 'enum'])
    for attr in attrs:
        # Get the attr value (and skip if invalid)
        try:
            attrType = cmds.getAttr('%s.%s'%(self.nodeName, attr), type=True)
            if attrType not in acceptedAttrTypes:
                continue # skip attr
            v = cmds.getAttr('%s.%s'%(self.nodeName, attr))
        except Exception, e:
            continue  # skip attr

        # Create the widget and bind the function
        attrValueWidget = QLineEdit(parent=self.attrUI)
        attrValueWidget.setText(str(v))

        ....

        # Add to layout
        layout.addRow(attr, attrValueWidget)

        # Track the widget associated with a particular attribute
        self.attrWidgets[attr] = attrValueWidget

    # Attach the QFormLayout to the root attrUI widget
    self.attrUI.setLayout(layout)
It uses functools.partial() to add metadata to setAttr, then connect to the attrValueWidget.editingFinished signal:
# Use functools.partial() to dynamically construct a function with additional parameters
onSetAttrFunc =  functools.partial(self.onSetAttr, widget=attrValueWidget, attrName=attr)
attrValueWidget.editingFinished.connect( onSetAttrFunc )

def onSetAttr(self, widget, attrName, *args, **kwargs):
    '''Handle setting the attribute when the UI widget edits the value for it.
    If it fails to set the value, then restore the original value to the UI widget
    '''
    print "onSetAttr", attrName, widget, args, kwargs

    try:
        attrType = cmds.getAttr('%s.%s'%(self.nodeName, attrName), type=True)
        if attrType == 'string':
            cmds.setAttr('%s.%s'%(self.nodeName, attrName), widget.text(), type=attrType)
        else:
            cmds.setAttr('%s.%s'%(self.nodeName, attrName), eval(widget.text()))
    except Exception, e:
        print e
        curVal = cmds.getAttr('%s.%s'%(self.nodeName, attrName))
        widget.setText( str(curVal) )
A wrapper class is created to remove MMessage callbacks:
class MCallbackIdWrapper(object):
    '''Wrapper class to handle cleaning up of MCallbackIds from registered MMessage
    '''
    def __init__(self, callbackId):
        super(MCallbackIdWrapper, self).__init__()
        self.callbackId = callbackId

    def __del__(self):
        om.MMessage.removeCallback(self.callbackId)

    def __repr__(self):
        return 'MCallbackIdWrapper(%r)'%self.callbackId
The addNodeDirtyPlugCallback is used to trigger a refresh of the value of the attribute:
nodeObj = getDependNode(nodeName)
cb = om.MNodeMessage.addNodeDirtyPlugCallback(nodeObj, self.onDirtyPlug, None)
self.nodeCallbacks.append( MCallbackIdWrapper(cb) )
The example also uses evalDeferred to defer the update of the UI. Evaluation is deferred to the next time that Maya is idle. See the onDirtyPlug() and _processDeferredUpdateRequest() function definitions below for more details.
def onDirtyPlug(self, node, plug, *args, **kwargs):
    '''Add to the self._deferredUpdateRequest member variable that is then
    deferred processed by self._processDeferredUpdateRequest().
    '''

    # get long name of the attr, to use as the dict key
    attrName = plug.partialName(False, False, False, False, False, True)

    # get widget associated with the attr
    widget = self.attrWidgets.get(attrName, None)
    if widget != None:
        # get node.attr string
        nodeAttrName = plug.partialName(True, False, False, False, False, True)

        # Add to the dict of widgets to defer update
        self._deferredUpdateRequest[widget] = nodeAttrName

        # Trigger an evalDeferred action if not already done
        if len(self._deferredUpdateRequest) == 1:
            cmds.evalDeferred(self._processDeferredUpdateRequest, low=True)

def _processDeferredUpdateRequest(self):
    '''Retrieve the attribute value and set the widget value
    '''
    for widget,nodeAttrName in self._deferredUpdateRequest.items():
        v = cmds.getAttr(nodeAttrName)
        widget.setText(str(v))
        print "_processDeferredUpdateRequest ", widget, nodeAttrName, v
    self._deferredUpdateRequest.clear()
Creating a Qt widget with a tree list view
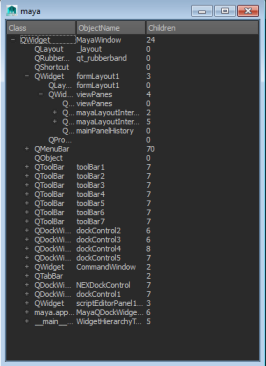
The widgetHierarchy.py script demonstrates how to create a Qt widget that lists all the Qt widgets used in Maya.
The tree list is created by deriving from MayaQWidgetBaseMixin and QTreeView:
class WidgetHierarchyTree(MayaQWidgetBaseMixin, QTreeView):
    def __init__(self, rootWidget=None, *args, **kwargs):
        super(WidgetHierarchyTree, self).__init__(*args, **kwargs)
This example demonstrates how to delete a widget when it is closed:
self.setAttribute(Qt.WA_DeleteOnClose, True)
It sets up for populating the hierarchy tree by setting the root widget:
# Determine root widget to scan
if rootWidget != None:
    self.rootWidget = rootWidget
else:
    mayaMainWindowPtr = omui.MQtUtil.mainWindow()
    self.rootWidget = wrapInstance(long(mayaMainWindowPtr), QWidget)
To populate the tree view, the example calls QStandardItem for each column and recurses through the child widgets:
def populateModel(self):
    # Create the headers
    self.columnHeaders = ['Class', 'ObjectName', 'Children']
    myModel = QStandardItemModel(0,len(self.columnHeaders))
    for col,colName in enumerate(self.columnHeaders):
        myModel.setHeaderData(col, Qt.Horizontal, colName)

    # Recurse through child widgets
    parentItem = myModel.invisibleRootItem();
    self.populateModel_recurseChildren(parentItem, self.rootWidget)
    self.setModel( myModel )

def populateModel_recurseChildren(self, parentItem, widget):
    # Construct the item data and append the row
    classNameStr = str(widget.__class__).split("'")[1]
    if pysideVersion == '1.2.0' :
      classNameStr = classNameStr.replace('PySide.','').replace('QtGui.', '').replace('QtCore.', '')
    else:
      classNameStr = classNameStr.replace('PySide2.','').replace('QtGui.', '').replace('QtCore.', '').replace('QtWidgets.', '')

    items = [QStandardItem(classNameStr),
             QStandardItem(widget.objectName()),
             QStandardItem(str(len(widget.children()))),
             ]
    parentItem.appendRow(items)


    # Recurse children and perform the same action
    for childWidget in widget.children():
        self.populateModel_recurseChildren(items[0], childWidget)
Creating a default widget, or a widget derived from the default widget
The defaultWidget.py script sets up the framework for creating a default widget (a push button created using QPushButton) and a derived widget. You can use this framework to create the default widget, or your own override widget.


