A skin is a hollow mesh.
More accurately, a skin is the dataset of a mesh and its matching hollowing mesh created by giving the original mesh's triangles a thickness. The two are linked, meaning that an action like deleting a triangle is applied to both mesh and hollowing mesh as applicable.
The standard display color of a skin is a reddish brown. When a skin is being edited, it is colored in a light blue.
- In the project tree, select the skin.
- In the context area, click
Edit Skin.
Tip: You can also click on the skin in the display to begin editing.
You now have three selection tools available,
 Select Faces (for individual triangles),
 Select Surfaces (for triangles bordering the clicked triangle as well as all triangles bordering the previous until an edge sharper than a threshold is encountered),
 Select Shells. Use these tools in combination with mouse and keys
Shift and
Ctrl to make your selection:
Select Shells. Use these tools in combination with mouse and keys
Shift and
Ctrl to make your selection:
| Action | No key | Ctrl | Shift |
|---|---|---|---|
|
Click on a triangle |
Selects the triangle. Any other, currently selected triangles become deselected. |
Toggles the selection state of the triangle. |
Adds the triangle to the current selection. |
|
Click and drag to draw a selection frame |
Selects the triangles intersected by or included in the selection frame. Any other, currently selected triangles become deselected. |
Toggles the selection state of the triangles intersected by or included in the selection frame. |
Adds the triangles intersected by or included in the selection frame to the current selection. |
Now you can delete the selected triangles with the Delete key, or adjust their thickness using the Thickness setting in the context area.
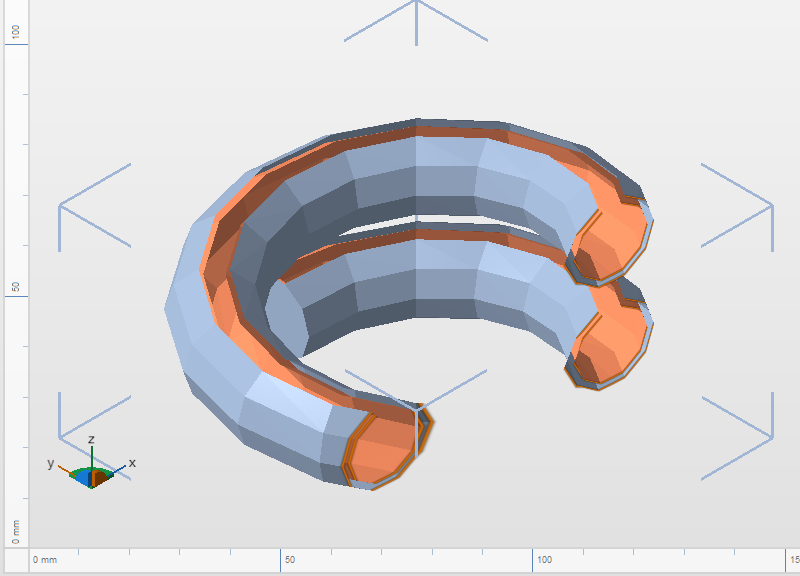
A hollow Helix being edited (note the light blue color on the outside), and shown with its cross sections. It has had a number of surface triangles deleted.
To finish editing the skin, click Done in the context area.
To continue working with the edited skin
The skin information on its own is not directly suitable for further steps. You need to convert it into a mesh.
- In the project tree, select the skin.
- In the context area, click Generate Mesh.
- Adjust the name of the new body, if necessary, then click Apply.
- Make your selection as to whether or not you want to keep the old body.
This creates a new mesh body from the skin. Notably, this also produces closed seams along the lines where the triangles had been removed during editing.