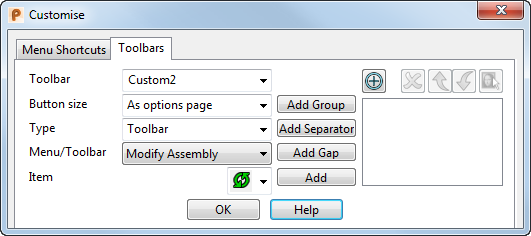
Use this dialog to define up to four customized toolbars.

Toolbar — Enter a new name for a new toolbar or select an existing user-defined toolbar from the list. You can define up to four toolbars.
Type — Select from the following:
- Menu — Select this option to add a menu item to your toolbar. Select the menu from the Menu/Toolbar list.
- Toolbar — Select this option to add a toolbar item to your toolbar and select the toolbar from the Menu/Toolbar list.
- Command — Select this option to enter your own Command and Description to be added to your toolbar.
Menu/Toolbar — Select the menu or toolbar that contains the option you want to add to your new toolbar.
Item — Select the menu option or toolbar button that you want to add to your new toolbar.
Add Group — Click this button to add a group marker. The group marker
 icon is displayed in the list of added items at the right of the dialog. A group marker shows the beginning of a group of buttons, menu items, or commands. On the toolbar, the group marker is a toggle button:
 Hide Group — Click this button to contract the items in the group.
 Show Group — Click this button to expand the items in the group.
Add Separator — Click this button to add a separator marker to divide up your toolbar items. The separator marker
 icon is displayed in the list of added items at the right of the dialog.
Add Gap — Click this button to add a small space between items on the toolbar. A gap is displayed in the list of added items at the right of the dialog.
Add — Click this button to add the selected Item to the toolbar. The item is displayed in the list of added items at the right of the dialog.
 Drag Crosshairs — Click and hold the mouse button and drag the crosshairs over a toolbar button. The button is added automatically to custom toolbar and is displayed on the dialog.
 Remove — Click this button to remove the item selected in the added items list from your toolbar.
 Move the item up the menu
— Click this button to move the selected item up the order of items on the toolbar.
 Move the item down the menu — Click this option to move it down the order of items on the toolbar.
 Change button icon — Click this button to change the icon for the button selected in the added items list. The
Customise Button dialog is displayed.