Rooms
The following sections cover information about the room class, its parameters, and how to use the room class in the API.
Room, Area, and Tags
The Room class is used to represent rooms and elements such as room schedule and area plans. The properties and create function for different rooms, areas, and their corresponding tags in the API are listed in the following table:
Table 55: Room, Area, and Tags relationship
| Element | Class | Category | Boundary | Location | Can Create |
| Room in Plan View | Room | OST_Rooms | Has if in an enclosed region | LocationPoint | NewRoom() except for NewRoom(Phase) |
| Room in Schedule View | Room | OST_Rooms | Null | Null | NewRoom(Phase) |
| Area | Room | OST_Areas | Always has | LocationPoint | No |
| Room Tag | RoomTag | OST_RoomTags | LocationPoint | Creation.Document.NewRoomTag() | |
| Area Tag | FamilySymbol | OST_AreaTags | LocationPoint | No |
| Code Region 28-1: Creating a room |
Room CreateRoom(Autodesk.Revit.DB.Document document, Level level)
{
        // Create a UV structure which determines the room location
        UV roomLocation = new UV(0, 0);

        // Create a new room
        Room room = document.Create.NewRoom(level, roomLocation);
        if (null == room)
        {
                throw new Exception("Create a new room failed.");
        }

        return room;
}
|
| Code Region 28-2: Creating and inserting a room into a plan circuit |
Room InsertNewRoomInPlanCircuit(Autodesk.Revit.DB.Document document, Level level, Phase newConstructionPhase)
{
    // create room using Phase
    Room newScheduleRoom = document.Create.NewRoom(newConstructionPhase);

    // set the Room Number and Name
    string newRoomNumber = "101";
    string newRoomName = "Class Room 1";
    newScheduleRoom.Name = newRoomName;
    newScheduleRoom.Number = newRoomNumber;

    // Get a PlanCircuit
    PlanCircuit planCircuit = null;
    // first get the plan topology for given level
    PlanTopology planTopology = document.get_PlanTopology(level);

    // Iterate circuits in this plan topology
    foreach (PlanCircuit circuit in planTopology.Circuits)
    {
        // get the first circuit we find
        if (null != circuit)
        {
            planCircuit = circuit;
            break;
        }
    }

    Room newRoom2 = null;
    if (null != planCircuit)
    {
        using (Transaction transaction = new Transaction(document, "Create Room"))
        {
            if (transaction.Start() == TransactionStatus.Started)
            {
                // The input room must exist only in the room schedule,
                // meaning that it does not display in any plan view.
                newRoom2 = document.Create.NewRoom(newScheduleRoom, planCircuit);
                // a model room with the same name and number is created in the
                // view where the PlanCircuit is located
                if (null != newRoom2)
                {
                    // Give the user some information
                    TaskDialog.Show("Revit", "Room placed in Plan Circuit successfully.");
                }
                transaction.Commit();
            }
        }
    }

    return newRoom2;
}
|
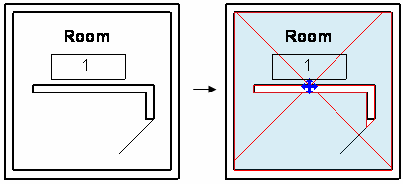 Figure 138: Room boundary
The size of the segment list depends on the enclosed region topology. Each BoundarySegment list makes a circuit or a continuous line in which one segment joins the next. The following pictures provide several examples. In the following pictures, all walls are Room-Bounding and the model lines category is OST_AreaSeparationLines. If an element is not Room-Bounding, it is excluded from the elements to make the boundary.
Figure 138: Room boundary
The size of the segment list depends on the enclosed region topology. Each BoundarySegment list makes a circuit or a continuous line in which one segment joins the next. The following pictures provide several examples. In the following pictures, all walls are Room-Bounding and the model lines category is OST_AreaSeparationLines. If an element is not Room-Bounding, it is excluded from the elements to make the boundary.
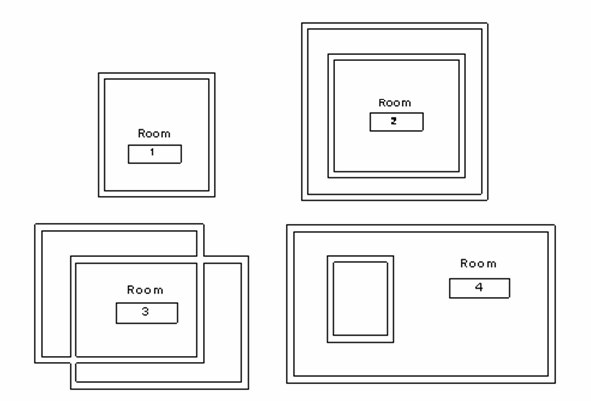 Figure 139: Rooms 1, 2, 3, 4
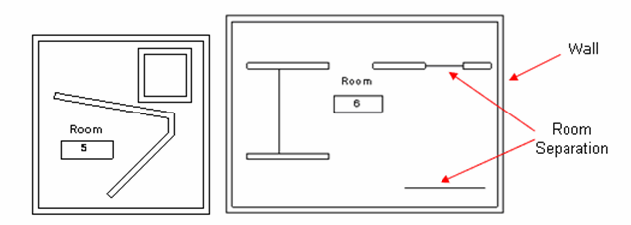 Figure 140: Room 5, 6
The following table provides the Room.GetBoundarySegments().Size results for the previous rooms:
Table 56: Room.GetBoundarySegments().Size
Figure 140: Room 5, 6
The following table provides the Room.GetBoundarySegments().Size results for the previous rooms:
Table 56: Room.GetBoundarySegments().Size
| Room | Room.GetBoundarySegments().Size |
| Room 1 Room 2 Room 3 | 1 |
| Room 4 | 2 |
| Room 5 Room 6 | 3 |
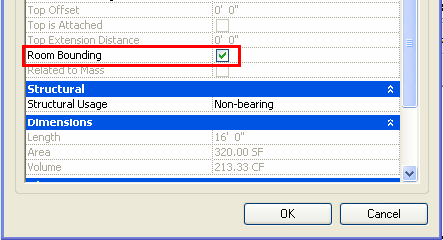 Figure 141: Room Bounding property
The WALL_ATTR_ROOM_BOUNDING BuiltInParameter is set through the API:
Figure 141: Room Bounding property
The WALL_ATTR_ROOM_BOUNDING BuiltInParameter is set through the API:
| Code Region 28-3: Setting room bounding |
public void SetRoomBounding(Wall wall)
{
        Parameter parameter = wall.get_Parameter(BuiltInParameter.WALL_ATTR_ROOM_BOUNDING);
        parameter.Set(1);   //set "Room Bounding" to true
        parameter.Set(0);   //set "Room Bounding" to false
}
|
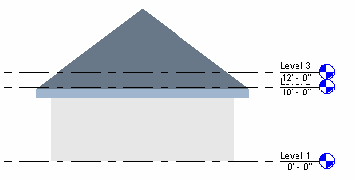 Figure 142: Room created in level 3 view
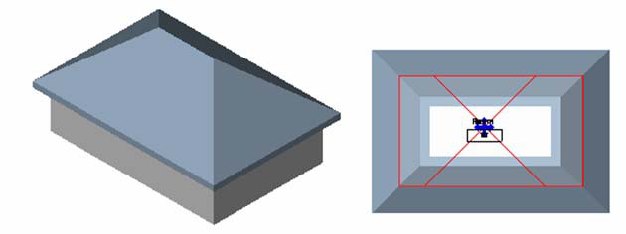 Figure 143: Room boundary formed by roof
The area boundary can only be a ModelCurve with the category Area Boundary (BuiltInCategory.OST_AreaSchemeLines) while the boundary of the displayed room can be walls and other elements.
Figure 143: Room boundary formed by roof
The area boundary can only be a ModelCurve with the category Area Boundary (BuiltInCategory.OST_AreaSchemeLines) while the boundary of the displayed room can be walls and other elements.
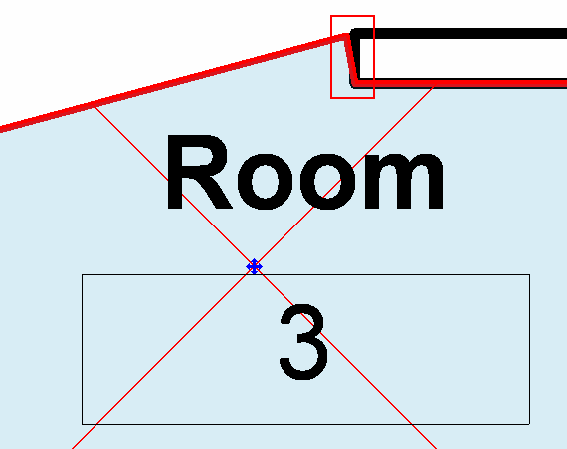 Figure 144: Wall end edge
If the BoundarySegment corresponds to the curve between the room separation and wall as the previous picture shows:
The Element property returns null
The Curve is not null.
#### Boundary and Transaction
When you call Room.GetBoundarySegments() after creating an Element using the API such as a wall, the wall can change the room boundary. You must make sure the data is updated.
The following illustrations show how the room changes after a wall is created using the Revit Platform API.
Figure 144: Wall end edge
If the BoundarySegment corresponds to the curve between the room separation and wall as the previous picture shows:
The Element property returns null
The Curve is not null.
#### Boundary and Transaction
When you call Room.GetBoundarySegments() after creating an Element using the API such as a wall, the wall can change the room boundary. You must make sure the data is updated.
The following illustrations show how the room changes after a wall is created using the Revit Platform API.
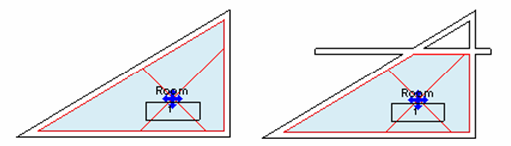 Figure 145: Added wall changes the room boundary
To update the room boundary data, use the transaction mechanism in the following code:
Figure 145: Added wall changes the room boundary
To update the room boundary data, use the transaction mechanism in the following code:
| Code Region 28-4: Using a transaction to update room boundary |
public void UpdateRoomBoundary(UIApplication application, Room room, Level level)
{
    Document document = application.ActiveUIDocument.Document;

    //Get the size before creating a wall
    int size = room.GetBoundarySegments(new SpatialElementBoundaryOptions()).First().Count;
    string message = "Room boundary size before wall: " + size;

    //Prepare a line
    XYZ startPos = new XYZ(-10, 0, 0);
    XYZ endPos = new XYZ(10, 0, 0);
    Line line = Line.CreateBound(startPos, endPos);

    //Create a new wall and enclose the creating into a single transaction
    using (Transaction transaction = new Transaction(document, "Create Wall"))
    {
        if (transaction.Start() == TransactionStatus.Started)
        {
            Wall wall = Wall.Create(document, line, level.Id, false);
            if (null != wall)
            {
                if (TransactionStatus.Committed == transaction.Commit())
                {
                    //Get the new size
                    size = room.GetBoundarySegments(new SpatialElementBoundaryOptions()).First().Count;
                    message += "\nRoom boundary size after wall: " + size;
                    TaskDialog.Show("Revit", message);
                }
            }
            else
            {
                transaction.RollBack();
            }
        }
    }
}
|
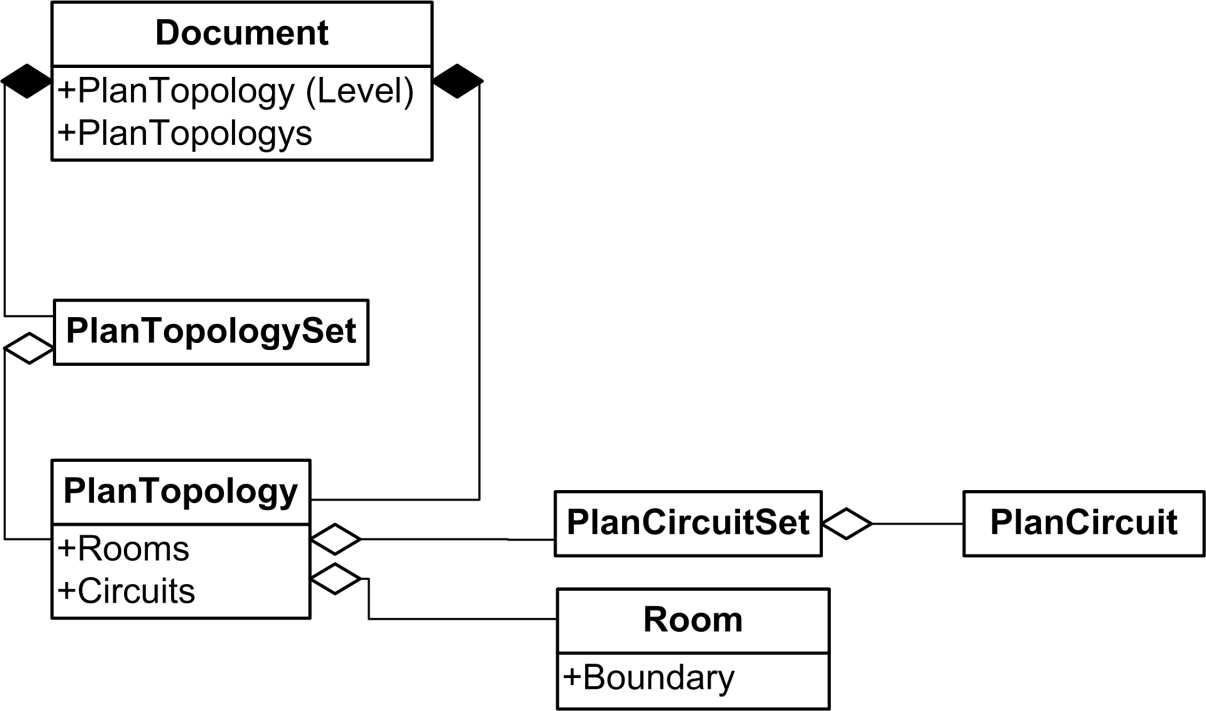 Figure 146: Room and Plan Topology diagram
The PlanCircuit.SideNum property returns the circuit side number, while SpatialElement.GetBoundarySegments() returns an IList<IList<Autodesk.Revit.DB.BoundarySegment> , whose Count is different from the circuit side number.
SpatialElement.GetBoundarySegments() recognizes the bottom wall as two walls if there is a branch on the wall.
* PlanCircuit.SideNum always sees the bottom wall in the picture as one regardless of the number of branches.
Figure 146: Room and Plan Topology diagram
The PlanCircuit.SideNum property returns the circuit side number, while SpatialElement.GetBoundarySegments() returns an IList<IList<Autodesk.Revit.DB.BoundarySegment> , whose Count is different from the circuit side number.
SpatialElement.GetBoundarySegments() recognizes the bottom wall as two walls if there is a branch on the wall.
* PlanCircuit.SideNum always sees the bottom wall in the picture as one regardless of the number of branches.
 Figure 147: Compare room boundary with PlanCircuit
Table 57: Compare Room Boundary with PlanCircuit
Figure 147: Compare room boundary with PlanCircuit
Table 57: Compare Room Boundary with PlanCircuit
| Circuit | Circuit.SideNum | IList<IList<Autodesk.Revit.DB.BoundarySegment> .Count for Room |
| Circuit 1 | 3 | 3 (Room1) |
| Circuit 2 | 4 +2 = 6 | 4 +3 = 7 (Room2) |
| Circuit 3 | 3 +2 = 5 | 3 +3 = 6 (Room3) |
| Circuit 4 | 3 | 3 (Room4) |
| Circuit 5 | 3 | 3 (Room5) |
Room and FamilyInstance
Doors and Windows are special family instances related to Room. Only doors are discussed here since the only difference is that windows have no handle to flip.
The following characteristics apply to doors:
- Door elements can exist without a room.
- In the API (and only in the API), a Door element has two additional properties that refer to the regions on the two opposite sides of a door: ToRoom and FromRoom
- If the region is a room, the property's value would be a Room element.
- If the region is not a room, the property will return null. Both properties may be null at the same time.
- The region on the side into which a door opens, will be ToRoom. The room on the other side will be FromRoom.
- Both properties get dynamically updated whenever the corresponding regions change.
In the following pictures, five doors are inserted into walls without flipping the facing. The table lists the FromRoom, ToRoom, and Room properties for each door. The Room property belongs to all Family Instances.
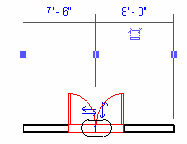 Figure 148: Door 1
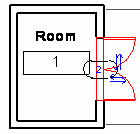 Figure 149: Door 2
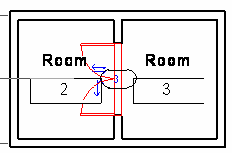 Figure 150: Door 3
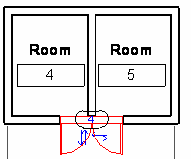 Figure 151: Door 4
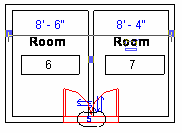 Figure 152: Door 5
Table 58: Door Properties
| Door | FromRoom | ToRoom | Room |
| Door 1 | null | null | null |
| Door 2 | Room 1 | null | null |
| Door 3 | Room 3 | Room 2 | Room 2 |
| Door 4 | Room 4 | null | null |
| Door 5 | null | Room 6 | Room 6 |
| Code Region 28-5: Getting a room from the family instance |
public void GetRoomInfo(FamilyInstance familyInstance)
{
        Room room = familyInstance.Room;
        room = familyInstance.FromRoom;  //for door and window family only
        room = familyInstance.ToRoom;    //for door and window family only
        if (null != room)
        {
                //use the room...
        }
}
|
Other Room Properties
The Room class has several other properties you can use to get information about the object. Rooms have these read-only dimension properties:
- Area
- Perimeter
- UnboundedHeight
- Volume
- ClosedShell
This example displays the dimension information for a selected room. Note that the volume calculations setting must be enabled, or the room volume is returned as 0.
| Code Region 28-6: Getting a room's dimensions |
public void GetRoomDimensions(Document doc, Room room)
{
    String roominfo = "Room dimensions:\n";
    // turn on volume calculations:
    using (Transaction t = new Transaction(doc, "Turn on volume calculation"))
    {
        t.Start();
        AreaVolumeSettings settings = AreaVolumeSettings.GetAreaVolumeSettings(doc);
        settings.ComputeVolumes = true;
        t.Commit();
    }

    roominfo += "Vol: " + room.Volume + "\n";
    roominfo += "Area: " + room.Area + "\n";
    roominfo += "Perimeter: " + room.Perimeter + "\n";
    roominfo += "Unbounded height: " + room.UnboundedHeight + "\n";
    TaskDialog.Show("Revit",roominfo);
}
|
In addition, you can get or set the base offset and limit offset for rooms with these properties:
- BaseOffset
- LimitOffset
You can get or set the level that defines the upper limit of the room with the UpperLimit property.