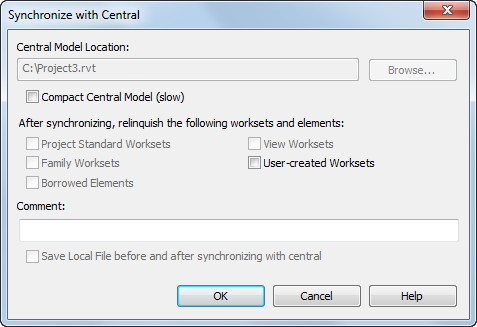
When working on a workshared project, use the Synchronize with Central tool to save your local changes to the central model.
To Synchronize with Central: Click Collaborate tab Synchronize panel
 Synchronize with Central drop-down
![]() (Synchronize Now).
(Synchronize Now).
If you want to modify the Synchronize with Central settings before you synchronize with central: Click Collaborate tab Synchronize panel
  Synchronize with Central drop-down
![]() (Synchronize and Modify Settings). The Synchronize with Central dialog displays.
(Synchronize and Modify Settings). The Synchronize with Central dialog displays.

- In the Synchronize with Central dialog, verify the location of the central model.
If necessary, click Browse to specify a different path for the central model. Specify the new path in the Central File Location dialog, and click OK.
- Select Compact Central Model to reduce file size when saving.
Note: Selecting this option increases the time needed to save.
- Under After synchronizing, relinquish the following worksets and elements, select from the following options:
- To make your changed worksets and elements available to other users, select the appropriate check boxes.
- To synchronize the changes to central but keep the worksets and elements editable, clear the appropriate check boxes.
- If desired, enter a comment that is saved to the central model.
You can see all comments using the Show History tool. See Viewing Workshared File History.
- Verify that Save local file before and after synchronizing with central is selected to ensure your local file remains synchronized with central.
- Click OK.
When you use Revit Cloud Worksharing, the Sync with Central window provides information about the progress of the synchronize with central process. If Sync with Central fails to complete, see Toubleshooting: Collaboration for Revit.
Your changes are saved to the central model and any changes from other team members are copied to your local model.
Editable Elements
If you have saved all changes to the central model, but still have editable elements when you close the local file, the Editable Elements dialog displays.
If you do not want to keep ownership of the checked out worksets and borrowed elements, click Relinquish elements and worksets; otherwise, click Keep ownership of elements and worksets.