Organize the properties of punches in the drawing.
To create a punch table
- Click
Annotate tab
 Table panel
Hole View .
Table panel
Hole View .
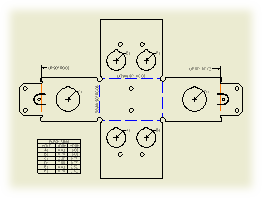
- Select a flat pattern drawing view to associate with the punch table.
- Click a point at the view to place the origin indicator.
- Click to place the punch table.
Note: Recovered punch centers can be selected individually by using the Hole Table - Selection command. Or, select feature set (all punch center instances from a single feature) by using the Hole Features command.
To edit a punch table
Revise table format, list of punch properties, and options for row merging and hole tags. Use the steps described on the modify a hole table Help page.
Tips:
- If the punch features are not included in the table by default, right-click the table and select Edit Hole Table. On the Options tab of the Edit Hole Table dialog box, select the Recovered Punch Centers option in the Included Features section.
- To add the appropriate columns to the punch table, right-click the table and select Edit Hole Table. On the Formatting tab of the Edit Hole Table dialog box, click Column Chooser, and add the punch-specific columns to the Selected Properties list.
- To include recovered punch centers in the table by default, choose
Manage tab
Styles and Standards panel
Styles Editor . In the Styles and Standards Editor dialog box, expand Hole Table and click a hole table style. Open the Options tab of the Hole Table Style window, and select the Recovered Punch Centers option in the Included Features section.